REMOVAL
I - REMOVAL PREPARATION OPERATION
| Note:
Before removing the exterior door handle, the
mechanic must know which option applies to the
vehicle. |
1 - Front side door
a - (Vehicle option 1: With keyless entry)
- Remove:
- the front side door trim (see Front side door trim:
Removal - Refitting) (72A, Side opening element
trim),
- the front side door sliding window (see 54A, Windows,
Front side door sliding window: Removal
- Refitting, page 54A-4) (54A, Windows),
- the front side door control module (see 51A, Side
opening element mechanisms, Front side door
electric window mechanism: Removal - Refitting,
page 51A-10) ,
- the lock blanking cover,
- the front side door lock barrel (see 51A, Side
opening element mechanisms, Front side door
lock barrel: Removal - Refitting, page 51A-5) .
b - (Vehicle option 2: Without keyless entry)
- Remove:
- the lock blanking cover,
- the front side door lock barrel (see 51A, Side
opening element mechanisms, Front side door
lock barrel: Removal - Refitting, page 51A-5) .
2 - Rear side door
a - (Vehicle option 1: With keyless entry)
- Remove:
- the lock blanking cover,
- the rear side door lock barrel,
- the rear side door trim (see Rear side door trim:
Removal - Refitting) (72A, Side opening element
trim).
- the rear side door sealing film, partially.
b - (Vehicle option 2: Without keyless entry)
- Remove:
- the lock blanking cover,
- the rear side door lock barrel.
II - OPERATION FOR REMOVAL OF PART
CONCERNED
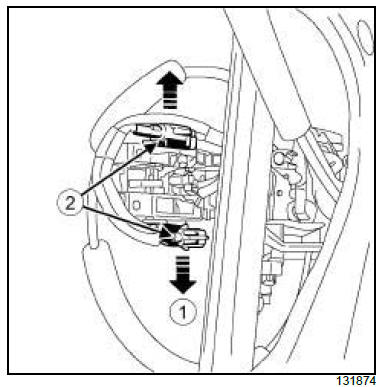
- Remove the power supply connectors from the exterior
handle module (depending on equipment level).
- Disconnect the supply connectors (2) (depending on
equipment level).
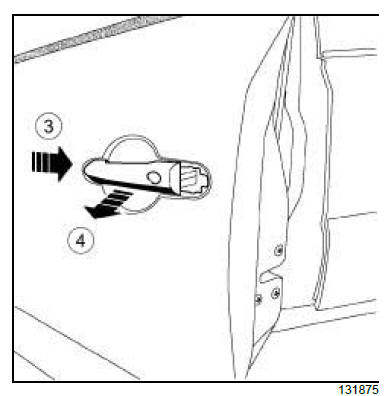
- Remove the handle in the direction of the arrows (3)
and (4) .
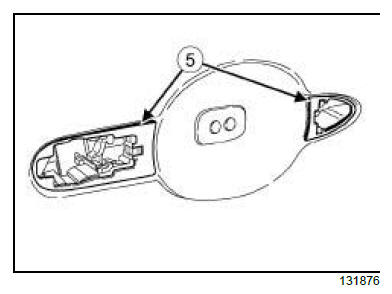
- Remove the exterior door handle seals (5) .
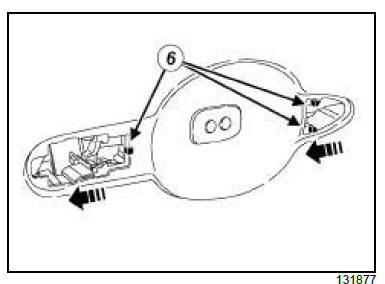
- Unclip the exterior door handle module at (6) while
pulling it towards the rear.
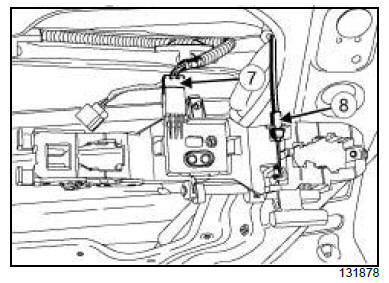
- Disconnect:
- the optical sensor connector (7) (depending on
equipment level),
- the door handle module door lock cable (8) (depending
on equipment level).
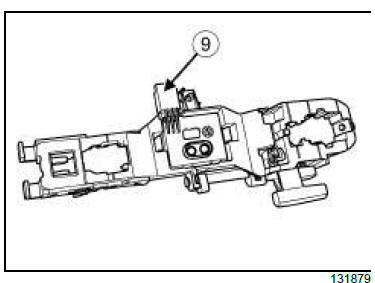
- Remove the exterior door handle module - optical
sensor assembly (9) (depending on equipment level).
REFITTING
I - REFITTING OPERATION FOR PART
CONCERNED
- Refit the exterior door handle module - optical sensor
assembly (9) (depending on equipment level).
- Connect:
- the door handle module door lock cable (8) (depending
on equipment level),
- the optical sensor connector (7) (depending on
equipment level).
- Refit:
- the exterior door handle module,
- the exterior door handle seals (5) .
- Connect the supply connectors (2) (depending on
equipment level).
- refit:
- the supply connectors (2) on the exterior handle
module (depending on equipment level),
- the door exterior handle.
II - FINAL OPERATION.
1 - Front side door
a - (Vehicle option 1: With keyless entry)
- Refit:
- the front side door lock barrel (see 51A, Side
opening element mechanisms, Front side door
lock barrel: Removal - Refitting, page 51A-5) ,
- the lock blanking cover,
- the front side door control module (see 51A, Side
opening element mechanisms, Front side door
electric window mechanism: Removal - Refitting,
page 51A-10) ,
- the front side door sliding window (see 54A, Windows,
Front side door sliding window: Removal
- Refitting, page 54A-4) (54A, Windows),
- the front side door trim (see Front side door trim:
Removal - Refitting) (72A, Side opening element
trim).
b - (Vehicle option 2: Without keyless entry)
- Refit:
- the front side door lock barrel (see 51A, Side
opening element mechanisms, Front side door
lock barrel: Removal - Refitting, page 51A-5) ,
- the lock blanking cover.
2 - Rear side door
a - (Vehicle option 1: With keyless entry)
- Refit:
- the rear side door lock barrel,
- the lock blanking cover,
- the rear side door sealing film,
- the rear side door trim (see Rear side door trim:
Removal - Refitting) (72A, Side opening element
trim).
b - (Vehicle option 2: Without keyless entry)
- Refit:
- the rear side door lock barrel,
- the lock blanking cover.
|


