LEFT-HAND DRIVE
REMOVAL
I - REMOVAL PREPARATION OPERATION
- Position the vehicle on a two-post lift (see Vehicle:
Towing and lifting) (02A, Lifting equipment).
- Disconnect the battery (see Battery: Removal - Refitting)
(80A, Battery).
- Place the pedal press on the brake pedal.
- Remove:
- the engine cover,
- the windscreen wiper arm (see Windscreen wiper
arm: Removal - Refitting) (85A, Wiping - Washing),
- the scuttle half-grille (see Scuttle panel half-grille:
Removal - Refitting) (56A, Exterior equipment),
- the windscreen wiper mechanism (see Windscreen
wiper mechanism: Removal - Refitting)
(85A, Wiping - Washing),
- the scoop under the scuttle panel grille (see Scoop
under the scuttle panel grille: Removal - Refitting)
(56A, Exterior equipment).
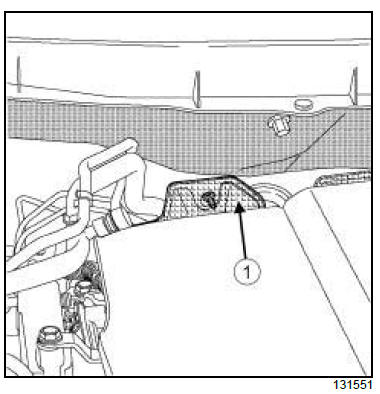
- Remove the bulkhead insulation (1) (see Bulkhead
insulation: Removal - Refitting) (68A, Soundproofing).
II - OPERATION FOR REMOVAL OF PART
CONCERNED
2TR
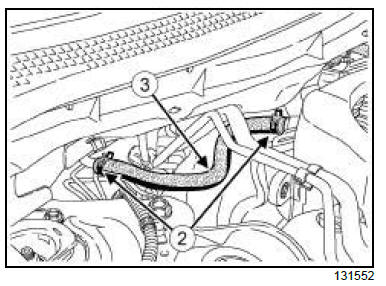
- Remove:
- clips (2) ,
- the vacuum hose (3) .
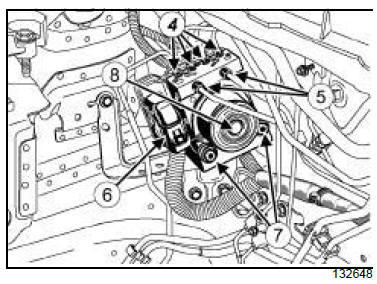
- Undo:
- the brake pipe unions (4) on the hydraulic unit,
- the brake pipe unions (5) on the hydraulic unit.
- Disconnect the connector (6) .
- Remove:
- the bolts (7) from the hydraulic brake unit,
- the hydraulic brake unit (8) .
REFITTING
I - REFITTING OPERATION FOR PART
CONCERNED
- Refit:
- the hydraulic brake unit,
- the hydraulic brake unit bolts.
- Connect the hydraulic brake unit connector.
- Refit:
- the brake pipe unions (5) on the hydraulic unit,
- the brake pipe unions (4) on the hydraulic unit.
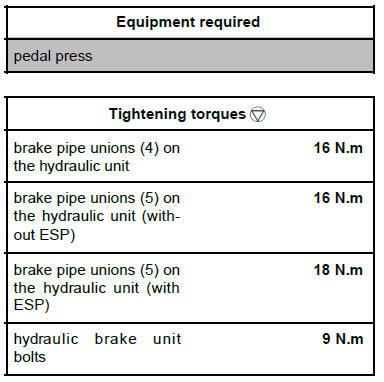
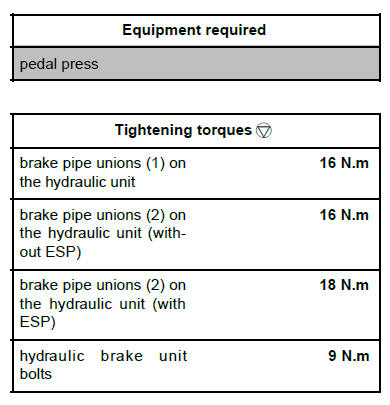
- Torque tighten:
- the brake pipe unions (4) on the hydraulic unit
(16 N.m),
- the brake pipe unions (5) on the hydraulic unit
(without ESP) (16 N.m),
- the brake pipe unions (5) on the hydraulic unit
(with ESP) (18 N.m),
- the hydraulic brake unit bolts (9 N.m).
II - FINAL OPERATION.
2TR
- Refit:
- the vacuum hose,
- the clips.
- Refit:
- the bulkhead insulation (see Bulkhead insulation:
Removal - Refitting) (68A, Soundproofing),
- the scoop under the scuttle panel grille (see Scoop
under the scuttle panel grille: Removal - Refitting)
(56A, Exterior equipment),
- the windscreen wiper mechanism (see Windscreen
wiper mechanism: Removal - Refitting)
(85A, Wiping - Washing),
- the scuttle half-grille (see Scuttle panel half-grille:
Removal - Refitting) (56A, Exterior equipment),
- the windscreen wiper arm (see Windscreen wiper
arm: Removal - Refitting) (85A, Wiping - Washing),
- the engine cover.
- Remove the pedal press from the brake pedal.
- Bleed the brake circuit (see 30A, General information,
Braking circuit: Bleed, page 30A-4) .
- Connect the battery (see Battery: Removal - Refitting)
(80A, Battery).
RIGHT-HAND DRIVE
REMOVAL
I - REMOVAL PREPARATION OPERATION
- Position the vehicle on a two-post lift (see Vehicle:
Towing and lifting) (02A, Lifting equipment).
- Disconnect the battery (see Battery: Removal - Refitting)
(80A, Battery).
- Place the pedal press on the brake pedal.
- Remove:
- the air intake sleeve,
- the air filter unit (see Air filter unit: Removal - Refitting)
(12A, Fuel mixture),
- the windscreen wiper arm (see Windscreen wiper
arm: Removal - Refitting) (85A, Wiping - Washing),
- the scuttle half-grille (see Scuttle panel half-grille:
Removal - Refitting) (56A, Exterior equipment),
- the windscreen wiper mechanism (see Windscreen
wiper mechanism: Removal - Refitting)
(85A, Wiping - Washing),
- the scoop under the scuttle panel grille (see Scoop
under the scuttle panel grille: Removal - Refitting)
(56A, Exterior equipment).
II - OPERATION FOR REMOVAL OF PART
CONCERNED
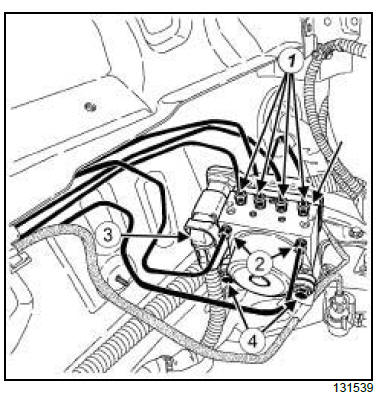
- Undo:
- the brake pipe unions (1) on the hydraulic unit,
- the brake pipe unions (2) on the hydraulic unit.
- Disconnect the connector (3) .
- Remove:
- the bolts (4) from the hydraulic brake unit,
- the hydraulic brake unit.
REFITTING
I - REFITTING OPERATION FOR PART
CONCERNED
- Refit:
- the hydraulic brake unit,
- the hydraulic brake unit bolts.
- Connect the hydraulic brake unit connector.
- Refit:
- the brake pipe unions (2) on the hydraulic unit,
- the brake pipe unions (1) on the hydraulic unit.
- Torque tighten:
- the brake pipe unions (1) on the hydraulic unit
(16 N.m),
- the brake pipe unions (2) on the hydraulic unit
(without ESP) (16 N.m),
- the brake pipe unions (2) on the hydraulic unit
(with ESP) (18 N.m),
- the hydraulic brake unit bolts (9 N.m).
II - FINAL OPERATION
- Refit:
- the scoop under the scuttle panel grille (see Scoop
under the scuttle panel grille: Removal - Refitting)
(56A, Exterior equipment),
- the windscreen wiper mechanism (see Windscreen
wiper mechanism: Removal - Refitting)
(85A, Wiping - Washing),
- the scuttle half-grille (see Scuttle panel half-grille:
Removal - Refitting) (56A, Exterior equipment),
- the windscreen wiper arm (see Windscreen wiper
arm: Removal - Refitting) (85A, Wiping - Washing),
- the air filter unit (see Air filter unit: Removal - Refitting)
(12A, Fuel mixture),
- the air intake sleeve.
- Remove the pedal press from the brake pedal.
- Bleed the brake circuit (see 30A, General information,
Braking circuit: Bleed, page 30A-4)
- Connect the battery (see Battery: Removal - Refitting)
(80A, Battery).
|