LEFT-HAND DRIVE
| WARNING
Prepare for the flow of fluid, and protect the surrounding
components. |
REMOVAL
I - REMOVAL PREPARATION OPERATION
- Position the vehicle on a two-post lift (see Vehicle:
Towing and lifting) (02A, Lifting equipment).
M9R
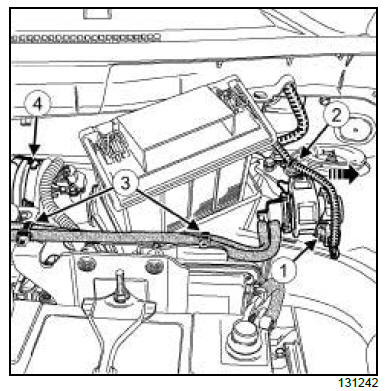
- Disconnect the connector (1) from the turbocharging
pressure regulation solenoid valve.
- Unclip:
- the turbocharging pressure regulation solenoid
valve (2) from its support,
- the hoses of the turbocharging pressure regulation
solenoid valve from the battery tray (3) .
- Remove:
- the battery (see Battery: Removal - Refitting)
(80A, Battery),
- the battery tray (see Battery tray: Removal - Refitting)
(80A, Battery),
- the air filter box (see Air filter unit: Removal - Refitting)
(12A, Fuel mixture),
- the air outlet pipe (4) from the air filter unit.
- Remove partially the bulkhead insulation (see Bulkhead
insulation: Removal - Refitting) (68A,
Soundproofing).
II - OPERATION FOR REMOVAL OF PART
CONCERNED
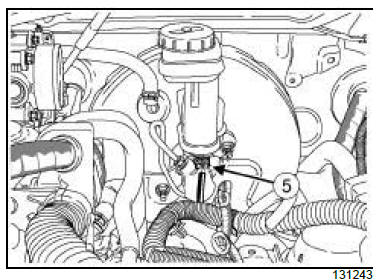
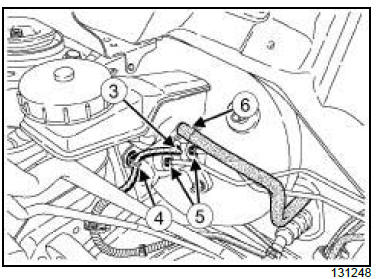
- Disconnect the brake fluid level sensor connector (5)
.
- Drain the brake fluid reservoir with a syringe.
6-SPEED MANUAL GEARBOX
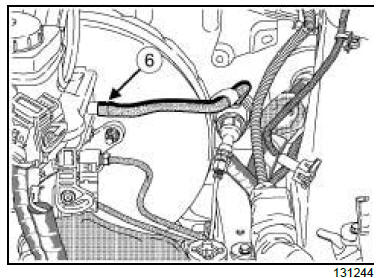
- Disconnect the clutch master cylinder supply hose
(6) from the brake fluid reservoir.
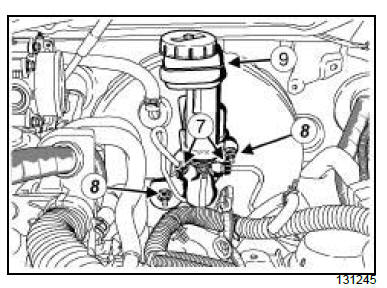
- Remove:
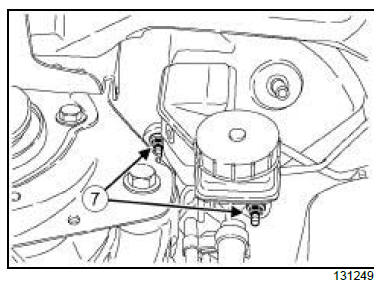
- the brake pipe unions (7) on the master cylinder after
having marked them,
- the master cylinder nuts (8) on the brake servo,
- the master cylinder with the brake fluid reservoir (9)
.
REFITTING
I - REFITTING PREPARATION OPERATION
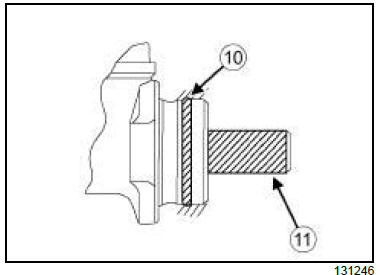
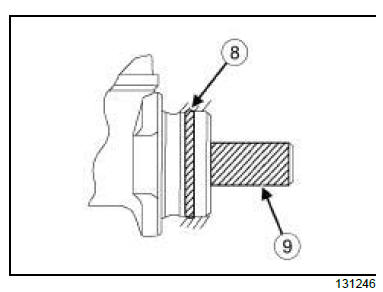
- Always replace the master cylinder seal (10) .
- Coat the seal and the shaft (11) of the master cylinder
with SILICONE grease (see Vehicle: Parts and
consumables for the repair) (04B, Consumables -
Products).
II - REFITTING OPERATION FOR PART
CONCERNED
- Line up the master cylinder with the brake servo so
that the pushrod goes into the master cylinder housing.
- Refit:
- the master cylinder with a new seal,
- the master cylinder nuts.
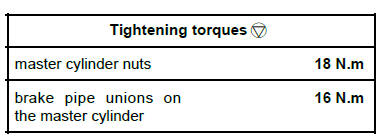
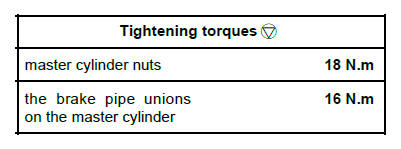
- Torque tighten the master cylinder nuts (18 N.m)
on the brake servo.
- Refit the brake pipe unions on the master cylinder.
- Torque tighten the brake pipe unions on the master
cylinder (16 N.m).
- Connect the connector on the brake fluid reservoir.
6-SPEED MANUAL GEARBOX
- Connect the clutch master cylinder supply hose on
the brake fluid reservoir.
III - FINAL OPERATION
- Refit:
- the bulkhead insulation (see Bulkhead insulation:
Removal - Refitting) (68A, Soundproofing).
- the air filter box air outlet pipe,
- the air filter box (see Air filter unit: Removal - Refitting)
(12A, Fuel mixture),
- the battery tray (see Battery tray: Removal - Refitting)
(80A, Battery),
- the battery (see Battery: Removal - Refitting)
(80A, Battery).
M9R
- Clip:
- the hoses of the turbocharging pressure regulation
solenoid valve on the battery tray,
- the turbocharging pressure regulation solenoid
valve on its support.
- Connect the turbocharging pressure regulation solenoid
valve connector.
- Fill up the brake fluid reservoir.
- Bleed the brake circuit (see 30A, General information,
Braking circuit: Bleed, page 30A-4) .
6-SPEED MANUAL GEARBOX
- Bleed the clutch circuit (see 37A, Mechanical component
controls, Clutch circuit: Bleed, page 37A-
48) .
RIGHT-HAND DRIVE
| WARNING
Prepare for the flow of fluid, and protect the surrounding
components. |
REMOVAL
I - REMOVAL PREPARATION OPERATION
- Position the vehicle on a two-post lift (see Vehicle:
Towing and lifting) (02A, Lifting equipment).
- Disconnect the battery (see Battery: Removal - Refitting)
(80A, Battery),
- Remove:
- the windscreen wiper arms (see Windscreen wiper
arm: Removal - Refitting) (85A, Wiping -
Washing),
- the scuttle panel half-grille (see Scuttle panel halfgrille:
Removal - Refitting) (56A, Exterior accessories),
- the windscreen wiper mechanism (see Windscreen
wiper mechanism: Removal - Refitting)
(85A, Wiping - Washing),
- the scoop under the scuttle panel grille (see Scoop
under the scuttle panel grille: Removal - Refitting)
(56A, Exterior equipment),
- the bulkhead insulation (see Bulkhead insulation:
Removal - Refitting) (68A, Soundproofing).
II - OPERATION FOR REMOVAL OF PART
CONCERNED
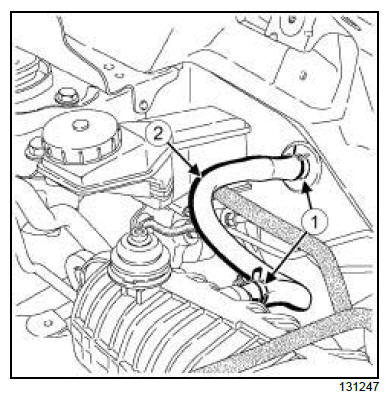
- Unfasten clips (1) .
- Remove the vacuum pipe (2) from the brake servo.
- Disconnect the brake fluid level sensor connector (3)
.
- Unclip the clip (4) from the wiring of the brake fluid
reservoir
- Drain the brake fluid reservoir with a syringe.
- Remove the master cylinder brake pipe unions (5) .
6-SPEED MANUAL GEARBOX
- Disconnect the clutch master cylinder supply hose
(6) from the brake fluid reservoir.
- Remove:
- the master cylinder nuts (7) ,
- the master cylinder with the brake fluid reservoir.
REFITTING
I - REFITTING PREPARATION OPERATION
- Always replace the master cylinder seal (8) .
- Coat the seal and the master cylinder shaft (9) with
SILICONE grease (see Vehicle: Parts and consumables
for the repair) (04B, Consumables -
Products).
II - REFITTING OPERATION FOR PART
CONCERNED
- Line up the master cylinder with the brake servo so
that the pushrod goes into the master cylinder housing.
- Refit:
- the master cylinder with a new seal,
- the master cylinder nuts.
- Torque tighten the master cylinder nuts (18 N.m)
on the brake servo.
- Refit the brake pipe unions on the master cylinder.
- Torque tighten the brake pipe unions on the master
cylinder (16 N.m).
- Connect the brake fluid level sensor connector.
- Clip the wiring clip to the brake fluid reservoir.
6-SPEED MANUAL GEARBOX
- Connect the clutch master cylinder supply hose on
the brake fluid reservoir.
- Refit the vacuum pipe on the brake servo.
- Tighten the clips.
III - FINAL OPERATION.
- Refit:
- the bulkhead insulation (see Bulkhead insulation:
Removal - Refitting) (68A, Soundproofing).
- the scoop under the scuttle panel grille (see Scoop
under the scuttle panel grille: Removal - Refitting)
(56A, Exterior equipment),
- the windscreen wiper mechanism (see Windscreen
wiper mechanism: Removal - Refitting)
(85A, Wiping - Washing),
- the scuttle panel half-grille (see Scuttle panel half-grille:
Removal - Refitting) (56A, Exterior accessories),
- the windscreen wiper arms (see Windscreen wiper
arm: Removal - Refitting) (85A, Wiping -
Washing),
- Connect the battery (see Battery: Removal - Refitting)
(80A, Battery).
- Fill up the brake fluid reservoir.
- Bleed the brake circuit (see 30A, General information,
Braking circuit: Bleed, page 30A-4) .
6-SPEED MANUAL GEARBOX
- Bleed the clutch circuit (see 37A, Mechanical component
controls, Clutch circuit: Bleed, page 37A-
48) .
|


