| IMPORTANT
Consult the safety and cleanliness advice and operation
recommendations before carrying out any
repair (see 80A, Battery, Battery: Precautions for
the repair, page 80A-1) . |
REMOVAL
I - REMOVAL PREPARATION OPERATION
WARNING
Before disconnecting the battery:
- wait for the motor-driven fan assembly to stop,
- wait for the computer to finish saving (1
minute).
|
| WARNING
The visual indicator cannot be considered reliable
in After-Sales; do not use it to determine the
state of the battery. |
II - OPERATION FOR REMOVAL OF PART
CONCERNED
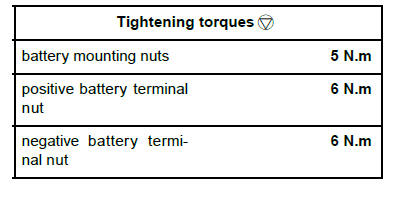
1 - DISCONNECTION
- Undo the negative battery terminal nut (1) .
- Disconnect the negative wiring from the negative
battery terminal.
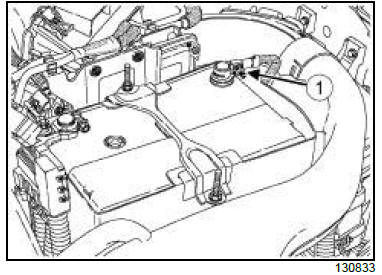
2 - REMOVAL
- Undo the positive battery terminal nut (2) .
- Disconnect the positive wiring from the positive battery
terminal.
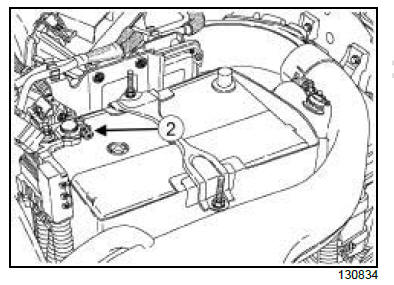
- Loosen the battery mounting nuts (3) .
- Remove:
- the battery mounting (4) ,
- the battery cover (5) ,
- the battery,
- the battery lower cover.
- In the event of a replacement operation, perform the
necessary checks (see Checking the charge circuit:
Tests) (Technical Note 6014A, 16A, Starting
and charging).
REFITTING
I - REFITTING PREPARATION OPERATION
- Check the battery (see Battery: Check) (Technical
Note 6002A, 80A, Battery).
II - REFITTING OPERATION FOR PART
CONCERNED
1 - REFITTING
- Fit the battery lower cover.
- Refit:
- the battery,
- the battery cover,
- the battery mounting.
- Torque tighten the battery mounting nuts (5 N.m).
- Push the positive battery wiring fully onto the positive
battery terminal.
| WARNING
Incorrect tightening could cause heating of contacts,
starting or charging faults, sparking, or
could cause the battery to explode (see 80A,
Battery, Battery: Precautions for the repair,
page 80A-1) . |
- Torque tighten the positive battery terminal nut (6
N.m).
2 - CONNECTION
- Push the negative battery wiring fully onto the negative
battery terminal
| WARNING
Incorrect tightening could cause heating of contacts,
starting or charging faults, sparking, or
could cause the battery to explode (see 80A,
Battery, Battery: Precautions for the repair,
page 80A-1) . |
- Torque tighten the negative battery terminal nut (6
N.m)
III - FINAL OPERATION
| Note:
When refitting the battery and after every time it
has been disconnected for longer than 3 seconds,
it may be necessary to carry out some
operations without the diagnostic tool, so that the
vehicle operates correctly. |
- If the battery is disconnected for more than 10 seconds,
reinitialise the electric windows: raise all the
windows to their upper stop and keep the raise button
pressed in this position for at least 3 seconds.
- If the battery is disconnected for more than 5 seconds:
reinitialise the rain and light sensor: perform
key ON, key OFF.
|


