LEFT-HAND DRIVE, and AIR CON 02
REMOVAL
I - REMOVAL PREPARATION OPERATION
1 - Left-hand mixer motor
- Remove:
- the dashboard lower cover on the driver's side (see
Dashboard: Removal - Refitting) (57A, Interior
equipment),
- the centre panel lower left-hand cover,
- the A pillar air distribution duct (see 61A, Heating,
A-pillar air distribution duct: Removal - Refitting,
page 61A-64) .
2 - Right-hand mixer motor
- Remove:
- the glovebox (see Glovebox: Removal - Refitting)
( 57A, Interior equipment),
- the centre panel lower left-hand cover
- the A pillar air distribution duct (see 61A, Heating,
A-pillar air distribution duct: Removal - Refitting,
page 61A-64) .
II - OPERATION FOR REMOVAL OF PART
CONCERNED
1 - Left-hand mixer motor
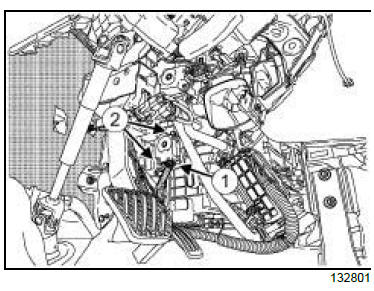
- Disconnect the connector (1) .
- Remove:
- the bolts (2) ,
- the left-hand mixer motor.
2 - Right-hand mixer motor
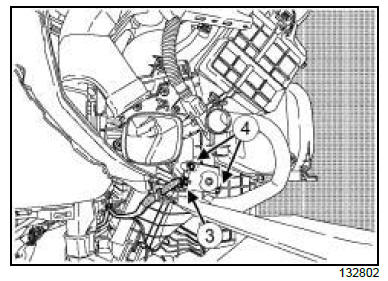
- Disconnect the connector (3) .
- Remove:
- the bolts (4) ,
- the right-hand mixer motor.
REFITTING
I - REFITTING OPERATION FOR PART
CONCERNED
- Refit:
- the air mixing motor,
- the air mixing motor bolts.
- Connect the air mixing motor connector.
II - FINAL OPERATION.
1 - Left-hand mixer motor
- Refit:
- the A pillar air distribution duct (see 61A, Heating,
A-pillar air distribution duct: Removal - Refitting,
page 61A-64) .
- the centre panel lower left-hand cover,
- the dashboard lower cover on the driver's side (see
Dashboard: Removal - Refitting) (57A, Interior
equipment).
2 - Right-hand mixer motor
- Refit:
- the A pillar air distribution duct (see 61A, Heating,
A-pillar air distribution duct: Removal - Refitting,
page 61A-64) .
- the centre panel lower left-hand cover,
- the glovebox (see Glovebox: Removal - Refitting)
(57A, Interior equipment).
RIGHT-HAND DRIVE, and AIR CON 02
REMOVAL
I - REMOVAL PREPARATION OPERATION
1 - Left-hand mixer motor
- Remove:
- the glovebox (see Glovebox: Removal - Refitting)
( 57A, Interior equipment),
- the centre panel lower left-hand cover,
- the A pillar air distribution duct (see 61A, Heating,
A-pillar air distribution duct: Removal - Refitting,
page 61A-64) .
- Remove:
- the bolts (1) ,
- the glove box air duct (2) .
2 - Right-hand mixer motor
- Remove:
- the dashboard lower cover on the driver's side (see
Dashboard: Removal - Refitting) (57A, Interior
equipment),
- the centre panel lower left-hand cover
- the A pillar air distribution duct (see 61A, Heating,
A-pillar air distribution duct: Removal - Refitting,
page 61A-64) .
II - OPERATION FOR REMOVAL OF PART
CONCERNED
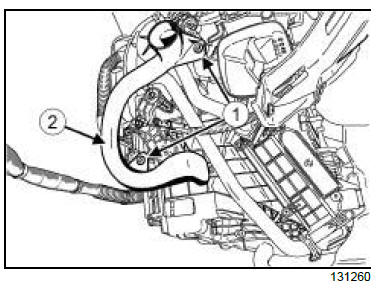
1 - Left-hand mixer motor
- Disconnect the connector (3) .
- Remove:
- the bolts (4) ,
- the left-hand mixer motor.
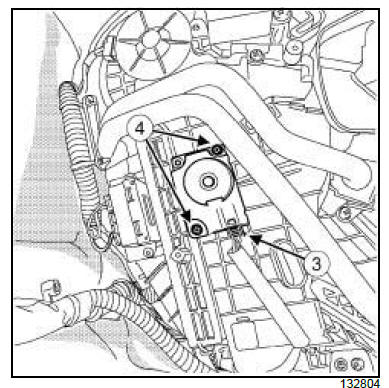
2 - Right-hand mixer motor
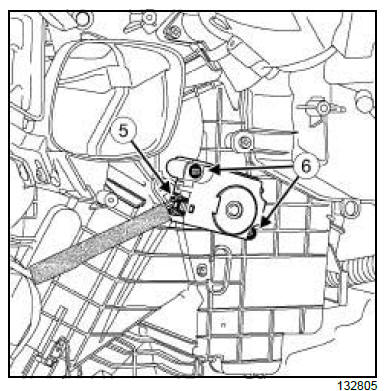
- Disconnect the connector (5) .
- Remove:
- the bolts (6) ,
- the right-hand mixer motor.
REFITTING
I - REFITTING OPERATION FOR PART
CONCERNED
- Refit:
- the air mixing motor,
- the air mixing motor bolts.
- Connect the air mixing motor connector.
II - FINAL OPERATION
1 - Left-hand mixer motor
- Remove:
- the glove box air duct,
- the bolts,
- the A pillar air distribution duct (see 61A, Heating,
A-pillar air distribution duct: Removal - Refitting,
page 61A-64) .
- the centre panel lower left-hand cover,
- the glovebox (see Glovebox: Removal - Refitting)
(57A, Interior equipment).
2 - Right-hand mixer motor
- Remove:
- the A pillar air distribution duct (see 61A, Heating,
A-pillar air distribution duct: Removal - Refitting,
page 61A-64) .
- the centre panel lower left-hand cover
- the dashboard lower cover on the driver's side (see
Dashboard: Removal - Refitting) (57A, Interior
equipment).
|


