RIGHT-HAND DRIVE, and 6-SPEED MANUAL GEARBOX
| WARNING
Prepare for the flow of fluid, and protect the surrounding
components. |
REMOVAL
I - REMOVAL PREPARATION OPERATION
- Position the vehicle on a two-post lift (see Vehicle:
Towing and lifting) (02A, Lifting equipment).
- Remove:
- the front left-hand wheel (see 35A, Wheels and tyres,
Wheel: Removal - Refitting, page 35A-1)
(35A, Wheels and tyres).
- the front left-hand wheel arch liner (see Front
wheel arch liner: Removal - Refitting) (55A, Exterior
protection),
- the battery (see Battery: Removal - Refitting)
(80A, Battery)
- the battery tray (see Battery tray: Removal - Refitting)
(80A, Battery),
- the air filter box (see Air filter unit: Removal - Refitting)
(12A, Fuel mixture).
- Drain the brake fluid reservoir with a syringe.
II - OPERATION FOR REMOVAL OF PART
CONCERNED

| WARNING
Prepare for the flow of fluid, and protect the surrounding
components. |
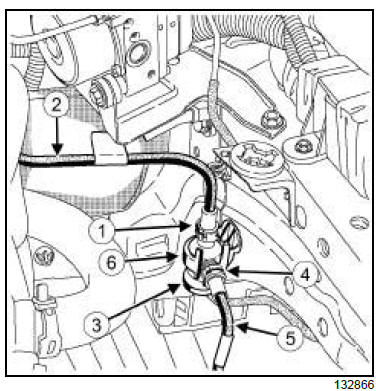
- Remove the clip (1) from the connecting pipe (2) between
the clutch master cylinder and the hydraulic
damper (3) .
- Disconnect the connecting pipe from the hydraulic
damper.
- Remove the clip (4) from the clutch control pipe (5)
on the hydraulic damper.
- Disconnect the clutch control pipe from the hydraulic
damper.
- Unclip the clutch hydraulic damper from its support
(6) .

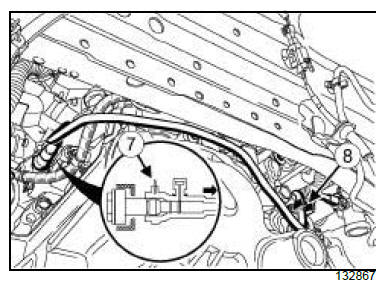
- Remove the clip (7) from the clutch control pipe on
the clutch slave cylinder on the gearbox.
- Disconnect the clutch control pipe from the clutch
slave cylinder.
- Unclip the clutch control pipe from its clip (8) .
- Remove the clutch control pipe.
- Fit plugs into the openings.
REFITTING
I - REFITTING OPERATION FOR PART
CONCERNED
- Refit:
- the clutch control pipe, taking care not to damage
anything,
- the clutch hydraulic damper on its support.
- Connect:
- the clutch control pipe on the slave cylinder side,
- the clutch control pipe on the hydraulic damper
side.
- Refit:
- the clutch control pipe onto its clip,
- the clutch control pipe clip onto the clutch slave cylinder,
- the clutch control pipe clip onto the hydraulic damper.
- Connect the connecting pipe onto the hydraulic
damper.
- Refit the connecting pipe clip between the clutch
master cylinder and the hydraulic damper.
II - FINAL OPERATION
- Bleed the clutch circuit (see 37A, Mechanical component
controls, Clutch circuit: Bleed, page 37A-
48) .
- Check that the clutch system is operating correctly.
- Refit:
- the air filter box (see Air filter unit: Removal - Refitting)
(12A, Fuel mixture)
- the battery tray (see Battery tray: Removal - Refitting)
(80A, Battery),
- the battery (see Battery: Removal - Refitting)
(80A, Battery)
- the front left-hand wheel arch liner (see Front
wheel arch liner: Removal - Refitting) (55A, Exterior
protection),
- the front left-hand wheel (see 35A, Wheels and tyres,
Wheel: Removal - Refitting, page 35A-1)
(35A, Wheels and tyres).
LEFT-HAND DRIVE, and 6-SPEED MANUAL GEARBOX
| WARNING
Prepare for the flow of fluid, and protect the surrounding
components. |
REMOVAL
I - REMOVAL PREPARATION OPERATION
- Position the vehicle on a two-post lift (see Vehicle:
Towing and lifting) (02A, Lifting equipment).
- Remove:
- the front left-hand wheel (see 35A, Wheels and tyres,
Wheel: Removal - Refitting, page 35A-1)
(35A, Wheels and tyres).
- the front left-hand wheel arch liner (see Front
wheel arch liner: Removal - Refitting) (55A, Exterior
protection),
- the battery (see Battery: Removal - Refitting)
(80A, Battery)
- the battery tray (see Battery tray: Removal - Refitting)
(80A, Battery),
- the air filter box (see Air filter unit: Removal - Refitting)
(12A, Fuel mixture).
- Drain the brake fluid reservoir with a syringe.
II - OPERATION FOR REMOVAL OF PART
CONCERNED

| WARNING
Prepare for the flow of fluid, and protect the surrounding
components. |
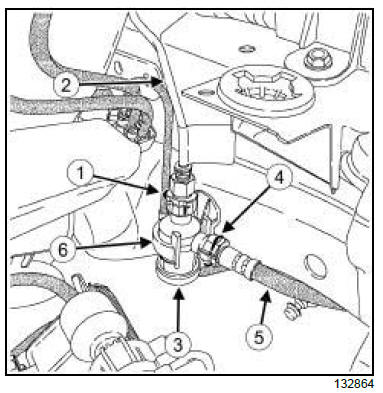
- Remove the clip (1) from the connecting pipe (2) between
the clutch master cylinder and the hydraulic
damper (3) .
- Disconnect the connecting pipe from the hydraulic
damper.
- Remove the clip (4) from the connecting hose (5) on
the hydraulic damper.
- Disconnect the connecting hose from the hydraulic
damper.
- Unclip the clutch shock damper from its support (6) .

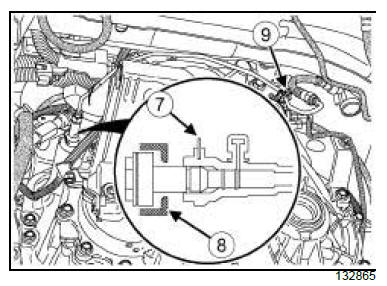
- Remove the clip (7) from the clutch control pipe on
the clutch slave cylinder on the gearbox (8) .
- Disconnect the clutch control pipe from the clutch
slave cylinder.
- Unclip the clutch control pipe from its clip (9) .
- Remove the clutch control pipe.
- Fit plugs into the openings.
REFITTING
I - REFITTING OPERATION FOR PART
CONCERNED
- Refit:
- the clutch control pipe, taking care not to damage
anything,
- the clutch hydraulic damper on its support.
- Connect:
- the clutch control pipe on the slave cylinder side,
- the connecting hose on the hydraulic damper side.
- Refit:
- the clutch control pipe on its clip,
- the clutch control pipe clip on the clutch slave cylinder,
- the connecting hose clip on the hydraulic damper.
- Connect the connecting pipe on the hydraulic damper.
- Refit the connecting pipe clip between the clutch
master cylinder and the hydraulic damper.
II - FINAL OPERATION.
- Bleed the clutch circuit (see 37A, Mechanical component
controls, Clutch circuit: Bleed, page 37A-
48) .
- Refit:
- the air filter box (see Air filter unit: Removal - Refitting)
(12A, Fuel mixture),
- the battery tray (see Battery tray: Removal - Refitting)
(80A, Battery),
- the battery (see Battery: Removal - Refitting)
(80A, Battery),
- the front left-hand wheel arch liner (see Front
wheel arch liner: Removal - Refitting) (55A, Exterior
protection),
- the front left-hand wheel (see 35A, Wheels and tyres,
Wheel: Removal - Refitting, page 35A-1)
(35A, Wheels and tyres).
|


