M9R
REMOVAL - REFITTING
I - REMOVAL PREPARATION OPERATION
- Position the vehicle on a two-post lift (see Vehicle:
Towing and lifting) (02A, Lifting equipment).
- Remove:
- the front wheel (see 35A, Wheels and tyres,
Wheel: Removal - Refitting, page 35A-1) ,
- the wheel arch liners (see Front wheel arch liner:
Removal - Refitting) (55A, Exterior protection),
- the engine undertray.
II - OPERATION FOR REMOVAL OF PART
CONCERNED
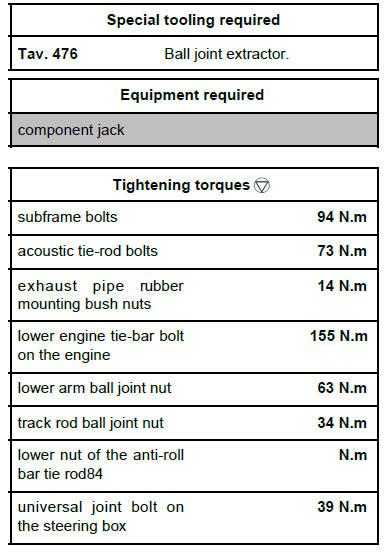
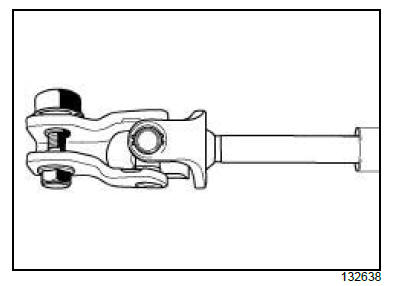
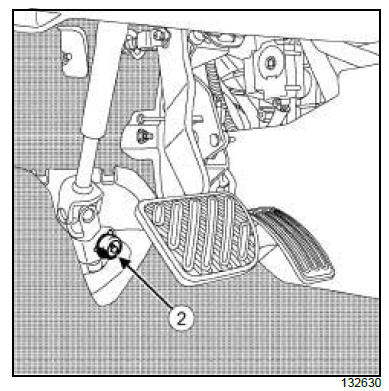
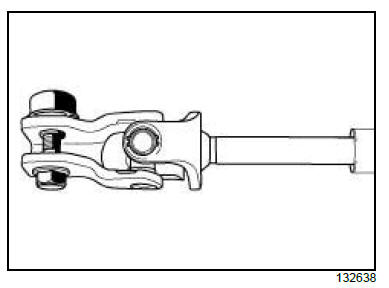
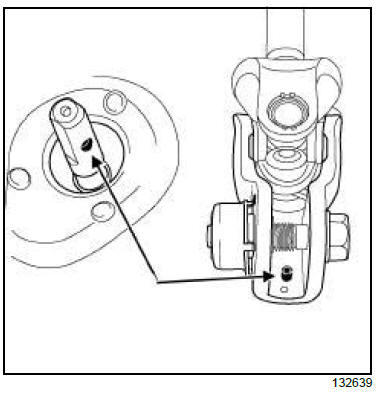
- Remove the steering cover (1) .
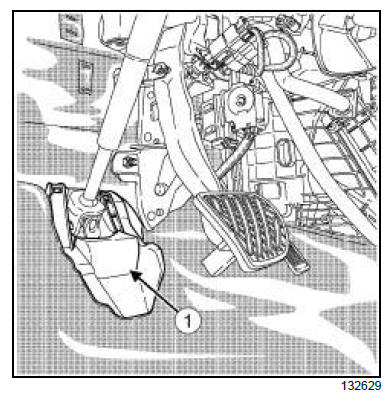
- Remove the cover (2) from the universal joint (do not
keep).
- Set the wheels straight ahead.
- Lock the steering column.
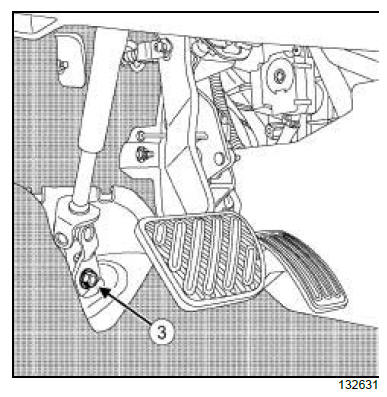
- Remove:
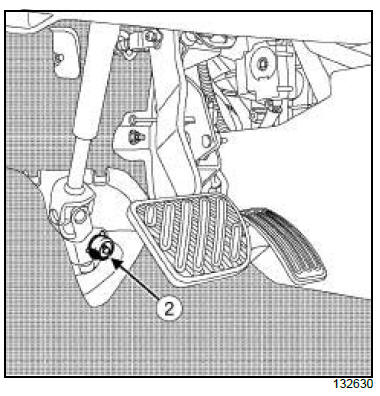
- the universal joint bolt (3) (do not keep),
- the universal joint nut,
- the universal joint.
| Note:
Swivel the universal joint to detach it from the
pinion; do not retract the intermediate shaft. |
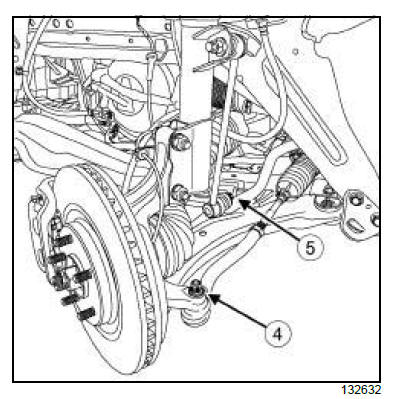
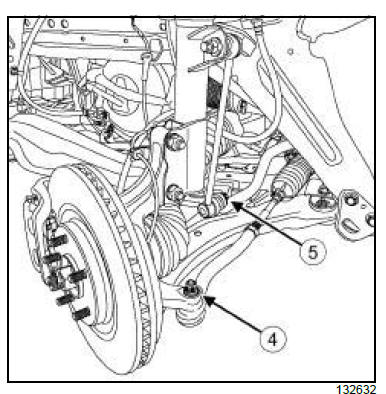
- Remove:
- the track rod ball joint nut (4) ,
- the lower nut (5) from the anti-roll bar tie rod.
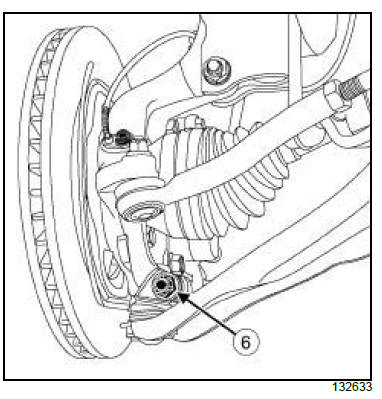
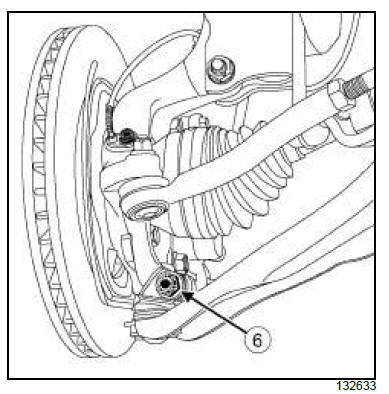
- Remove the lower arm ball joint nut (6) .
- Extract the track rod end using the (Tav. 476).
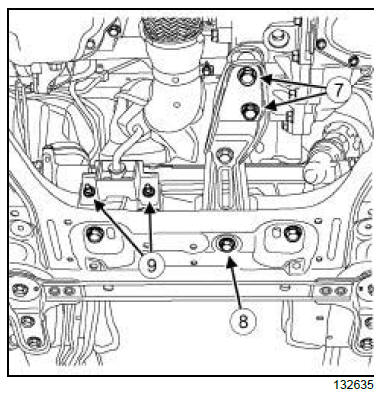
- Remove:
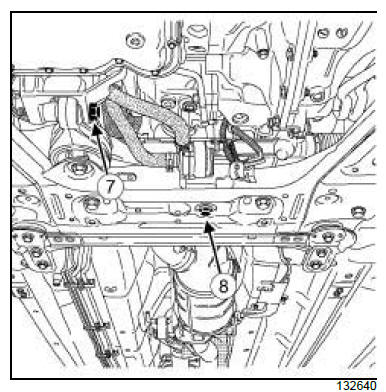
- the bolt (7) from the lower engine tie-bar on the engine,
- the bolt (8) from the turbocharger cooling pump.
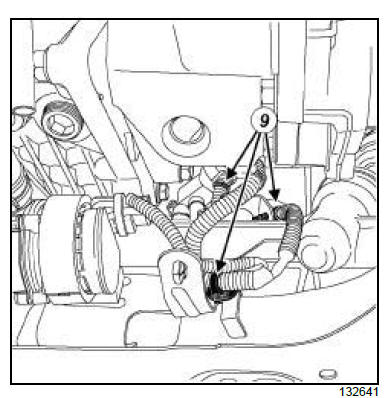
- Unclip the wiring clips (9) .
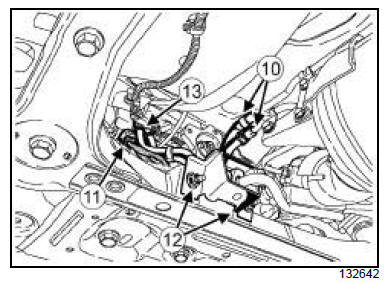
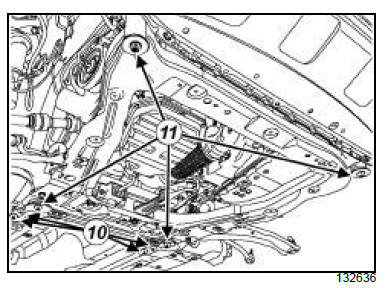
- Remove the clips (10) .
- Disconnect:
- the hose from the particle filter,
- the particle filter upstream temperature sensor connector
(11) .
- Remove the rubber mounting bush nuts (12) from
the exhaust pipe.
- Unclip the clip (13) from the wiring.
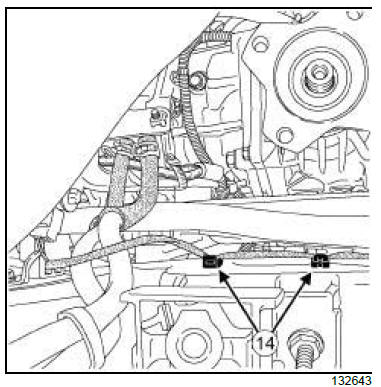
- Unclip the clips (14) from the particle filter upstream
temperature sensor wiring.
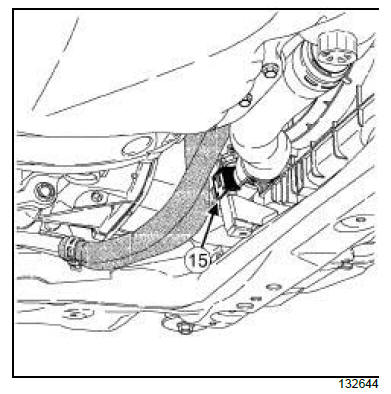
- Unclip the hose clip (15) from the radiator hose.
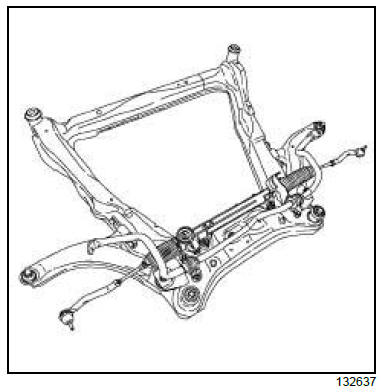
- Place the component jack under the subframe.
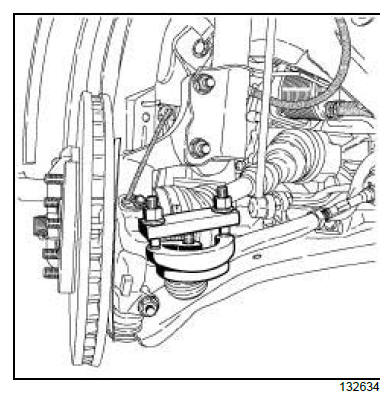
- Extract the lower arm ball joints.
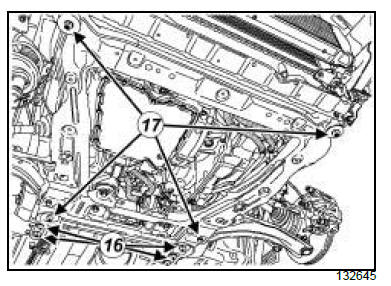
- Remove:
- the acoustic tie-rod bolts (16) ,
- the acoustic tie-rod,
- the subframe bolts (17) ,
- the subframe, slowly.
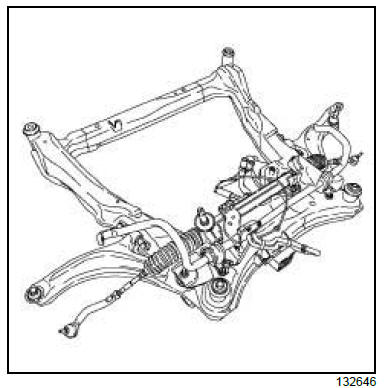
- Remove the subframe mountings.
REFITTING
I - REFITTING PREPARATION OPERATION
- Always replace:
- the anti-roll bar tie rod lower nuts,
- the bolt from the universal joint.
II - REFITTING OPERATION FOR PART
CONCERNED
- Refit the subframe mountings.
- Degrease the surfaces of the body which are in contact
with the subframe and the cross member using
surface cleaner.
- Position the subframe using the component jack.
- Refit:
- the subframe bolts,
- the acoustic tie-rod,
- the acoustic tie-rod bolts.
| Note:
Make sure that the tightening order of the subframe
bolts is respected (rear left-hand - rear
right-hand - front left-hand - front right-hand). |
- Torque tighten:
- the subframe bolts (94 N.m),
- the acoustic tie-rod bolts (73 N.m).
- Refit the lower arm ball joint.
- Remove the component jack.
- Clip:
- the hose clip on the radiator hose,
- the clips of the particle filter upstream temperature
sensor wiring,
- the wiring clip.
- Refit the rubber mounting bush nuts on the exhaust
pipe.
- Torque tighten the exhaust pipe rubber mounting
bush nuts (14 N.m).
- Connect:
- the particle filter upstream temperature sensor connector,
- the particle filter hose.
- Clip on the wiring clips.
- Refit:
- the turbocharger cooling pump bolts,
- the lower engine tie-bar bolt on the engine.
- Torque tighten the lower engine tie-bar bolt on the
engine (155 N.m).
- Refit the lower arm ball joint nut.
- Torque tighten the lower arm ball joint nut (63
N.m).
- Refit:
- the anti-roll bar linkage lower nut,
- the track rod ball joint nut.
- Torque tighten:
- the track rod ball joint nut (34 N.m),
- the lower nut of the anti-roll bar tie rod84 (N.m).
- Set the wheels straight ahead.
- Observe the direction of fitting for the universal joint
cam nut and bolt.
- Refit:
- the universal joint,
- the new universal joint bolt,
- the cam nut from the universal joint.
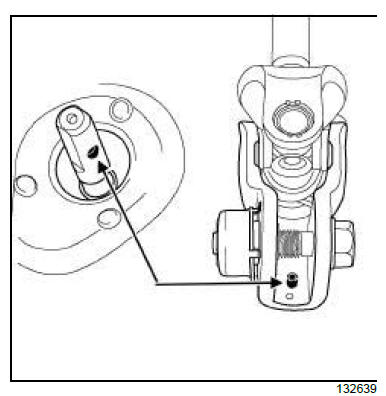
- Check that the universal joint is in the correct position.
- Torque tighten the universal joint bolt on the
steering box (39 N.m).
- Refit the steering cover.
III - FINAL OPERATION
- Refit:
- the engine undertray,
- the wheel arch liners (see Front wheel arch liner:
Removal - Refitting) (55A, Exterior protection),
- the front wheel (see 35A, Wheels and tyres,
Wheel: Removal - Refitting, page 35A-1) .
- Check the front axle geometry (see 30A, General
information, Front axle system: Adjustment,
page 30A-11) .
2TR

REMOVAL - REFITTING
I - REMOVAL PREPARATION OPERATION
- Position the vehicle on a two-post lift (see Vehicle:
Towing and lifting) (02A, Lifting equipment).
- Remove:
- the front wheel (see 35A, Wheels and tyres,
Wheel: Removal - Refitting, page 35A-1) ,
- the wheel arch liners (see Front wheel arch liner:
Removal - Refitting) (55A, Exterior protection),
- the engine undertray.
II - OPERATION FOR REMOVAL OF PART
CONCERNED

- Remove the steering cover (1) .
- Remove the cover (2) from the universal joint (do not
keep).
- Set the wheels straight ahead.
- Lock the steering column.
- Remove:
- the universal joint bolt (3) (do not keep),
- the universal joint nut,
- the universal joint.
| Note:
Swivel the universal joint to detach it from the
pinion; do not retract the intermediate shaft. |
- Remove:
- the track rod ball joint nut (4) ,
- the lower nut (5) from the anti-roll bar tie rod.
- Remove the lower arm ball joint nut (6) .

- Extract the track rod end using the (Tav. 476).
- Remove:
- the bolt (7) from the lower engine tie-bar on the engine,
- the lower engine tie-bar retaining bracket bolt (8) ,
- the lower engine tie-bar retaining bracket,
- the nuts (9) from the exhaust pipe rubber mounting
bush.
- Place the component jack under the subframe.
- Extract the lower arm ball joints.
- Remove:
- the acoustic tie-rod bolts (10) ,
- the acoustic tie-rod,
- the subframe bolts (11) ,
- the subframe, slowly.
- Remove the subframe mountings.
REFITTING
I - REFITTING PREPARATION OPERATION
- Always replace:
- the anti-roll bar tie rod lower nuts,
- the bolt from the universal joint.
II - REFITTING OPERATION FOR PART
CONCERNED
- Refit the subframe mountings.
- Degrease the surfaces of the body which are in contact
with the subframe and the cross member using
surface cleaner.
- Position the subframe using the component jack.
- Refit:
- the subframe bolts,
- the acoustic tie-rod,
- the acoustic tie-rod bolts.
| Note:
Make sure that the tightening order of the subframe
bolts is respected (rear left-hand - rear
right-hand - front left-hand - front right-hand). |
- Torque tighten:
- the subframe bolts (94 N.m),
- the acoustic tie-rod bolts (73 N.m).
- Refit the lower arm ball joint.
- Remove the component jack.
- Refit:
- the nuts on the exhaust pipe rubber mounting
bush,
- the lower engine tie-bar retaining bracket,
- the lower engine tie-bar retaining bracket bolts,
- the lower engine tie-bar bolt on the gearbox.
- Torque tighten:
- the nuts of the exhaust pipe (rubber mounting
bush14 N.m),
- the lower engine tie-bar retaining bracket bolt
(110 N.m),
- the lower engine tie-bar bolts on the gearbox
(110 N.m).
- Refit the lower arm ball joint nut.
- Torque tighten the lower arm ball joint nut (63
N.m).
- Refit:
- the anti-roll bar linkage lower nut,
- the track rod ball joint nut.
- Torque tighten:
- the track rod ball joint nut (34 N.m),
- the lower nut of the anti-roll bar tie rod84 (N.m).
- Set the wheels straight ahead.
- Observe the direction of fitting for the universal joint
cam nut and bolt.
- Refit:
- the universal joint,
- the new universal joint bolt,
- the cam nut from the universal joint.
- Check that the universal joint is in the correct position.
- Torque tighten the universal joint bolt on the
steering box (39 N.m).
- Refit the steering cover.
III - FINAL OPERATION
- Refit:
- the engine undertray,
- the wheel arch liners (see Front wheel arch liner:
Removal - Refitting) (55A, Exterior protection),
- the front wheel (see 35A, Wheels and tyres,
Wheel: Removal - Refitting, page 35A-1) .
- Check the front axle geometry (see 30A, General
information, Front axle system: Adjustment,
page 30A-11) .
|


