LEFT-HAND DRIVE
| WARNING
Prepare for the flow of fluid, and protect the surrounding
components. |
REMOVAL
I - REMOVAL PREPARATION OPERATION
- Position the vehicle on a two-post lift (see Vehicle:
Towing and lifting) (02A, Lifting equipment).
- Disconnect the battery (see Battery: Removal - Refitting)
(80A, Battery).
- Position a pedal press on the brake pedal to limit
the outflow of brake fluid.
- Remove:
- the front right-hand wheel (see 35A, Wheels and
tyres, Wheel: Removal - Refitting, page 35A-1)
(35A, Wheels and tyres),
- the windscreen wiper arms (see Windscreen wiper
arm: Removal - Refitting) (85A, Wiping -
Washing),
- the scuttle panel half-grille (see Scuttle panel half-grille:
Removal - Refitting) (56A, Exterior equipment),
- the windscreen wiper mechanism (see Windscreen
wiper mechanism: Removal - Refitting)
(85A, Wiping - Washing),
- the scoop under the scuttle panel grille (see Scoop
under the scuttle panel grille: Removal - Refitting)
(56A, Exterior equipment).
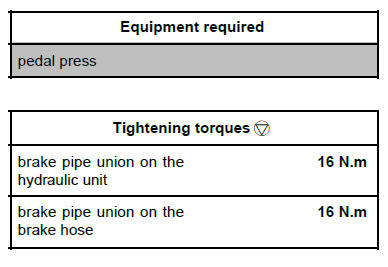
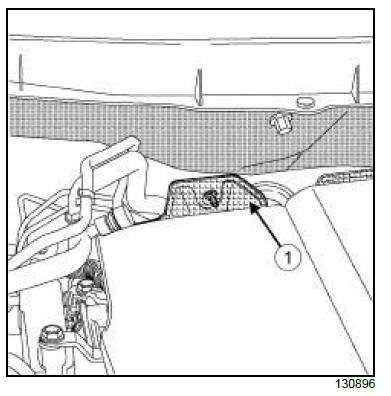
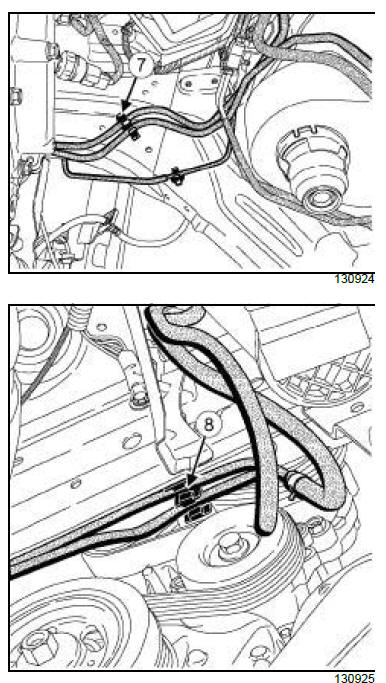
- Remove the insulation (1) from the bulkhead (see
Bulkhead insulation: Removal - Refitting) (68A,
Soundproofing).
2TR
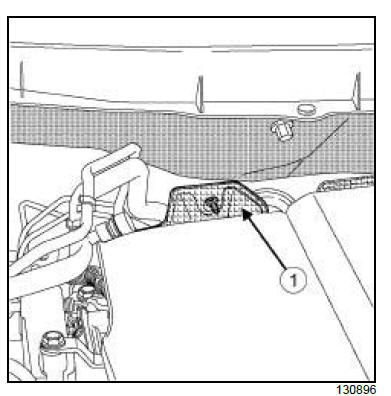
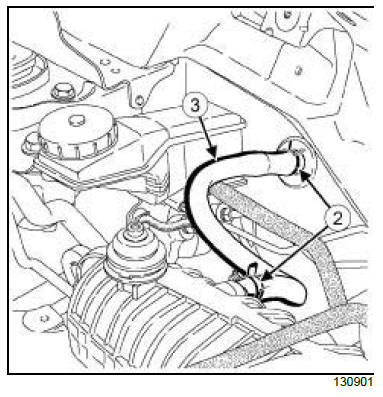
- Remove:
- clips (2) ,
- the vacuum hose (3) .
II - OPERATION FOR REMOVAL OF PART
CONCERNED
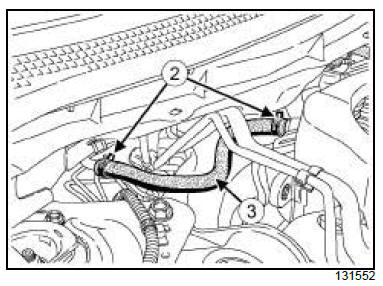
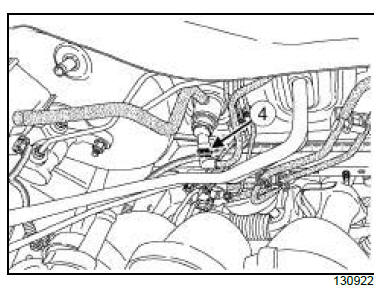
- Undo the brake pipe union (4) .
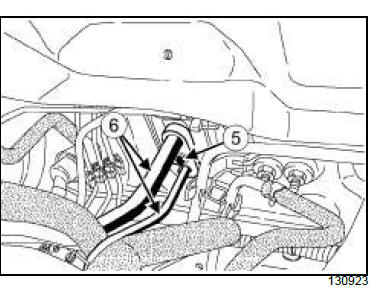
- Remove the retaining clip (5) .
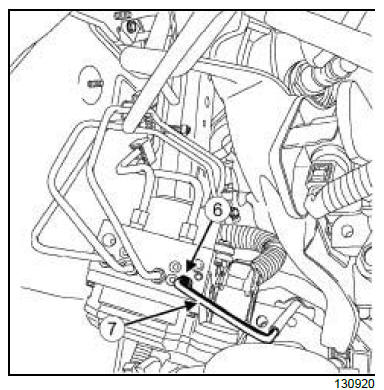
- Undo the brake pipe union (6) on the hydraulic unit.
- Remove the brake pipe (7) between the hydraulic
unit and the front right-hand brake hose.
REFITTING
I - REFITTING OPERATION FOR PART
CONCERNED
- Refit:
- the brake pipe between the hydraulic unit and the
front right-hand brake hose,
- the brake pipe union on the hydraulic unit,
- the retaining clip,
- the brake pipe union on the brake hose.
- Torque tighten:
- the brake pipe union on the hydraulic unit (16
N.m),
- the brake pipe union on the brake hose (16
N.m).
II - FINAL OPERATION
2TR
- Refit:
- the vacuum hose,
- the clips.
- Refit:
- the bulkhead insulation (see Bulkhead insulation:
Removal - Refitting) (86A, Soundproofing),
- the scoop under the scuttle panel grille (see Scoop
under the scuttle panel grille: Removal - Refitting)
(56A, Exterior equipment).
- the windscreen wiper mechanism (see Windscreen
wiper mechanism: Removal - Refitting)
(85A, Wiping - Washing),
- the scuttle panel half-grille (see Scuttle panel halfgrille:
Removal - Refitting) (56A, Exterior equipment),
- the windscreen wiper arms (see Windscreen wiper
arm: Removal - Refitting) (85A, Wiping -
Washing),
- the front right-hand wheel (see 35A, Wheels and
tyres, Wheel: Removal - Refitting, page 35A-1)
(35A, Wheels and tyres),
- Remove the pedal press.
- Bleed the brake circuit (see 30A, General information,
Braking circuit: Bleed, page 30A-4) .
- Connect the battery (see Battery: Removal - Refitting)
(80A, Battery).
RIGHT-HAND DRIVE
| WARNING
Prepare for the flow of fluid, and protect the surrounding
components. |
REMOVAL
I - REMOVAL PREPARATION OPERATION
- Position the vehicle on a two-post lift (see Position
of the attachment points) (02A, Lifting equipment).
- Drain the refrigerant circuit using the refrigerant
charging station (see Refrigerant circuit: Draining
- Filling) 62A, Air conditioning).
- Disconnect the battery (see Battery: Removal - Refitting)
(80A, Battery).
- Position a pedal press on the brake pedal to limit
the outflow of brake fluid.
- Remove:
- the front left-hand wheel (see 35A, Wheels and tyres,
Wheel: Removal - Refitting, page 35A-1)
(35A, Wheels and tyres),
- the engine cover,
- the air intake sleeve,
- the air filter box (see Air filter unit: Removal - Refitting)
(12A, Fuel mixture)
- the windscreen wiper arms (see Windscreen wiper
arm: Removal - Refitting) (85A, Wiping -
Washing),
- the scuttle panel half-grille (see Scuttle panel half-grille:
Removal - Refitting) (56A, Exterior equipment),
- the windscreen wiper mechanism (see Windscreen
wiper mechanism: Removal - Refitting)
(85A, Wiping - Washing),
- the scoop under the scuttle panel grille (see Scoop
under the scuttle panel grille: Removal - Refitting)
(56A, Exterior equipment).
- Remove the insulation (1) from the bulkhead (see
Bulkhead insulation: Removal - Refitting) (68A,
Soundproofing).
2TR
- Remove:
- clips (2) ,
- the vacuum hose (3) .
- Disconnect the clutch pipe (4) .
- Remove the bolt (5) from the pipe union.
- Disconnect the pipes (6) .
2TR
- Unclip the petrol vapour absorber pipe at (7) .
- Unclip the petrol vapour absorber pipe at (8) .
- Remove the brake pipe between the hydraulic unit
and the master cylinder (see 31A, Front axle components,
Hydraulic unit - master cylinder brake
pipe: Removal - Refitting, page 31A-16) .
II - OPERATION FOR REMOVAL OF PART
CONCERNED
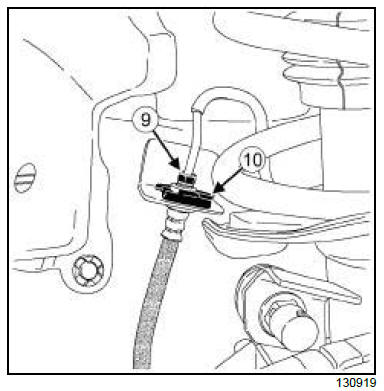
- Undo the brake pipe union (9) .
- Remove the retaining clip (10) .
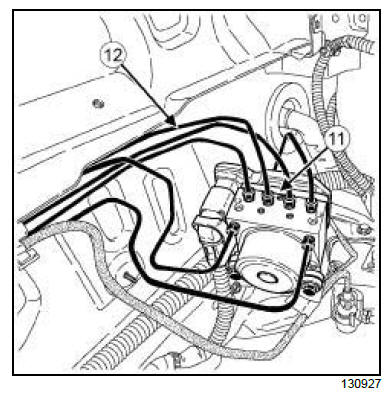
- Undo the brake pipe union (11) on the hydraulic unit.
- Remove the brake pipe (12) between the hydraulic
unit and the front right-hand brake hose.
REFITTING
I - REFITTING OPERATION FOR PART
CONCERNED
- Refit:
- the brake pipe (12) between the hydraulic unit and
the front right-hand brake hose,
- the brake pipe union (11) on the hydraulic unit,
- the retaining clip (10) ,
- the brake pipe union (9) on the brake hose.
- Torque tighten:
- the brake pipe union on the hydraulic unit (16
N.m),
- the brake pipe union on the brake hose (16
N.m).
II - FINAL OPERATION
- Refit the brake pipe between the hydraulic unit and
the master cylinder (see 31A, Front axle components,
Hydraulic unit - master cylinder brake
pipe: Removal - Refitting, page 31A-16) .
2TR
- Clip:
- the petrol vapour absorber pipe at (8) ,
- the petrol vapour absorber pipe at (7)
- Connect the pipes (6) .
- Refit the pipe union bolt (5) .
- Torque tighten the pipe union bolt (4 N.m).
- Connect the clutch pipe (4) .
2TR
- Refit:
- the vacuum hose (3) ,
- the clips (2) .
- Refit:
- the bulkhead insulation (see Bulkhead insulation:
Removal - Refitting) (86A, Soundproofing),
- the scoop under the scuttle panel grille (see Scoop
under the scuttle panel grille: Removal - Refitting)
(56A, Exterior equipment).
- the windscreen wiper mechanism (see Windscreen
wiper mechanism: Removal - Refitting)
(85A, Wiping - Washing),
- the scuttle panel half-grille (see Scuttle panel half-grille:
Removal - Refitting) (56A, Exterior equipment),
- the windscreen wiper arms (see Windscreen wiper
arm: Removal - Refitting) (85A, Wiping -
Washing),
- the air filter box (see Air filter unit: Removal - Refitting)
(12A, Fuel mixture),
- the air intake sleeve,
- the engine cover,
- the front left-hand wheel (see 35A, Wheels and tyres,
Wheel: Removal - Refitting, page 35A-1)
(35A, Wheels and tyres).
- Remove the pedal press.
- Bleed the brake circuit (see 30A, General information,
Braking circuit: Bleed, page 30A-4) .
- Connect the battery (see Battery: Removal - Refitting)
(80A, Battery).
- Fill the refrigerant circuit using the refrigerant
charging station (see Refrigerant circuit: Draining
- Filling) 62A, Air conditioning).
- Check the sealing of the cooling system (see Air
conditioning: Check) (62A, Air conditioning).
|


