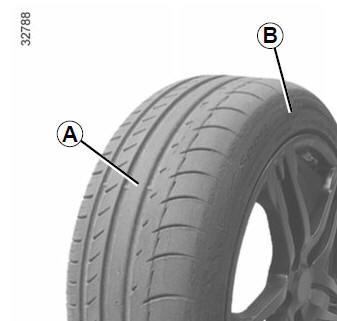
| The kit repairs tyres when
tread A has been damaged
by objects smaller
than 4 mm. It cannot repair
all types of puncture, such as cuts
larger than 4 mm, or cuts in tyre
sidewall B.
Ensure also that the wheel rim is in
good condition.
Do not pull out the foreign body
causing the puncture if it is still in
the tyre. |
| Do not attempt to use the
inflation kit if the tyre has
been damaged as a result
of driving with a puncture.
You should therefore carefully check
the condition of the tyre sidewalls
before any operation.
Driving with underinflated, flat or
punctured tyres can be dangerous
and may make the tyre impossible
to repair.
This repair is temporary.
A tyre which has been punctured
should always be inspected (and repaired,
where possible) as soon as
possible by a specialist.
When taking a tyre which has been
repaired using this kit to be replaced,
you must inform the specialist.
When driving, vibration may be felt
due to the presence of the repair
product injected into the tyre. |
| The kit is only approved for
inflating the tyres of the vehicle
originally equipped
with the kit.
It must never be used to inflate
the tyres of another vehicle, or any
other inflatable object (rubber ring,
rubber boat, etc.).
Avoid spillage on skin when handling
the repair product bottle. If droplets
do leak out, rinse them off with
plenty of water.
Keep the repair kit away from children.
Do not dispose of the empty bottle
in the countryside. Return it to your
approved dealer or to a recycling organisation.
The bottle has a limited service
life which is indicated on its label.
Check the expiry date.
Contact an approved dealer to replace
the inflation tube and repair
product bottle. |
In the event of a puncture, use the kit
located in the boot, underneath the
trunk carpet.
| Before using this kit, park
the vehicle at a sufficient
distance from traffic, switch
on the hazard warning
lights, apply the parking brake, ask
all passengers to leave the vehicle
and keep them away from traffic. |
With the engine running and the
parking brake applied,
If the recommended pressure of
1.8 bar cannot be achieved after
10 minutes, repair is impossible. Do
not drive the vehicle. Consult an authorised
dealer.
| If the vehicle is parked on
the hard shoulder, you must
warn other road users of
your vehicle's presence
with a warning triangle or with other
devices as per the legislation applying
to the country you are in. |
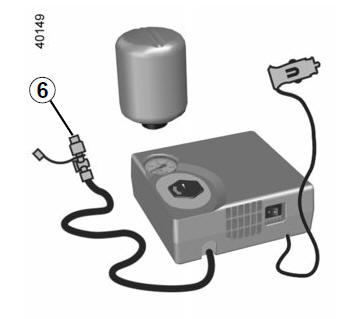
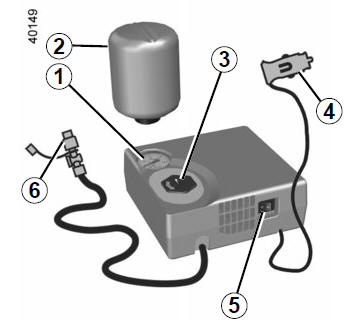
Once the tyre is correctly inflated,
remove the kit: slowly unscrew the inflation
adapter 6 to prevent any repair
product from escaping and store the
container in plastic packaging to prevent
the product from escaping.
| Nothing should be placed
around the driver's feet
as such objects may slide
under the pedals during
sudden braking manoeuvres and
obstruct their use. |
- Affix the driving recommendation
label to the dashboard where it can
easily be seen by the driver;
- Put the kit away.
- At the end of this initial inflation operation,
air will still escape from the
tyre. You must drive a short distance
in order to seal the hole.
- Start immediately and drive at between
12 and 40 mph (20 and
60 km/h) in order to distribute the
product evenly in the tyre and, after
driving for 2 miles (3 km), stop and
check the pressure.
- If the pressure is greater than 1.3 bar
but less than the recommended
pressure (refer to the label affixed to
the edge of the driver's door), readjust
it. Otherwise, please contact an
authorised dealer: the tyre cannot be
repaired.
Precautions when using the
kit
The kit should not be operated for more
than 10 consecutive minutes.
| Please be aware that a
poorly tightened or missing
valve cap can make the
tyres less airtight and may
lead to pressure loss.
Always use valve caps identical to
those fitted originally and tighten
them fully. |
| Following repair with the kit,
do not travel further than
120 miles (200 km). In addition,
reduce your speed and
under no circumstances exceed
48 mph (80 km/h). The sticker,
which you must affix in a prominent
position on the dashboard, reminds
you of this.
Depending on the country or local
legislation, a tyre repaired with the
inflation kit may need to be replaced. |
|


