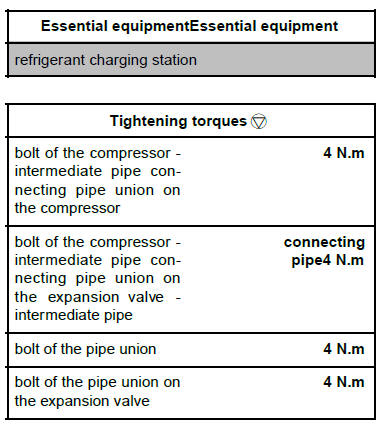
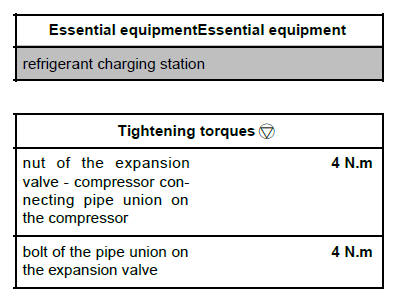
M9R, and AIR CON 01 or AIR CON 02
| IMPORTANT
To avoid any risk of damaging the systems, apply
the safety and cleanliness instructions and the operation
recommendations before carrying out the
repair. |
REMOVAL
I - REMOVAL PREPARATION OPERATION
- Position the vehicle on a two-post lift (see Vehicle:
Towing and lifting) (02A, Lifting equipment).
- Drain the refrigerant circuit using the refrigerant
charging station (see 62A, Air conditioning, Coolant
circuit Draining - Refilling, page 62A-11) .
- Disconnect the battery (see Battery : Removal -
Refitting) (80A, Battery).
Expansion valve - intermediate pipe connecting
pipe
- Remove:
- the windscreen wiper arms (see Windscreen wiper
arm: Removal - Refitting) (85A, Wiping -
Washing),
- the scuttle panel half-grille (see Scuttle half-grille:
Removal - Refitting) (56A, Exterior equipment),
- the windscreen wiper mechanism (see Windscreen
wiper mechanism: Removal - Refitting)
(85A, Wiping - Washing),
- the scoop under the scuttle panel grille (see Scoop
under scuttle panel grille: Removal - Refitting)
(56A, Exterior equipment).

- Remove the nut (1) of the bulkhead insulation.
- Separate the bulkhead insulation.
II - OPERATION FOR REMOVAL OF PART
CONCERNED
1 - Compressor - intermediate pipe connecting pipe
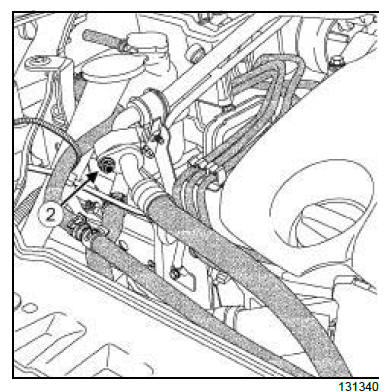
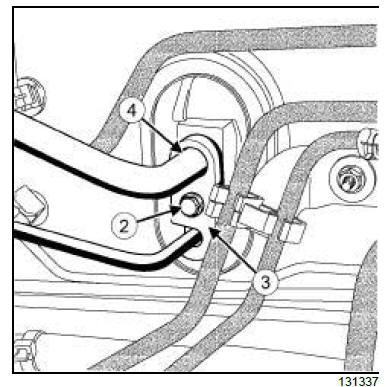
- Remove the bolt of the pipe union (2) .
| WARNING
In order to avoid any refrigerant leaks, do not
damage (deform, twist, etc.) the pipe. |
- Disconnect the compressor - intermediate pipe connecting
pipe from the expansion valve - intermediate
pipe connecting pipe.
| WARNING
To prevent moisture from entering the system,
place plugs on the cold loop components which
are open to the air. |
- Fit plugs into the openings.
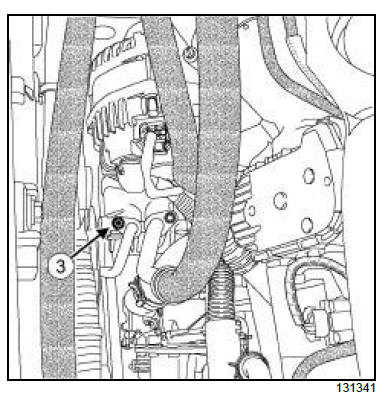
- Remove the bolt from the pipe union (3) .
- Disconnect the compressor - intermediate pipe connecting
pipe from the compressor.
- Fit plugs into the openings.
2 - Expansion valve - intermediate pipe connecting
pipe
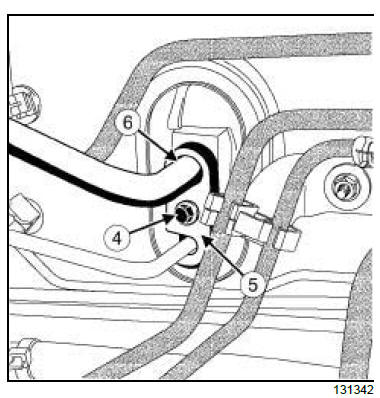
- Remove:
- the bolt (4) of the pipe union,
- the pipe union (5) .
| WARNING
In order to avoid any refrigerant leaks, do not
damage (deform, twist, etc.) the pipe. |
- Disconnect the expansion valve - intermediate pipe
connecting pipe (6) from the expansion valve.
| WARNING
To prevent moisture from entering the system,
place plugs on the cold loop components which
are open to the air. |
- Fit plugs into the openings.
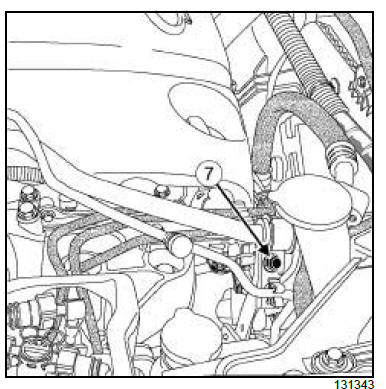
- Remove the bolt (7) from the clip.
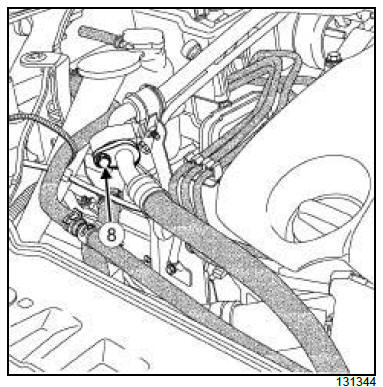
- Remove the bolt (8) from the pipe union.
- Disconnect the expansion valve - intermediate pipe
connecting pipe from the compressor - intermediate
pipe connecting pipe.
- Fit plugs into the openings.
REFITTING
I - REFITTING PREPARATION OPERATION
- Always replace the seals on the refrigerant connecting
pipes.
- Lubricate the seals using recommended air conditioning
oil to make fitting easier.
II - REFITTING OPERATION FOR PART
CONCERNED
| WARNING
Do not remove the blanking plugs from each
component until the last moment.
Also, do not remove the components from their
packaging until they are to be fitted to the vehicle. |
1 - Compressor - intermediate pipe connecting pipe
- Remove the plugs from the openings on the side
concerned.
| WARNING
To avoid any leaks, check that the pipe surface is
sound before positioning the new seal. The surface
must be clean and scratch free. |
- Fit new seals to the refrigerant connecting pipes.
- Connect the compressor - intermediate pipe connecting
pipe on the compressor.
- Refit the bolt of the compressor - intermediate pipe
connecting pipe union.
- Torque tighten the bolt of the compressor - intermediate
pipe connecting pipe union on the compressor
(4 N.m).
- Remove the plugs from the openings on the side
concerned.
- Refit the bolt of the pipe union.
- Connect the compressor - intermediate pipe connecting
pipe on the expansion valve - intermediate
pipe connecting pipe.
- Torque tighten the bolt of the compressor - intermediate
pipe connecting pipe union on the expansion
valve - intermediate pipe (connecting
pipe4 N.m).
2 - Expansion valve - intermediate pipe connecting
pipe
- Remove the plugs from the openings on the side
concerned.
| WARNING
To avoid any leaks, check that the pipe surface is
sound before positioning the new seal. The surface
must be clean and scratch free. |
- Fit new seals to the refrigerant connecting pipes.
- Connect the expansion valve - intermediate pipe
connecting pipe on the compressor - intermediate
pipe connecting pipe.
- Remove the bolt from the pipe union.
- Torque tighten the bolt of the pipe union (4 N.m).
- Refit the bolt of the clip.
- Connect the expansion valve - intermediate pipe
connecting pipe on the expansion valve.
- Refit:
- the pipe union,
- the bolt of the pipe union.
- Torque tighten the bolt of the pipe union on the
expansion valve (4 N.m).
III - FINAL OPERATION.
Expansion valve - intermediate pipe connecting
pipe
- Fit the bulkhead seal in its original position.
- Refit:
- the nut of the bulkhead insulation,
- the scoop under the scuttle panel grille (see Scoop
under scuttle panel grille: Removal - Refitting)
(56A, Exterior equipment),
- the windscreen wiper mechanism (see Windscreen
wiper mechanism: Removal - Refitting)
(85A, Wiping - Washing),
- the scuttle panel half-grille (see Scuttle half-grille:
Removal - Refitting) (56A, Exterior equipment),
- the windscreen wiper arms (see Windscreen wiper
arm: Removal - Refitting) (85A, Wiping -
Washing).
- Connect the battery (see Battery : Removal - Refitting)
(80A, Battery).
| Note:
When replacing a pipe, add 10 ml of the recommended
oil to the quantity of oil recovered. |
- Fill the refrigerant circuit using the refrigerant charging
station (see 62A, Air conditioning, Coolant
circuit Draining - Refilling, page 62A-11) .
- Set the control of the passenger compartment
blower unit to the maximum speed.
- Check that the air conditioning system is operating
correctly (see 62A, Air conditioning, Air conditioning:
Check, page 62A-6) .
- Check for leaks (see 62A, Air conditioning, Coolant
circuit check, page 62A-9) .
2TR, and AIR CON 01 or AIR CON 02
| IMPORTANT
To avoid all risk of damage to the systems, apply
the safety and cleanliness instructions and operation
recommendations before carrying out any
repair (see 62A, Air conditioning, Air conditioning:
Precautions for repair, page 62A-1) . |
REMOVAL
I - REMOVAL PREPARATION OPERATION
- Position the vehicle on a two-post lift (see Vehicle:
Towing and lifting) (02A, Lifting equipment).
- Drain the refrigerant circuit using the refrigerant
charging station (see 62A, Air conditioning, Coolant
circuit Draining - Refilling, page 62A-11) .
- Disconnect the battery (see Battery : Removal -
Refitting) (80A, Battery).
- Remove:
- the windscreen wiper arms (see Windscreen wiper
arm: Removal - Refitting) (85A, Wiping -
Washing),
- the scuttle half-grille (see Scuttle half-grille: Removal
- Refitting) (56A, Exterior equipment),
- the windscreen wiper mechanism (see Windscreen
wiper mechanism: Removal - Refitting)
(85A, Wiping - Washing),
- the scoop under the scuttle panel grille (see Scoop
under scuttle panel grille: Removal - Refitting)
(56A, Exterior equipment).
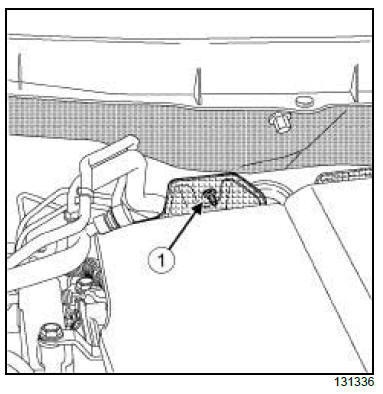
- Remove the nut (1) from the bulkhead insulation.
- Separate the bulkhead insulation.
II - OPERATION FOR REMOVAL OF PART
CONCERNED
- Remove:
- the bolt (2) of the pipe union,
- the pipe union (3) .
| WARNING
In order to avoid any refrigerant leaks, do not
damage (deform, twist, etc.) the pipe. |
- Disconnect the connecting pipe (4) from the expansion
valve.
| WARNING
To prevent moisture from entering the system,
place plugs on the cold loop components which
are open to the air. |
- Fit plugs into the openings.
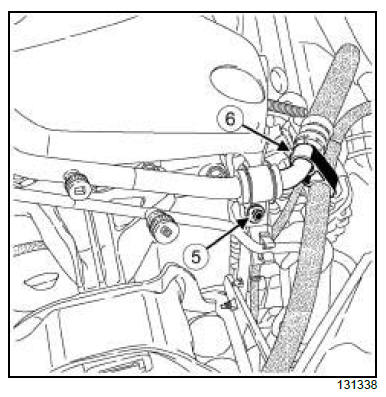
- Remove the bolt (5) from the connecting pipe clip.
- Unfasten clip (6) .
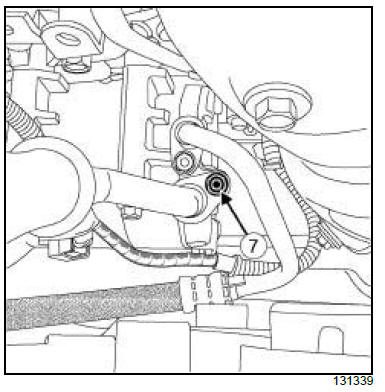
- Remove the nut (7) from the pipe union.
| WARNING
In order to avoid any refrigerant leaks, do not
damage (deform, twist, etc.) the pipe. |
- Disconnect the expansion valve - compressor connecting
pipe from the compressor.
| WARNING
To prevent moisture from entering the system,
place plugs on the cold loop components which
are open to the air. |
- Fit plugs into the openings.
REFITTING
I - REFITTING PREPARATION OPERATION
- Always replace the seals on the refrigerant connecting
pipes.
- Lubricate the seals using recommended air conditioning
oil to make fitting easier.
II - REFITTING OPERATION FOR PART
CONCERNED
| WARNING
Do not remove the blanking plugs from each
component until the last moment.
Also, do not remove the components from their
packaging until they are to be fitted to the vehicle. |
- Remove the plugs from the openings on the side
concerned.
| WARNING
To avoid any leaks, check that the pipe surface is
sound before positioning the new seal. The surface
must be clean and scratch free. |
- Fit new seals to the refrigerant connecting pipes.
- Connect the expansion valve - compressor connecting
pipe to the compressor.
- Refit the nut of the pipe union.
- Torque tighten the nut of the expansion valve -
compressor connecting pipe union on the compressor
(4 N.m).
- Engage clip (6) .
- Refit the bolt of the connecting pipe clip.
- Remove the opening plugs on the side concerned.
- Connect the expansion valve - compressor connecting
pipe to the expansion valve.
- Refit:
- the pipe union,
- the bolt of the pipe union.
- Torque tighten the bolt of the pipe union on the
expansion valve (4 N.m).
III - FINAL OPERATION
- Fit the bulkhead insulation in its original position.
- Refit:
- the nut of the bulkhead insulation,
- the scoop under the scuttle panel grille (see Scoop
under scuttle panel grille: Removal - Refitting)
(56A, Exterior equipment),
- the windscreen wiper mechanism (see Windscreen
wiper mechanism: Removal - Refitting)
(85A, Wiping - Washing),
- the scuttle half-grille (see Scuttle half-grille: Removal
- Refitting) (56A, Exterior equipment),
- the windscreen wiper arms (see Windscreen wiper
arm: Removal - Refitting) (85A, Wiping -
Washing).
- Connect the battery (see Battery : Removal - Refitting)
(80A, Battery).
| Note:
When replacing a pipe, add 10 ml of the recommended
oil to the quantity of oil recovered. |
- Fill the refrigerant circuit using the refrigerant charging
station (see 62A, Air conditioning, Coolant
circuit Draining - Refilling, page 62A-11) .
- Set the control of the passenger compartment
blower unit to the maximum speed.
- Check that the air conditioning system is operating
correctly (see 62A, Air conditioning, Air conditioning:
Check, page 62A-6) .
- Check for leaks (see 62A, Air conditioning, Coolant
circuit check, page 62A-9) .
|


