LEFT-HAND DRIVE, and 6-SPEED MANUAL GEARBOX
REMOVAL
I - REMOVAL PREPARATION OPERATION
- Disconnect the battery (see Battery: Removal - Refitting)
(80A, Battery).
- Remove:
- the dashboard lower cover on the driver's side (see
Dashboard lower trim: Removal - Refitting)
(57A, Interior equipment),
- the A-pillar air distribution duct (see Front footwell
air distribution duct: Removal - Refitting) (61A,
Heating system),
II - OPERATION FOR REMOVAL OF PART
CONCERNED
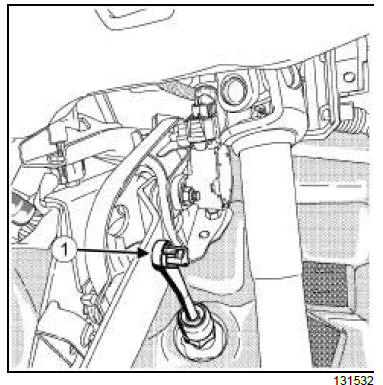
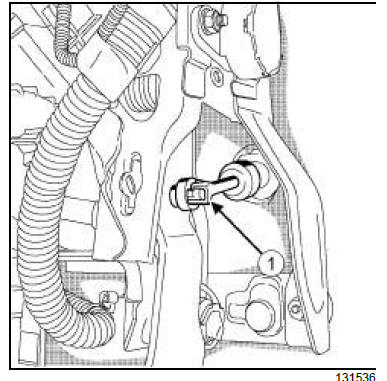
- Separate the clutch master cylinder ball joint (1)
from the clutch pedal.
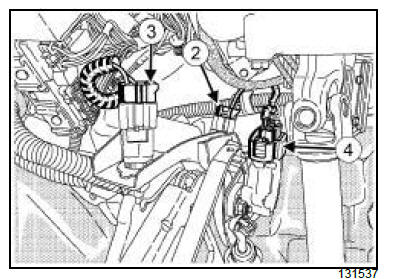
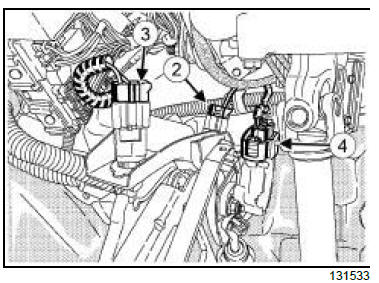
- Disconnect the connector (2) from the clutch pedal
switch.
CRUISE CONTROL
- Disconnect the connector (3) from the clutch pedal
switch.
FOOT BRAKE AUTOMATIC CONTROL
- Disconnect the position sensor connector (4) from
the clutch pedal.
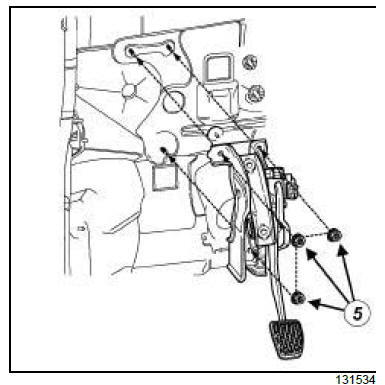
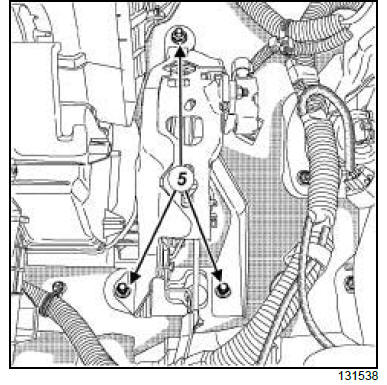
- Remove:
- the accelerator pedal nuts (5) ,
- the clutch pedal.
FOOT BRAKE AUTOMATIC CONTROL
- Remove the clutch pedal position sensor from the
clutch pedal (see 37A, Mechanical component
controls, Clutch pedal position sensor: Removal
- Refitting, page 37A-47) .
REFITTING
I - REFITTING OPERATION FOR PART
CONCERNED
FOOT BRAKE AUTOMATIC CONTROL
- Refit the clutch pedal position sensor on the clutch
pedal (see 37A, Mechanical component controls,
Clutch pedal position sensor: Removal - Refitting,
page 37A-47) .
- Refit:
- the clutch pedal,
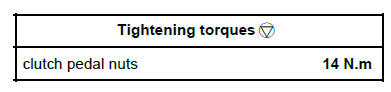
- the clutch pedal nuts.
- Torque tighten the clutch pedal nuts (14 N.m).
- Connect the clutch pedal switch connector.
CRUISE CONTROL
- Connect the clutch pedal switch connector.
FOOT BRAKE AUTOMATIC CONTROL
- Connect the clutch pedal position sensor connector.
- Place the clutch cylinder ball joint on the clutch pedal.
II - FINAL OPERATION.
- Refit:
- the A-pillar air distribution duct (see Front footwell
air distribution duct: Removal - Refitting) (61A,
Heating system),
- the dashboard lower cover on the driver's side (see
Dashboard lower trim: Removal - Refitting)
(57A, Interior equipment).
- Connect the battery (see Battery: Removal - Refitting)
(80A, Battery).
RIGHT-HAND DRIVE, and 6-SPEED MANUAL GEARBOX
REMOVAL
I - REMOVAL PREPARATION OPERATION
- Unlock the steering column.
| IMPORTANT
Never handle the pyrotechnic systems (pretensioners
or airbags) near to a source of heat or
naked flame - they may be triggered. |
| IMPORTANT
To prevent the pyrotechnic components from
being permanently deactivated or triggered (airbags
or pretensioners), wait for at least 3 minutes
after disconnecting the battery. |
- Disconnect the battery (see Battery: Removal - Refitting)
(80A, Battery).
- Remove:
- the driver's front airbag (see Driver's frontal airbag:
Removal - Refitting) (88C, Airbags and pretensioners),
- the steering wheel (see 36A, Steering assembly,
Steering wheel: Removal - Refitting, page 36A-
39) (36A, Steering assembly),
- the radio control satellite (see Radio control satellite:
Removal - Refitting) (86A, Radio),
- the rotary switch (see Rotary switch: Removal -
Refitting) (84A, Controls - Signalling),
- the steering column switch assembly (see Steering
column switch assembly: Removal - Refitting)
(84A, Controls - Signalling),
- the dashboard lower cover on the driver's side (see
Dashboard: Removal - Refitting) (61A, Heating
system),
- the A-pillar air distribution duct (see Front footwell
air distribution duct: Removal - Refitting) (61A,
Heating system),
- the right-hand trim from the centre front panel,
- the steering column from the dashboard cross
member (see 36A, Steering assembly, Steering
column: Removal - Refitting, page 36A-16) (36A,
Steering assembly).
| Note:
It is not necessary to remove the steering column
from the steering box. |
II - OPERATION FOR REMOVAL OF PART
CONCERNED
- Separate the clutch master cylinder ball joint (1)
from the clutch pedal.
- Disconnect the connector (2) from the clutch pedal
switch.
CRUISE CONTROL
- Disconnect the connector (3) from the clutch pedal
switch.
FOOT BRAKE AUTOMATIC CONTROL
- Disconnect the position sensor connector (4) from
the clutch pedal.
- Unclip the electrical wiring from the clutch.
- Remove:
- the accelerator pedal nuts (5) ,
- the clutch pedal.
FOOT BRAKE AUTOMATIC CONTROL
- Remove the position sensor from the clutch pedal
(see 37A, Mechanical component controls,
Clutch pedal position sensor: Removal - Refitting,
page 37A-47) .
REFITTING
I - REFITTING OPERATION FOR PART
CONCERNED
FOOT BRAKE AUTOMATIC CONTROL
- Refit the clutch pedal position sensor on the clutch
pedal (see 37A, Mechanical component controls,
Clutch pedal position sensor: Removal - Refitting,
page 37A-47) .
- Refit:
- the clutch pedal,
- the clutch pedal nuts.
- Torque tighten the clutch pedal nuts (14 N.m).
- Connect the clutch pedal switch connector.
CRUISE CONTROL
- Connect the clutch pedal switch connector.
FOOT BRAKE AUTOMATIC CONTROL
- Connect the clutch pedal position sensor connector.
- Fit the clutch cylinder ball joint on the clutch pedal.
II - FINAL OPERATION.
- Refit:
- the steering column on the dashboard cross member
(see 36A, Steering assembly, Steering column:
Removal - Refitting, page 36A-16) (36A,
Steering assembly),
- the centre front panel right-hand trim
- the A-pillar air distribution duct (see Front footwell
air distribution duct: Removal - Refitting) (61A,
Heating system).
- the dashboard lower cover on the driver's side (see
Dashboard: Removal - Refitting) (61A, Heating
system),
- the steering column switch assembly (see Steering
column switch assembly: Removal - Refitting)
(84A, Controls - Signalling),
- the rotary switch (see Rotary switch: Removal -
Refitting) (84A, Controls - Signalling),
- the radio control satellite (see Radio control satellite:
Removal - Refitting) (86A, Radio),
- the steering wheel (see 36A, Steering assembly,
Steering wheel: Removal - Refitting, page 36A-
39) (36A, Steering assembly),
- the driver's front airbag (see Driver's frontal airbag:
Removal - Refitting) (88C, Airbags and pretensioners),
- Connect the battery (see Battery: Removal - Refitting)
(80A, Battery).
- Adjust the neutral position of the steering wheel angle
sensor (see Fault finding - Configurations and
programming (80C, Xenon bulbs).
|


