M9R
| IMPORTANT
Wear protective gloves during the operation. |
| WARNING
Do not run the engine without the accessories belt
to avoid damaging the crankshaft accessories pulley. |
REMOVAL
I - REMOVAL PREPARATION OPERATION
| IMPORTANT
To prevent the vehicle from falling, lash it to the
vehicle lift using a strap. |
- Position the vehicle on a two-post lift.
- Remove:
- the front right-hand wheel
- the front right-hand wheel arch liner
II - OPERATION FOR REMOVAL OF PART
CONCERNED
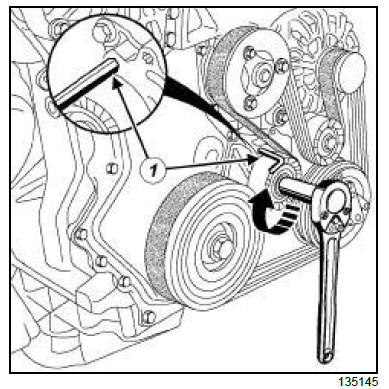
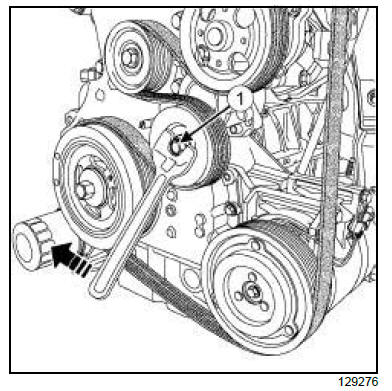
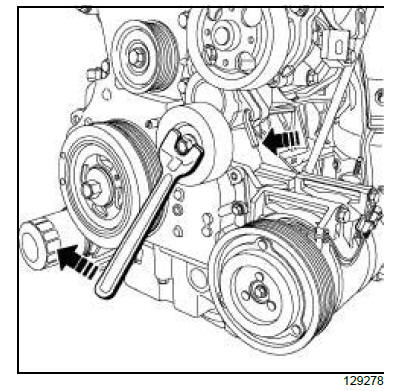
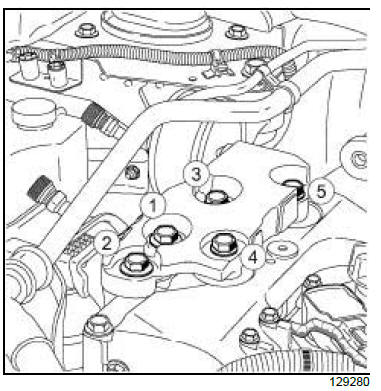
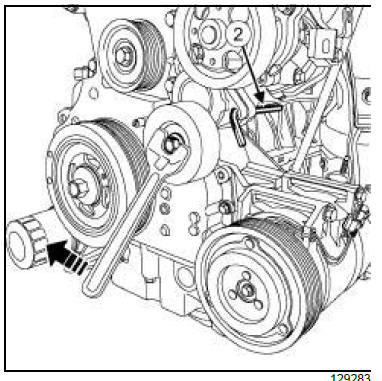
- Place a 3 mm Allen key (1) in the tensioning roller
hole.
- Rotate the tensioning roller clockwise and push on
the key at the same time until the tensioning roller
locks.
- Remove the accessories belt.
- Turn the tensioning roller slightly in a clockwise direction.
- Remove the 3 mm Allen key.
- Turn the tensioning roller anti-clockwise until it locks.
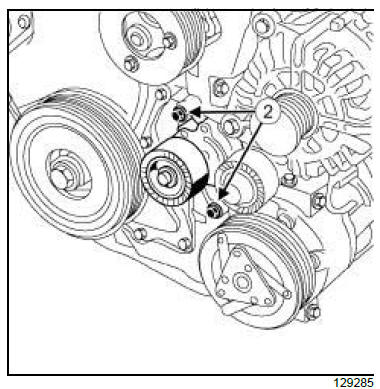
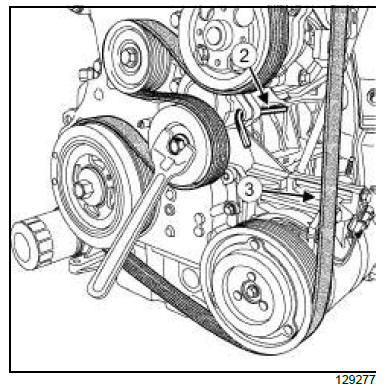
- Remove:
- the tensioning roller bolts (2) ,
- the tensioning roller.

- Remove:
- the fixed roller bolt protector (3) ,
- the fixed roller bolt (4) ,
- the fixed roller.
REFITTING
I - REFITTING PREPARATION OPERATION
- parts always to be replaced: Accessories belt
(10,10,01,03)
parts always to be replaced: Accessories belt
tensioning roller (10,10,01,04)
parts always to be replaced: Accessories fixed
roller (10,10,01,06)
| WARNING
Only use brushes with plastic or non-corrosive
metal (brass) bristles. |
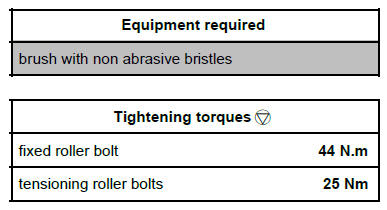
| Note:
Clean the V-grooves on all accessories pulleys
using a brush with non abrasive bristles. |
| Note:
The Parts Department supplies the tensioning
roller with a pin in the locked position. |
II - REFITTING OPERATION FOR PART
CONCERNED
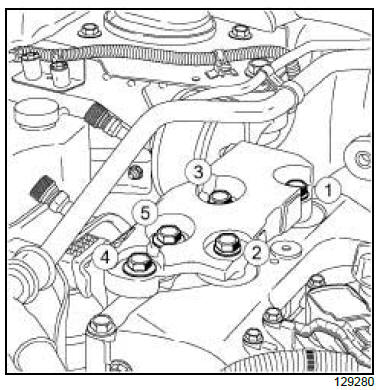
- Refit:
- the new fixed roller,
- the fixed roller bolt.
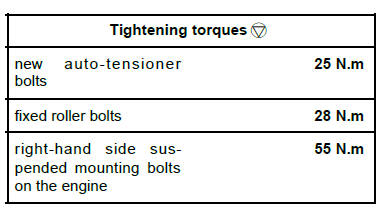
- Torque tighten the fixed roller bolt (44 N.m).
- Refit:
- the fixed roller bolt protector,
- the new tensioning roller,
- the tensioning roller bolts.
- Torque tighten the tensioning roller bolts (25 Nm).
- Refit the new accessories belt.
- Turn the tensioning roller slightly in a clockwise direction.
- Remove the tensioning roller locking pin.
- Turn the crankshaft twice.
- Check that the accessories belt V-grooves are correctly
fitted in the accessories pulley V-grooves.
III - FINAL OPERATION
- Refit:
- the front right-hand wheel arch liner
- the front right-hand wheel
2TR, and AIR CONDITIONING 01 or AIR CONDITIONING 02
| IMPORTANT
Wear protective gloves during the operation. |
| WARNING
Do not run the engine without the accessories belt
to avoid damaging the crankshaft accessories pulley. |
REMOVAL
I - REMOVAL PREPARATION OPERATION
| IMPORTANT
To prevent the vehicle from falling, lash it to the
vehicle lift using a strap. |
- Position the vehicle on a two-post lift.
- Remove:
- the front right-hand wheel
- the front right-hand flap
- the front right-hand wheel arch liner
II - OPERATION FOR REMOVAL OF PART
CONCERNED
- Carefully rotate the tensioning roller bolt (1) clockwise,
to release the accessories belt.
| Note:
Do not rotate the tensioning roller bolt anticlockwise.
If the tensioning roller bolt is turned anticlockwise,
replace the auto tensioner and
tensioning roller at the same time. |
- Insert an Allen key (2) in the auto tensioner to maintain
the play in the accessories belt.
- Remove the accessories belt (3) .
- Remove the Allen key whilst carefully rotating the
tensioning roller bolt clockwise.
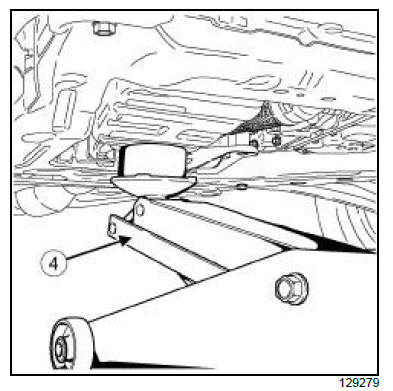
- Place the trolley jack (4) or an equivalent engine
support tool under the lower section of the engine.
| Note:
Do not remove bolt N 1 or 2 from the right-hand
side suspended mounting on the engine. |
- Loosen in order the N 1 and 2 bolts of the right-hand
side suspended mounting on the engine.
- Remove the remaining bolts from the right-hand side
suspended mounting on the engine in order.
| Note:
Carefully lower the jack to perform the following
operation. |
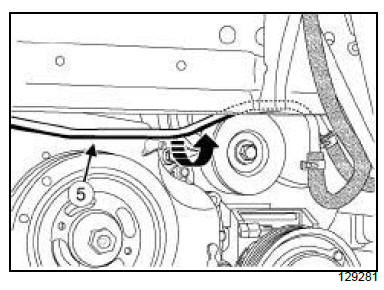
- Unclip the petrol vapour breathing pipe (5) .
- Separate the petrol vapour breathing pipe on one
side.
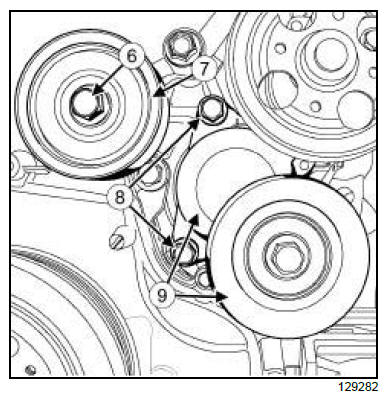
- Remove:
- the fixed roller bolt (6) ,
- the fixed roller (7) ,
- the auto tensioner bolts (8) ,
- the auto tensioner and the tensioning roller (9) at
the same time.
REFITTING
I - REFITTING PREPARATION OPERATION
- parts always to be replaced: Accessories belt
(10,10,01,03)
parts always to be replaced: Accessories belt
tensioning roller (10,10,01,04)
parts always to be replaced: Accessories fixed
roller (10,10,01,06)
parts always to be replaced: Accessories tensioning
roller bolt (10,10,01,09)
II - REFITTING OPERATION FOR PART
CONCERNED
- Use a brush to remove any deposits from the crankshaft
accessories pulley V-grooves.
- Refit:
- the new auto tensioner and the tensioning roller (9)
at the same time,
- the new auto tensioner bolts (8) .
- Torque tighten the new auto-tensioner bolts (25
N.m) (8) .
- Refit:
- the fixed roller (7) ,
- the fixed roller bolt (6)
- Torque tighten the fixed roller bolts (28 N.m) (6) .
- Clip on the petrol vapour rebreathing pipe (5)
| Note:
Carefully lower the jack to perform the following
operation. |
- Refit the right-hand side suspended mounting bolts
on the engine.
- Torque tighten the right-hand side suspended
mounting bolts on the engine (55 N.m).
- Place the trolley jack (4) or an equivalent engine
support tool under the lower section of the engine.
- Carefully rotate the tensioning roller bolt clockwise,
to insert an Allen key (2) in the auto tensioner.
| Note:
Do not rotate the tensioning roller bolt anticlockwise.
If the tensioning roller bolt is turned anticlockwise,
replace the auto tensioner and
tensioning roller at the same time. |
- Refit the new accessories belt (3) .
- Remove the Allen key (2) , whilst carefully rotating
the tensioning roller bolt (1) clockwise.
- Turn the camshaft around twice to fit the accessories
belt correctly.
III - FINAL OPERATION
- Refit:
- the front right-hand wheel arch liner
- the front right-hand flap
- the front right-hand wheel
|


