| IMPORTANT
Consult the safety and cleanliness advice and operation
recommendations before carrying out any
repair. |
| WARNING
To prevent moisture from entering the system,
place plugs on the cold loop components which are
open to the air. |
REMOVAL
I - REMOVAL PREPARATION OPERATION
- Position the vehicle on a two-post lift (see Vehicle:
Towing and lifting) (02A, Lifting equipment).
- Drain the refrigerant circuit using the refrigerant
charging station (see 62A, Air conditioning, Coolant
circuit Draining - Refilling, page 62A-11) .
| IMPORTANT
To prevent the pyrotechnic components from
being permanently deactivated or triggered (airbags
or pretensioners), wait for at least 3 minutes
after disconnecting the battery. |
- Disconnect the battery (see Battery : Removal -
Refitting) (80A, Battery).
- Remove:
- the driver's front airbag (see Driver's front airbag:
Removal - Refitting) (88C, Airbags and pretensioners),
- the steering wheel (see Steering wheel: Removal
- Refitting) (36A, Steering assembly),
- the rotary switch (see Rotary switch: Removal -
Refitting) (84A, Control - Signal),
- the steering column switch assembly (see Steering
wheel controls assembly: Removal - Refitting)
(84A, Controls - Signalling),
- the instrument panel (see Instrument panel: Removal
- Refitting) (83A, Instrument panel),
- the solar radiation detector (see 61A, Heating, Insolation
sensor: Removal - Refitting, page 61A-
76) ,
- the tweeter (see Tweeter: Removal - Refitting)
(86A, Radio),
- the front speaker (see Front speakers: Removal -
Refitting) (86A, Radio),
- the display (see Display: Removal - Refitting)
(86A, Radio),
- the navigation screen (see Navigation screen:
Removal - Refitting) (83C, On-board telematics
system),
- the CD changer (see CD changer: Removal - Refitting)
(86A, Radio),
- the radio (see Car radio: Removal - Refitting)
(86A, Radio),
- the control panel (see 61A, Heating, Control panel:
Removal - Refitting, page 61A-48) ,
- the starter control panel (see Card reader: Removal
- Refitting) (82A, Immobiliser),
- the central console (see Centre console: Removal
- Refitting) (57A, Interior equipment),
- the dashboard (see Dashboard: Removal - Refitting)
(57A, Interior equipment),
- the dashboard cross member (see Dashboard
cross member: Removal - Refitting) (42A, Upper
front structure).
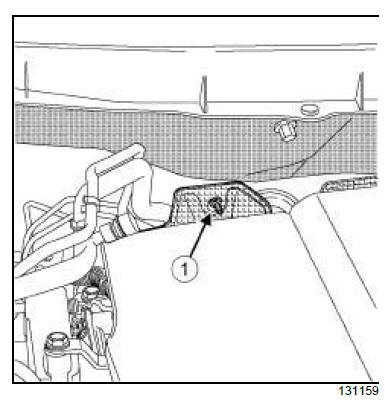
- Remove the nut (1) .
- Lift the bulkhead insulation.
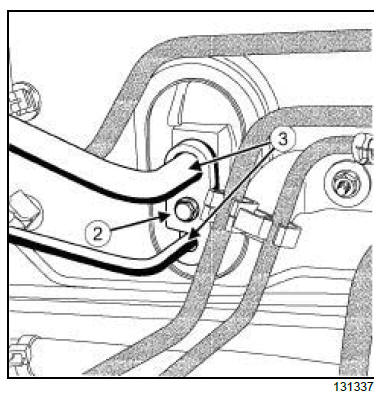
- Remove:
- the bolt (2) of the pipe union,
- the expansion valve pipe union.
| WARNING
In order to avoid any refrigerant leaks, do not
damage (deform, twist, etc.) the pipe. |
- Disconnect the expansion valve connection pipes
(3) .
- Fit plugs into the openings.
- Remove the air filter housing (see Air filter unit: Removal
- Refitting) (12A, Fuel mixture).
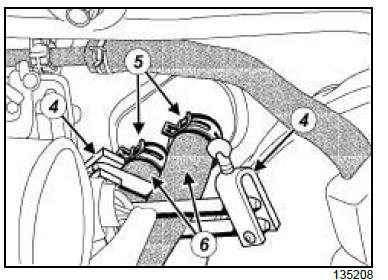
- Fit the hose clamps (Ms. 583) (4) on the heater matrix
inlet and outlet hoses.
- Remove the clips (5) from the heater matrix hoses.
- Disconnect the heater matrix hoses (6) .
- Remove the bracket for the heater matrix pipes (see
61A, Heating, Heater matrix: Removal - Refitting,
page 61A-29) .
II - OPERATION FOR REMOVAL OF PART
CONCERNED
- Remove the air distribution unit.
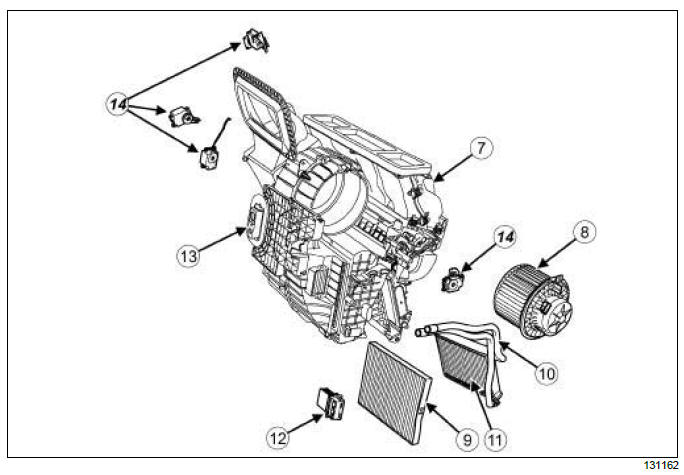
- Remove the following air distribution unit components
(7) :
- the fan assembly (8) ,
- the cabin filter (9) ,
- the heater matrix pipes (10) ,
- the heater matrix (11) ,
- the heating resistor (if the vehicle is fitted with one),
- the fan assembly control unit (12) ,
- the expansion valve (13) ,
- the control cables (if the vehicle is fitted with them),
- the motors (14) (if the vehicle is fitted with them).
REFITTING
I - REFITTING PREPARATION OPERATION
- Check that the parts are in good condition and if necessary,
replace any defective parts.
- Refit the following components to the air distribution
unit:
- the motors (if the vehicle is fitted with them),
- the control cables (if the vehicle is fitted with them),
- the expansion valve,
- the fan assembly control unit,
- the heating resistor (if the vehicle is fitted with one),
- the heater matrix,
- the heater matrix pipes,
- the cabin filter,
- the fan assembly.
II - REFITTING OPERATION FOR PART
CONCERNED
- Refit the air distribution unit.
III - FINAL OPERATION
- Refit the bracket for the heater matrix pipes (see
61A, Heating, Heater matrix: Removal - Refitting,
page 61A-29) .
- Connect the heater matrix hoses.
- Refit the clips on the heater matrix hoses.
- Remove the hose clamps (Ms. 583).
- Refit the air filter housing (see Air filter unit: Removal
- Refitting) (12A, Fuel mixture).
| WARNING
Do not remove the blanking plugs from each
component until the last moment.
Also, do not remove the components from their
packaging until they are to be fitted to the vehicle. |
- Remove the plugs from the openings.
- Connect the connecting pipes to the expansion valve.
- Refit:
- the pipe union to the expansion valve,
- the bolt to the pipe union.
- Torque tighten the pipe union bolt (4 N.m).
- Refit:
- the bulkhead insulation in its original position,
- the nut of the bulkhead insulation,
- the dashboard cross member (see Dashboard
cross member: Removal - Refitting) (42A, Upper
front structure),
- the dashboard (see Dashboard: Removal - Refitting)
(57A, Interior equipment),
- the central console (see Centre console: Removal
- Refitting) (57A, Interior equipment),
- the starter control panel (see Card reader: Removal
- Refitting) (82A, Immobiliser),
- the control panel (see 61A, Heating, Control panel:
Removal - Refitting, page 61A-48) ,
- the radio (see Car radio: Removal - Refitting)
(86A, Radio),
- the CD changer (see CD changer: Removal - Refitting)
(86A, Radio),
- the navigation screen (see Navigation screen:
Removal - Refitting) (83C, On-board telematics
system),
- the display (see Display: Removal - Refitting)
(86A, Radio),
- the front speaker (see Front speakers: Removal -
Refitting) (86A, Radio),
- the tweeter (see Tweeter: Removal - Refitting)
(86A, Radio),
- the solar radiation detector (see 61A, Heating, Insolation
sensor: Removal - Refitting, page 61A-
76) ,
- the instrument panel (see Instrument panel: Removal
- Refitting) (83A, Instrument panel),
- the steering column switch assembly (see Steering
wheel controls assembly: Removal - Refitting)
(84A, Controls - Signalling),
- the rotary switch (see Rotary switch: Removal -
Refitting) (84A, Control - Signal),
- the steering wheel (see Steering wheel: Removal
- Refitting) (36A, Steering assembly),
- the driver's front airbag (see Driver's front airbag:
Removal - Refitting) (88C, Airbags and pretensioners).
- Connect the battery (see Battery : Removal - Refitting)
(80A, Battery).
- Perform the following operations:
- fill the cooling system (see Cooling circuit: Draining
- Refilling) (19A, Cooling),
- bleed the cooling system (see Cooling circuit:
Draining - Refilling) (19A, Cooling),
- check the cooling system (see Engine cooling circuit:
check) (19A, Cooling),
- fill the refrigerant circuit using the refrigerant charging
station (see 62A, Air conditioning, Coolant
circuit Draining - Refilling, page 62A-11) .
- Check:
- that the air conditioning system is operating correctly
(see 62A, Air conditioning, Air conditioning:
Check, page 62A-6) ,
- that there are no leaks (see 62A, Air conditioning,
Air conditioning: Check, page 62A-6) .
|


