REMOVAL
I - REMOVAL PREPARATION OPERATION
- Position the vehicle on a two-post lift (see Vehicle:
Towing and lifting) (02A, Lifting equipment).
- Release the parking brake.
- Remove:
- the rear wheels (see 35A, Wheels and tyres,
Wheel: Removal - Refitting, page 35A-1) (35A,
Wheels and tyres),
- the rear brake calliper without disconnecting it from
the brake hose (see 33A, Rear axle components,
Rear brake calliper: Removal - Refitting, page
33A-5) .
- Suspend the rear brake calliper.
- Remove:
- the rear brake pads (see 33A, Rear axle components,
Rear brake pads: Removal - Refitting,
page 33A-1) ,
- the rear brake calliper mounting (see 33A, Rear
axle components, Rear brake calliper mounting:
Removal - Refitting, page 33A-7) ,
- the rear brake disc (see 33A, Rear axle components,
Rear brake disc: Removal - Refitting,
page 33A-13) .
II - OPERATION FOR REMOVAL OF PART
CONCERNED
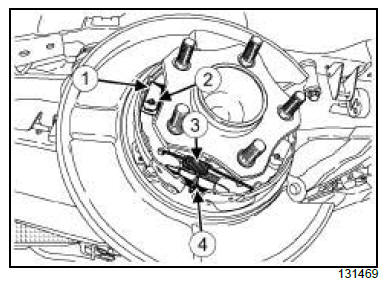
- Remove:
- the side retainers (1) by rotating the connecting
rods (2) while pressing against the rear brake disc
shield on both sides,
- the lower return spring (3) ,
- the lower return spring adjuster (4) .
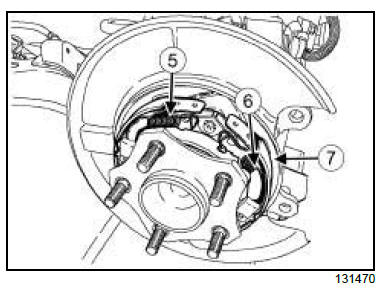
- Remove:
- the upper return springs, (5)
- the upper return spring bracket (6) ,
- the brake linings (7) .
REFITTING
I - REFITTING PREPARATION OPERATION
- Clean the parking brake linings and the rear brake
disc.
- Lightly lubricate the lower return spring adjuster (4) .
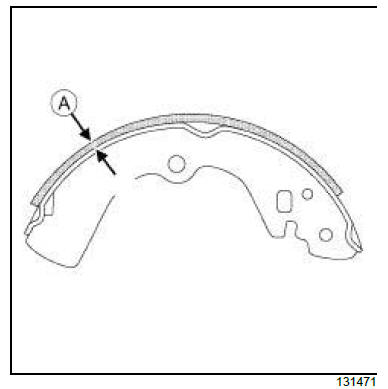
- Check the thickness (A) of the rear brake lining:
- thickness of the disc lining: 3.25 mm,
- minimum thickness of the disc lining:1.5 mm.
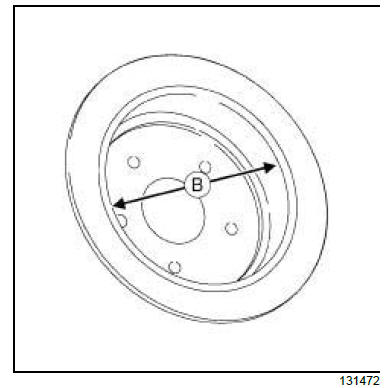
- Check the diameter (B) of the rear brake drum:
- drum diameter: 172 mm,
- maximum diameter of drum wear: 173 mm.
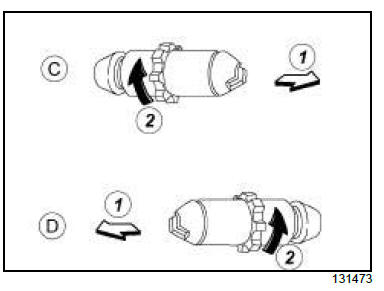
(C) For the right-hand side brake
(D) For the left-hand side brake
(1) Front of the vehicle
(2) Expanding the adjuster
- Assemble the adjuster so that the threaded part is
expanded when rotating the adjuster in the direction
shown by the arrow.
II - REFITTING PART CONCERNED
- Refit:
- the brake linings (7) ,
- the upper return spring bracket (6) ,
- the upper return springs, (5)
- the lower return spring adjuster (4) ,
- the lower return spring (3) ,
- the side retainers (1) by rotating the connecting
rods (2) while pressing against the rear brake disc
shield.
III - FINAL OPERATION
- Refit:
- the rear brake disc (see 33A, Rear axle components,
Rear brake disc: Removal - Refitting,
page 33A-13) ,
- the rear brake calliper mounting (see 33A, Rear
axle components, Rear brake calliper mounting:
Removal - Refitting, page 33A-7) ,
- the rear brake pads (see 33A, Rear axle components,
Rear brake pads: Removal - Refitting,
page 33A-1) ,
- the rear brake calliper (see 33A, Rear axle components,
Rear brake calliper: Removal - Refitting,
page 33A-5) ,
- the rear wheels (see 35A, Wheels and tyres,
Wheel: Removal - Refitting, page 35A-1) .
FOOT BRAKE MANUAL CONTROL
- Adjust the parking brake cables (see 37A, Mechanical
component controls, Parking brake lever:
Adjustment, page 37A-38) .
- After replacing the parking brake linings, perform the
brake-in operation as follows:
- adjust the parking brake cables (see 37A, Mechanical
component controls, Parking brake lever:
Adjustment, page 37A-38) ,
- perform the parking brake break-in operation using
Diagnostic tool by driving the vehicle under the
following conditions:
- Vehicle speed: 24 mph (40 km/h),
- Parking brake lever operating force: 130 N (5
notches),
- Distance: 200~ 233 m,
- Braking time: 18~21 sec.
| Note:
To prevent the lining from overheating, allow a
cool-off period of approximately 5 minutes after
every break-in operation. |
- After the break-in procedure, check the lever stroke
of the parking brake. If it does not conform to the
specifications, repeat the adjustment (see 37A, Mechanical
component controls, Parking brake lever:
Adjustment, page 37A-38) .
FOOT BRAKE AUTOMATIC CONTROL
- With the ignition on, push the handle to release the
assisted parking brake. Then pull the handle so that
the automatic parking brake locking function is signalled
by a sound and the play compensation is set
automatically.
- After replacement of the parking brake linings, perform
the break-in operation using the Diagnostic
tool (see Fault finding: Programming) (37B, Electronic
parking brake).
|


