4X2 TRANSMISSION
REMOVAL
I - REMOVAL PREPARATION OPERATION
- Position the vehicle on a two-post lift (see Vehicle:
Towing and lifting) (02A, Lifting equipment).
- Remove:
- the rear wheels (see 35A, Wheels and tyres,
Wheel: Removal - Refitting, page 35A-1) ,
- the rear brake calliper without disconnecting it from
the brake hose (see 33A, Rear axle components,
Rear brake pads: Removal - Refitting, page 33A-
1) .
- Suspend the rear brake calliper.
- Remove:
- the rear brake pads (see 33A, Rear axle components,
Rear brake pads: Removal - Refitting,
page 33A-1) ,
- the rear brake calliper mounting (see 33A, Rear
axle components, Rear brake calliper mounting:
Removal - Refitting, page 33A-7) ,
- the rear brake disc (see 33A, Rear axle components,
Rear brake disc: Removal - Refitting,
page 33A-13) ,
- the rear brake lining (see 33A, Rear axle components,
Rear brake lining: Removal - Refitting,
page 33A-15)
II - OPERATION FOR REMOVAL OF PART
CONCERNED
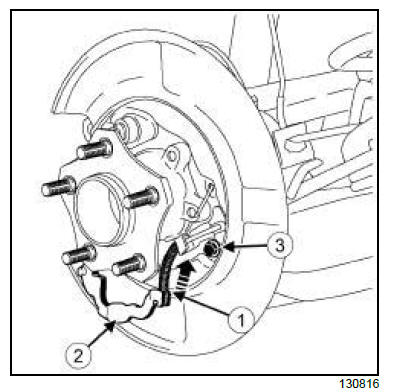
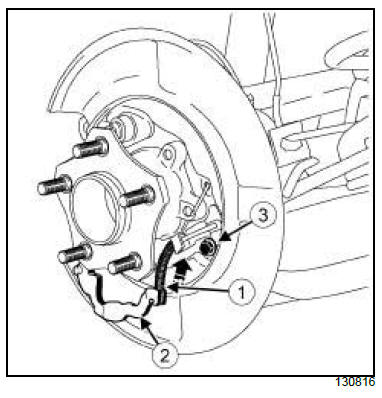
- Unhook the parking brake cable (1) from the parking
brake lever (2) .
- Remove the bolt (3) of the parking brake cable from
the rear brake disc shield.

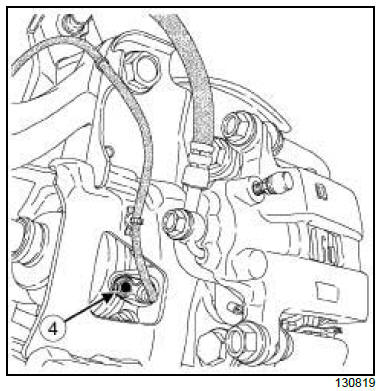
- Remove:
- the rear wheel speed sensor bolt (4) ,
- the rear wheel speed sensor of the rear wheel hub,
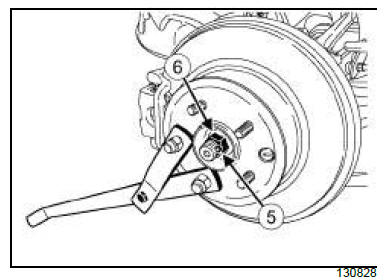
- the rear wheel hub bolts (5) ,
- the rear wheel hub,
- the rear brake disc shield.
REFITTING
I - REFITTING OPERATION FOR PART
CONCERNED
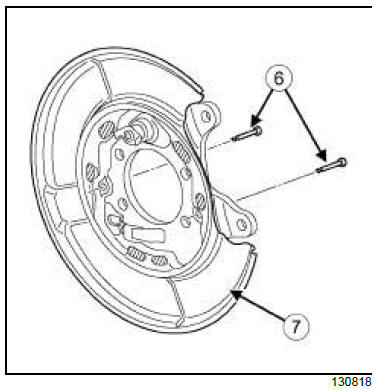
- Refit:
- the rear brake lining connecting rods (6) on the rear
brake disc shield,
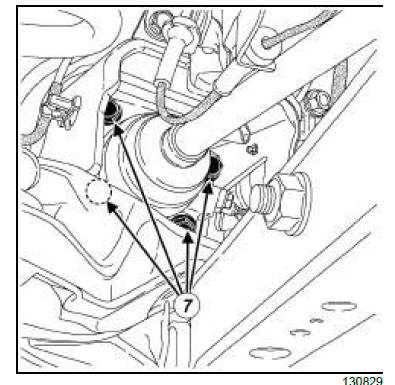
- the rear brake disc shield (7) ,
- the rear wheel hub,
- the rear wheel hub bolts,
- the rear wheel speed sensor on the rear wheel hub,
- the rear wheel speed sensor bolt.
- Torque tighten:
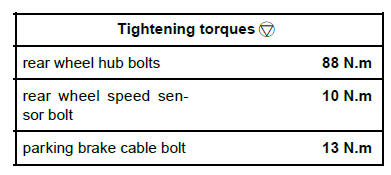
- the rear wheel hub bolts (88 N.m),
- the rear wheel speed sensor bolt (10 N.m).
- Refit:
- the parking brake cable to the parking brake lever,
- the parking brake cable bolt on to the rear brake
disc shield,
- Torque tighten the parking brake cable bolt (13
N.m) on the rear brake disc shield.
II - FINAL OPERATION.
- Refit:
- the rear brake lining (see 33A, Rear axle components,
Rear brake lining: Removal - Refitting,
page 33A-15) ,
- the rear brake disc (see 33A, Rear axle components,
Rear brake disc: Removal - Refitting,
page 33A-13) ,
- the rear brake calliper mounting (see 33A, Rear
axle components, Rear brake calliper mounting:
Removal - Refitting, page 33A-7) ,
- the rear brake pads (see 33A, Rear axle components,
Rear brake pads: Removal - Refitting,
page 33A-1) ,
- the rear brake calliper (see 33A, Rear axle components,
Rear brake pads: Removal - Refitting,
page 33A-1) ,
- the rear wheels (see 35A, Wheels and tyres,
Wheel: Removal - Refitting, page 35A-1) .
| IMPORTANT
To avoid any accident, bring the pistons, brake
pads and brake discs into contact by depressing
the brake pad several times. |
FOOT BRAKE MANUAL CONTROL
- Adjust the parking brake cables (see 37A, Mechanical
component controls, Parking brake lever:
Adjustment, page 37A-38) .
FOOT BRAKE AUTOMATIC CONTROL
- With the ignition on, push the handle to release the
assisted parking brake. Then pull the handle, so that
automatic parking brake locking function is signalled
by a sound and the play compensation is set automatically.
4X4 TRANSMISSION
REMOVAL
I - REMOVAL PREPARATION OPERATION
- Position the vehicle on a two-post lift (see Vehicle:
Towing and lifting) (02A, Lifting equipment).
- Remove:
- the rear wheel (see 35A, Wheels and tyres,
Wheel: Removal - Refitting, page 35A-1) ,
- the rear brake calliper without disconnecting the
brake hose (see 33A, Rear axle components,
Rear brake pads: Removal - Refitting, page 33A-
1) .
- Suspend the rear brake calliper.
- Remove:
- the rear brake pads (see 33A, Rear axle components,
Rear brake pads: Removal - Refitting,
page 33A-1) ,
- the rear brake calliper mounting (see 33A, Rear
axle components, Rear brake calliper mounting:
Removal - Refitting, page 33A-7) ,
- the rear brake disc (see 33A, Rear axle components,
Rear brake disc: Removal - Refitting,
page 33A-13) ,
- the rear brake lining (see 33A, Rear axle components,
Rear brake lining: Removal - Refitting,
page 33A-15)
II - OPERATION FOR REMOVAL OF PART
CONCERNED
- Unhook the parking brake cable (1) from the parking
brake lever (2) .
- Remove the parking brake cable bolt (3) from the
rear brake disc shield.
- Remove:
- the rear wheel speed sensor bolt (4) ,
- the rear wheel speed sensor of the rear wheel hub.
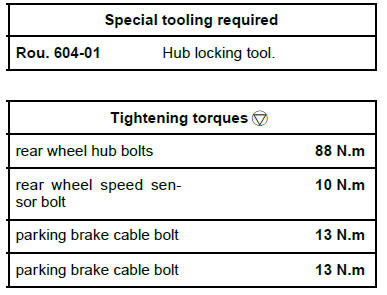
- Position the tool (Rou. 604-01) on the rear wheel
hub.
- Remove:
- the cotter pin (5) ,
- the rear wheel hub nut (6) .
| Note:
To avoid damaging the " rear brake lining - brake
disc shield " assembly, carefully remove the rear
wheel hub. |
- Remove:
- the rear wheel hub bolts (7) ,
- the rear wheel hub,
- the rear brake disc protector.
REFITTING
I - REFITTING PREPARATION OPERATION
- Always replace the cotter pin.
II - REFITTING OPERATION FOR PART
CONCERNED
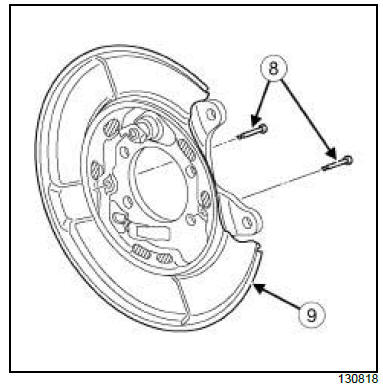
- Refit:
- the rear brake lining connecting rods (8) on to the
rear brake disc shield (9) ,
- the rear brake disc shield,
- the rear wheel hub,
- the rear wheel hub bolts,
- the rear wheel speed sensor on the rear wheel hub,
- the rear wheel speed sensor bolt.
- Torque tighten:
- the rear wheel hub bolts (88 N.m),
- the rear wheel speed sensor bolt (10 N.m).
- Refit the rear wheel hub nut using the tool (Rou.604-01).
- Torque tighten the parking brake cable bolt (13
N.m) on the rear brake disc shield.
- Refit the new cotter pin.
- Refit:
- the parking brake cable to the parking brake lever,
- the parking brake cable bolt on to the rear brake
disc shield,
- Torque tighten the parking brake cable bolt (13
N.m) on the rear brake disc shield.
III - FINAL OPERATION.
- Refit:
- the rear brake lining (see 33A, Rear axle components,
Rear brake lining: Removal - Refitting,
page 33A-15) ,
- the brake disc (see 33A, Rear axle components,
Rear brake disc: Removal - Refitting, page 33A-
13) ,
- the rear brake calliper mounting (see 33A, Rear
axle components, Rear brake calliper mounting:
Removal - Refitting, page 33A-7) ,
- the rear brake pads (see 33A, Rear axle components,
Rear brake pads: Removal - Refitting,
page 33A-1) ,
- the rear brake calliper without disconnecting it from
the brake hose (see 33A, Rear axle components,
Rear brake pads: Removal - Refitting, page 33A-
1) ,
- the rear wheel (see 35A, Wheels and tyres,
Wheel: Removal - Refitting, page 35A-1) .
| IMPORTANT
To avoid any accident, bring the pistons, brake
pads and brake discs into contact by depressing
the brake pad several times. |
FOOT BRAKE MANUAL CONTROL
- Adjust the parking brake cables (see 37A, Mechanical
component controls, Parking brake lever:
Adjustment, page 37A-38) .
FOOT BRAKE AUTOMATIC CONTROL
- With the ignition on, push the handle to release the
assisted parking brake. Then pull the handle, so that
automatic parking brake locking function is signalled
by a sound and the play compensation is set automatically.
|


