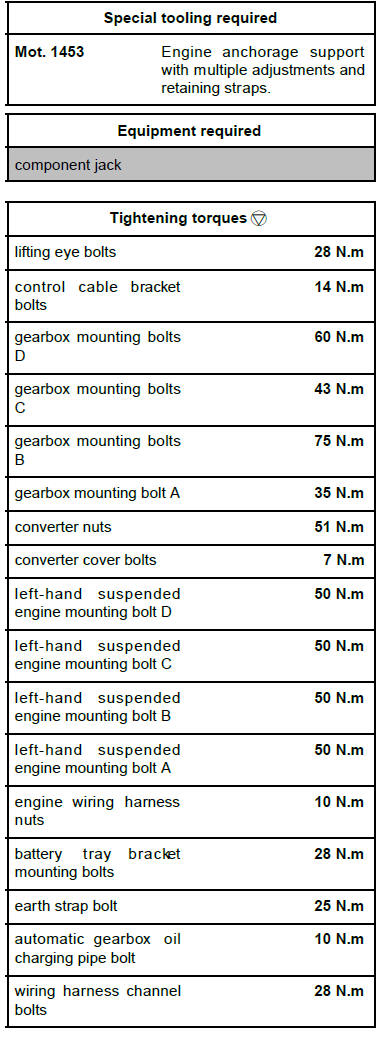
6-SPEED AUTOMATIC GEARBOX
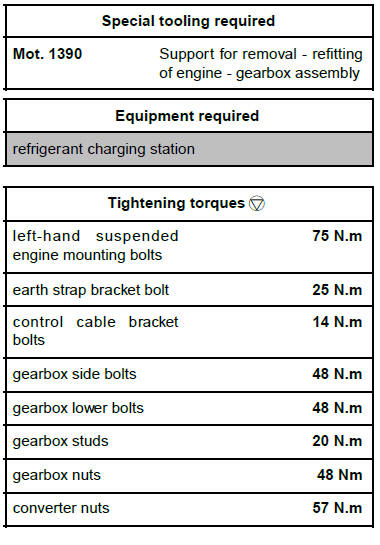
| IMPORTANT
Consult the safety and cleanliness advice and operation
recommendations before carrying out any
repair. |
REMOVAL
I - REMOVAL PREPARATION OPERATION
- Position the vehicle on a two-post lift.
| IMPORTANT
To prevent the vehicle from falling, lash it to the
vehicle lift using a strap. |
- Remove:
- the air inlet sleeve
- the battery
- the battery tray
- Drain the refrigerant circuit using the refrigerant
charging station
- Remove the engine undertray.
- Drain:
- the cooling circuit
- the automatic gearbox
- Remove:
- the front wheels
- the front wheel arch liners
- the front left-hand driveshaft
- the front right-hand driveshaft
- the particle filter
- the rear suspended engine mounting
- the front axle subframe
4X4 TRANSMISSION
- Disconnect the propshaft from the transfer box.
- Secure the propshaft to the control cable using a
string.
- Remove the transfer box.
- Remove:
- the engine - gearbox assembly
- the engine - gearbox assembly from the tool (Mot.1390) using a workshop hoist,
- the starter
II - OPERATION FOR REMOVAL OF PART
CONCERNED
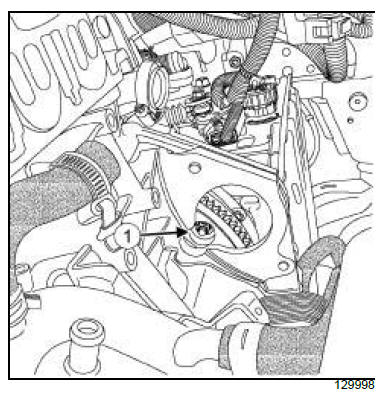
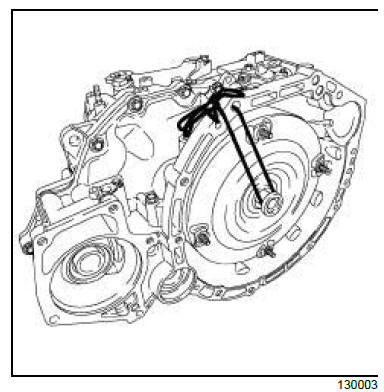
- Remove the four nuts (1) from the torque converter
by rotating the crankshaft clockwise.

- Remove:
- the gearbox nuts (2) ,
- the gearbox studs (3) .
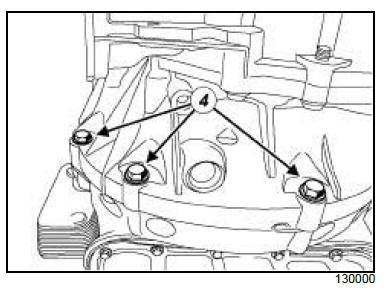
- Remove the gearbox lower bolts (4) .
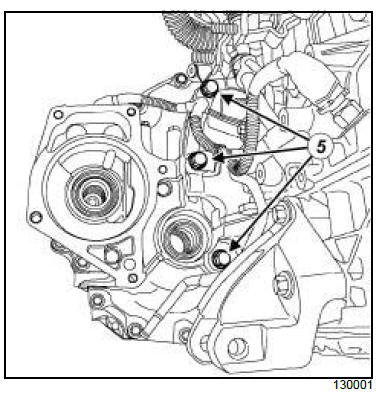
- Remove:
- the gearbox side bolts (5) ,
- the automatic gearbox.
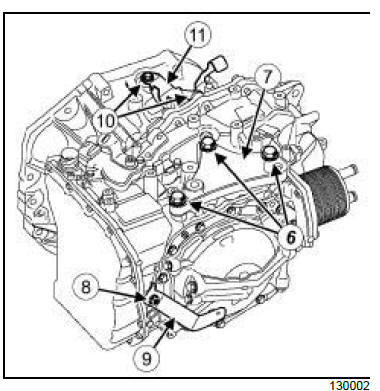
- Remove:
- the left-hand suspended engine mounting bolts (6)
,
- the left-hand suspended engine mounting (7) ,
- the earth strap bracket bolt (8) ,
- the earth strap bracket (9) ,
- the control cable bracket bolts (10) ,
- the control cable bracket (11) .
- Secure the converter with string to prevent it from
being dislodged.
REFITTING
I - REFITTING PREPARATION OPERATION
- Always replace the converter nuts.
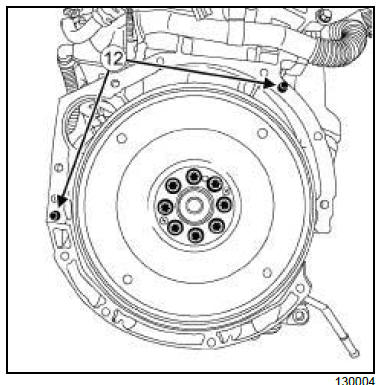
- Check:
- that the centring dowels are in place (12) ,
- that the drive plate is not damaged (run-out tolerance
of 0.2 mm on the outer diameter).
II - REFITTING OPERATION FOR PART
CONCERNED
- Refit:
- the automatic gearbox,
- the gearbox side bolts,
- the gearbox lower bolts,
- the gearbox studs (3) ,
- the gearbox nuts (2) .
- Torque tighten:
- the gearbox side bolts (48 N.m),
- the gearbox lower bolts (48 N.m),
- the gearbox studs (20 N.m),
- the gearbox nuts (48 Nm).
- Refit the new converter nuts by rotating the crankshaft
clockwise.
- Torque tighten the converter nuts (57 N.m).
III - FINAL OPERATION.
- Refit:
- the starter
- the engine - gearbox assembly on the (Mot. 1390)
using a workshop hoist,
- the engine - gearbox assembly.
4X4 TRANSMISSION
- Refit:
- the transfer box
- the propshaft on the transfer box
- Refit:
- the front left-hand driveshaft
- the front right-hand driveshaft
- the front axle subframe
- the particle filter
- the rear suspended engine mounting
- Perform the following operations:
- top up and bleed the cooling circuit
- top up the oil in the automatic gearbox
- top up the refrigerant circuit using the refrigerant
charging station
- Refit:
- the front wheel arch liners
- the front wheels
- the battery tray
- the battery
- the air inlet sleeve
FK0 or FK8
| IMPORTANT
Consult the safety and cleanliness advice and operation
recommendations before carrying out any
repair. |
REMOVAL
I - REMOVAL PREPARATION OPERATION
- Position the vehicle on a two-post lift.
| IMPORTANT
To prevent the vehicle from falling, lash it to the
vehicle lift using a strap. |
- Remove the engine undertray.
- Drain:
- the cooling system
- the automatic gearbox
- Remove:
- the battery
- the battery tray
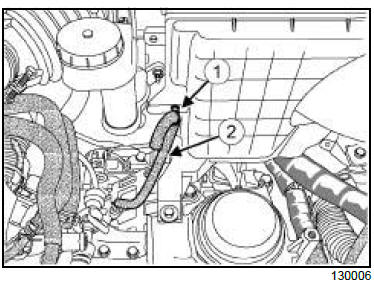
- Unclip the breather hose clip (1) .
- Remove the breather hose (2) .
- Remove:
- the engine cover
- the air inlet sleeve
- the air resonator
- the air filter box
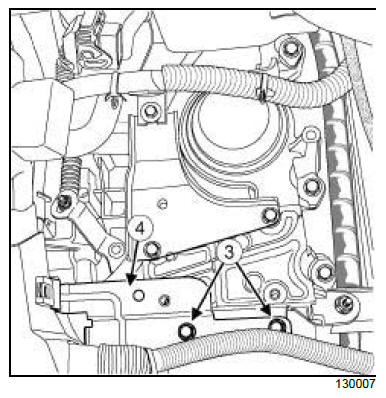
- Remove the bolts (3) from the engine wiring harness
channel.
- Remove the wiring harness channel (4) .
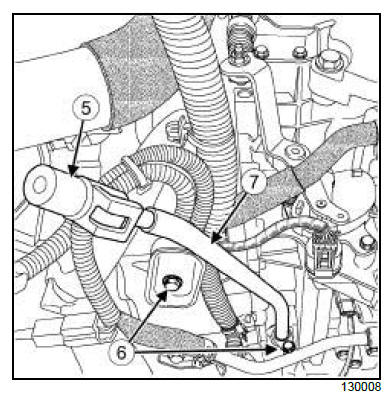
- Remove:
- the oil level gauge (5) from the automatic gearbox,
- the automatic gearbox oil charging pipe bolts (6) ,
- the automatic gearbox oil charging pipe (7) ,
- the O-ring from the automatic gearbox oil charging
pipe.
- Disconnect:
- the speed sensor connectors
- the multifunction switch connector
- the automatic gearbox control cable
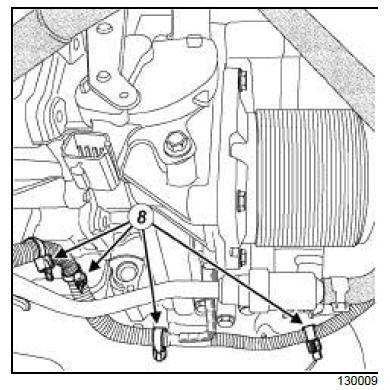
- Unclip the automatic gearbox wiring clips (8) .
- Remove:
- the front wheels
- the front wheel arch liners

- Disconnect the automatic transmission connector
(9) .
- Remove:
- the earth strap bolt (10) ,
- the automatic gearbox cooling hoses
- the starter
- the front left-hand driveshaft
- the front right-hand driveshaft
- the rear suspended engine mounting
- the front axle subframe
- the connector pipe.
FK8
- Remove the propshaft from the transfer box.
- Secure the propshaft to the control cable bracket using
a string.
- Remove the transfer box.
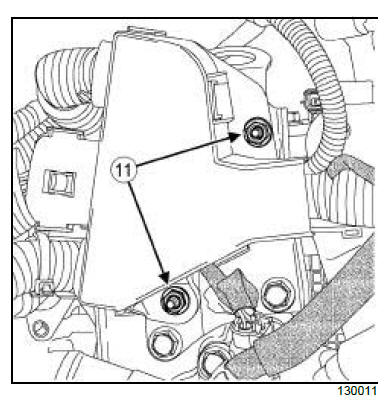
- Remove the engine wiring harness nuts (11) .
- Move the wiring harness to one side.
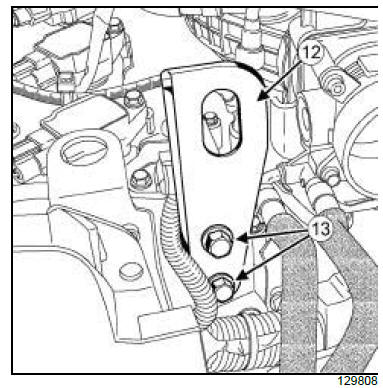
- Fit:
- the lifting eye (12) ,
- the lifting eye bolts (13) .
- Torque tighten the lifting eye bolts (28 N.m).
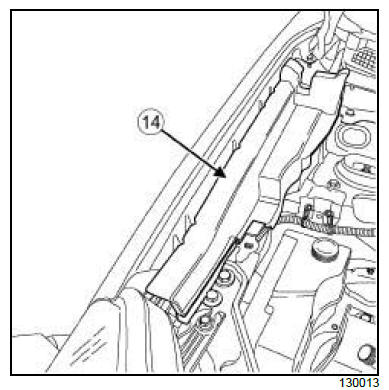
- Remove the hood seals (14) .
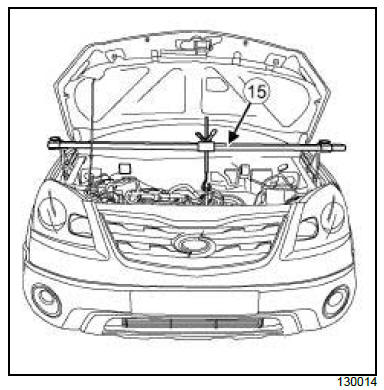
- Position the (Mot. 1453) (15) .
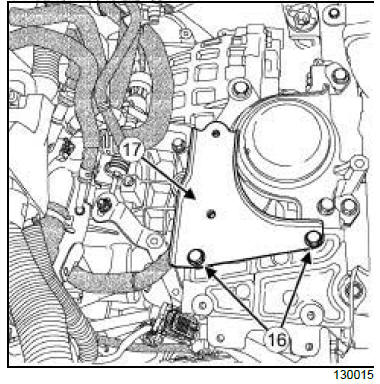
- Remove:
- the bolts (16) from the battery tray bracket,
- the battery tray bracket (17) .
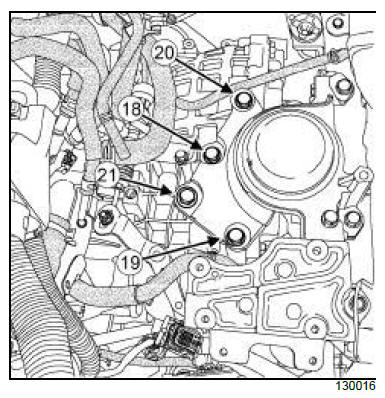
- Remove in the following order:
- the left-hand suspended engine mounting bolt A
(18) ,
- the left-hand suspended engine mounting bolt B
(19) ,
- the left-hand suspended engine mounting bolt C
(20) ,
- the left-hand suspended engine mounting bolt D
(21) .
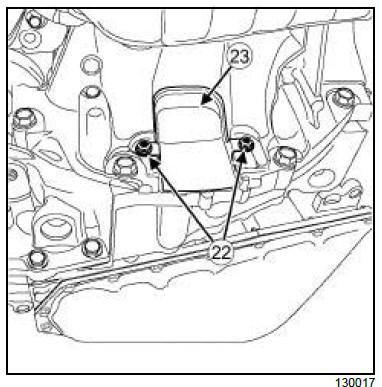
- Remove:
- the converter cover bolts (22) ,
- the converter cover (23) .
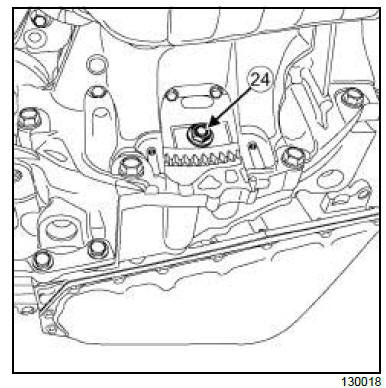
- Remove the four nuts (24) from the torque converter
by rotating the crankshaft clockwise.
- Place the component jack underneath the gearbox.
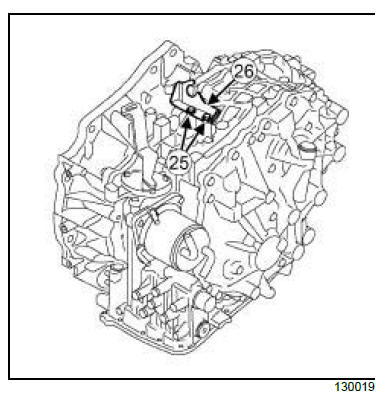
- Remove:
- the control cable bracket bolts (25) ,
- the control cable bracket (26) .
II - OPERATION FOR REMOVAL OF PART
CONCERNED
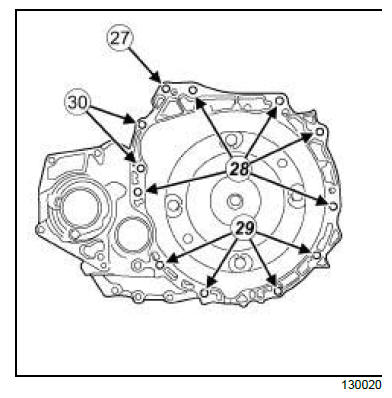
- Remove:
- the gearbox mounting bolt A (27) ,
- the gearbox mounting bolts B (28) ,
- the gearbox mounting bolts C (29) ,
- the gearbox mounting bolts D (30) ,
- the automatic gearbox.
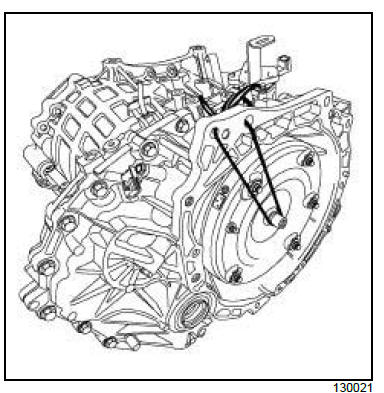
- Secure the converter with string to prevent it from
being dislodged.
REFITTING
I - REFITTING PREPARATION OPERATION
- Always replace:
- the converter nuts,
- the O-ring.
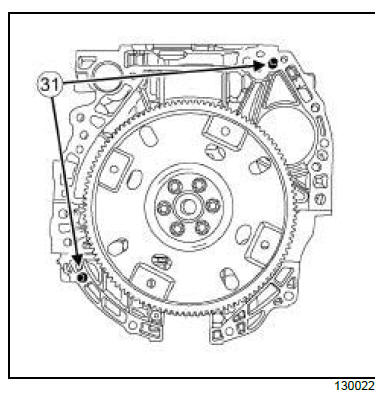
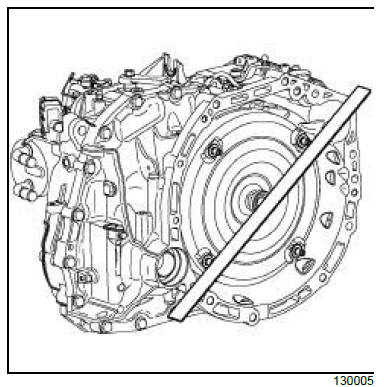
- Check that the centring dowels (31) are in place.

- Check that torque converter is correctly coupled to
the continuously variable gearbox using a rule and a
straightedge. The distance (X) between the converter
retaining bolt bead and the housing must be at
least 14.4 mm.
- Refit:
- the control cable bracket,
- the control cable bracket bolts.
- Torque tighten the control cable bracket bolts (14
N.m).
II - REFITTING OPERATION FOR PART
CONCERNED
- Refit:
- the automatic gearbox,
- the gearbox mounting bolts D,
- the gearbox mounting bolts C,
- the gearbox mounting bolts B,
- the gearbox mounting bolt A,
- Torque tighten:
- the gearbox mounting bolts D (60 N.m),
- the gearbox mounting bolts C (43 N.m),
- the gearbox mounting bolts B (75 N.m),
- the gearbox mounting bolt A (35 N.m).
III - FINAL OPERATION.
- Refit the new converter nuts by rotating the crankshaft
clockwise.
- Torque tighten the converter nuts (51 N.m).
- Refit:
- the converter cover,
- the converter cover bolts.
- Torque tighten the converter cover bolts (7 N.m).
- Refit and tighten to torque and in order:
- the left-hand suspended engine mounting bolt
D (50 N.m),
- the left-hand suspended engine mounting bolt
C (50 N.m),
- the left-hand suspended engine mounting bolt
B (50 N.m),
- the left-hand suspended engine mounting bolt
A (50 N.m).
- Remove:
- the (Mot. 1453),
- the lifting eye bolts,
- the lifting eye.
- Refit:
- the hood seals,
- the engine wiring harness,
- the engine wiring harness nuts.
- Torque tighten the engine wiring harness nuts (10
N.m).
- Refit:
- the battery tray bracket,
- the battery tray bracket bolts.
- Tighten to torque the battery tray bracket mounting
bolts (28 N.m).
- Refit:
- the automatic gearbox cooling hoses
- the starter
- the connector pipe
- the front axle subframe
- the rear suspended engine mounting
- the front left-hand driveshaft
- the front right-hand driveshaft
- the earth strap bolt.
- Torque tighten the earth strap bolt (25 N.m).
FK8
- Refit the transfer box.
- Refit the propshaft on the transfer box.
- Connect:
- the automatic gearbox connector
- the speed sensor connectors
- the multifunction switch connector
- the automatic gearbox control cable.
- Clip the automatic gearbox wiring clips.
- Refit:
- the front wheel arch liners
- the front wheels
- Refit:
- the new O-ring on the automatic gearbox oil charging
pipe,
- the automatic gearbox oil charging pipe,
- the automatic gearbox oil charging pipe bolts,
- the oil level gauge on the automatic gearbox.
- Torque tighten the automatic gearbox oil charging
pipe bolt (10 N.m).
- Refit:
- the air filter box
- the air resonator
- the air inlet sleeve
- the engine cover
- the breather hose
- the engine wiring harness channel
- the engine wiring harness channel bolts.
- Torque tighten the wiring harness channel bolts
(28 N.m).
- Refit:
- the battery tray
- the battery
- Refill:
- the automatic gearbox oil
- the cooling circuit
- Bleed the cooling circuit .
- Refit the engine undertray.
|


