M9R
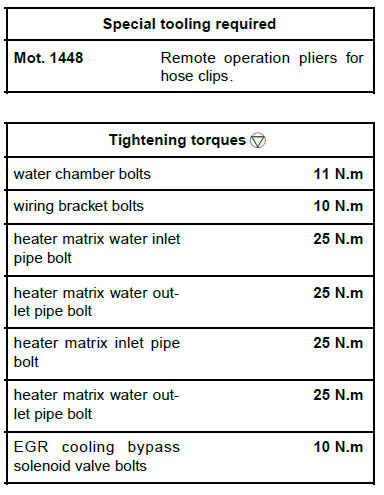
| IMPORTANT
Consult the safety and cleanliness advice and operation
recommendations before carrying out any
repair. |
| IMPORTANT
The circuits are designed to be pressurised, so be
careful at high temperatures (risk of serious burns).
Do not remove the cap from the expansion bottle
while the engine is hot.
Take care when carrying out a repair under the bonnet,
as the radiator fan(s) may start to operate without warning.
Do not open the bleed screw(s) with the engine running. |
| WARNING
When carrying out a repair that requires a complete
change, it is essential to flush the circuit with clean
water, blast compressed air through the circuit to
drive out the water, fill and bleed the circuit and
then measure the effective protection.
The criteria to be met are:
- protection down to -25ºC +- 2 for cold and temperate
countries,
- protection down to -40ºC +- 2 for "extreme cold"
countries.
|
WARNING
Before disconnecting the battery:
- wait for the motor-driven fan assembly to stop,
- wait for the computer to finish saving (1 minute).
|
REMOVAL
I - REMOVAL PREPARATION OPERATION
- Position the vehicle on a two-post lift.
- Remove:
- the engine cover,
- the engine undertray.
- Remove:
- the air inlet sleeve clips,
- the air inlet sleeve from the air filter unit,
- the battery,
- the battery tray,
- the air filter box .
- Drain the cooling system.
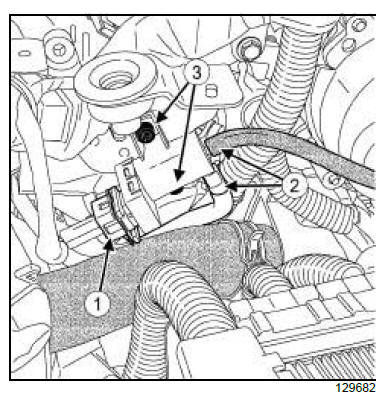
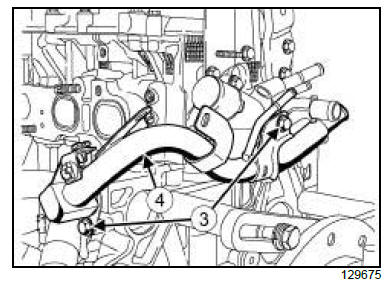
- Disconnect:
- the connector (1) from the EGR cooling bypass solenoid
valve
- the underpressure hoses (2) from the EGR cooling
bypass solenoid valve.
- Remove:
- the EGR cooling bypass solenoid valve bolts (3) ,
- the EGR cooling bypass solenoid valve.
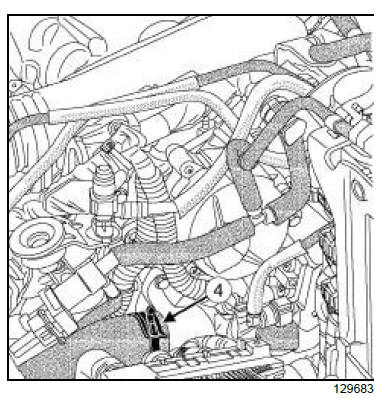
- Remove the clip from the coolant radiator inlet hose
(4) using the tool (Mot. 1448).
- Disconnect the coolant radiator inlet hose.
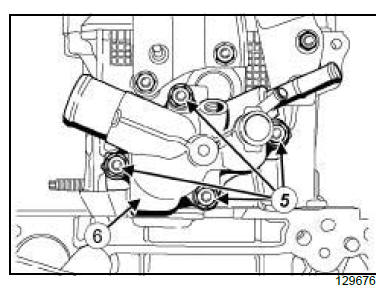
6-SPEED MANUAL GEARBOX
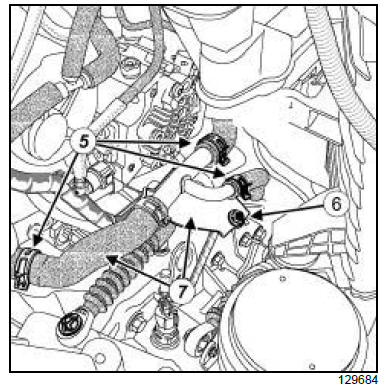
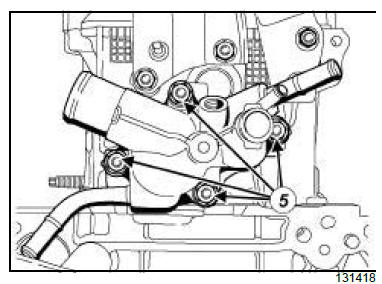
- Remove:
- the clips (5) from the heater matrix water outlet
hose using the tool (Mot. 1448),
- the bolt (6) from the heater matrix water outlet
hose.
- Disconnect the " heater matrix water outlet pipe -
hose assembly " (7) from the water chamber and
heater matrix water outlet hose.
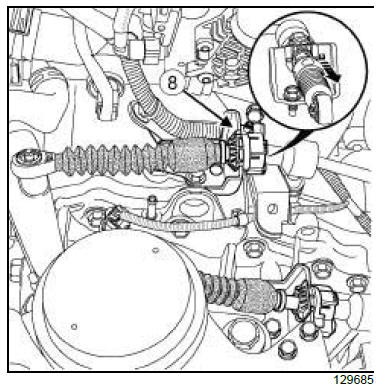
- Unclip the gear shift cable (8) .
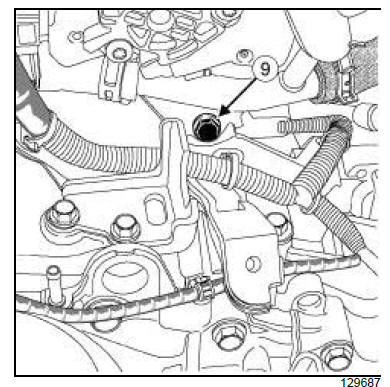
- Remove the bolt (9) from the heater matrix inlet pipe.
6-SPEED AUTOMATIC GEARBOX
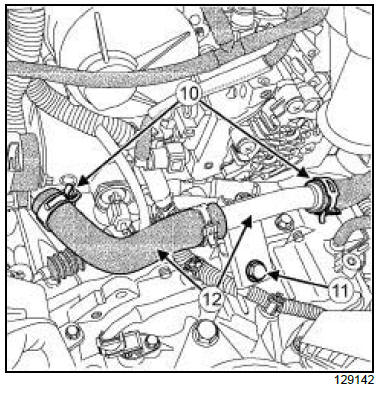
- Remove:
- the heater matrix water outlet hose clips (10) using
the tool (Mot. 1448)
- the bolt (11) from the heater matrix water outlet
hose.
- Disconnect the " heater matrix water outlet pipe -
hose assembly " (12) from the water chamber and
heater matrix water outlet hose.
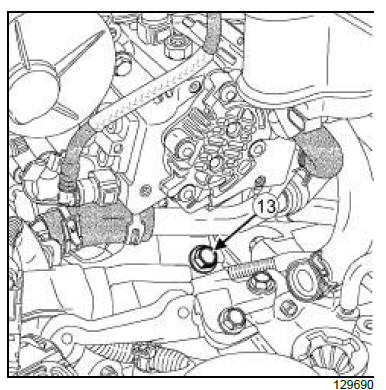
- Remove the bolt (13) from the heater matrix inlet
pipe.
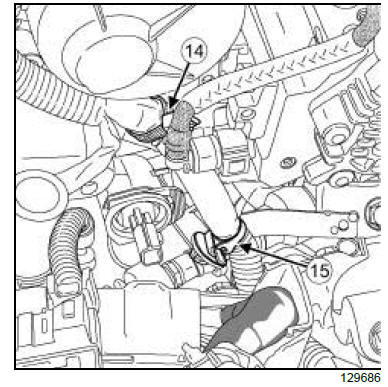
- Unclip:
- the wiring at (14) ,
- the wiring at (15) .
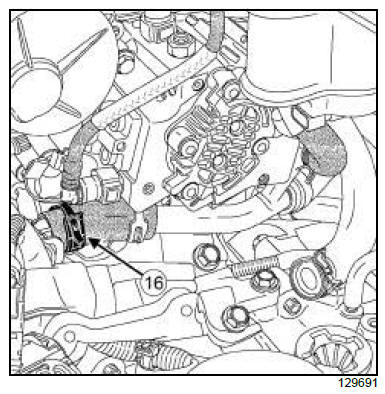
- Remove the clip from the heater matrix water inlet
hose (16) using the tool (Mot. 1448).
- Disconnect the heater matrix water inlet hose from
the water chamber.
- Move aside the water matrix water inlet hose.
- Disconnect the coolant temperature sensor connector.
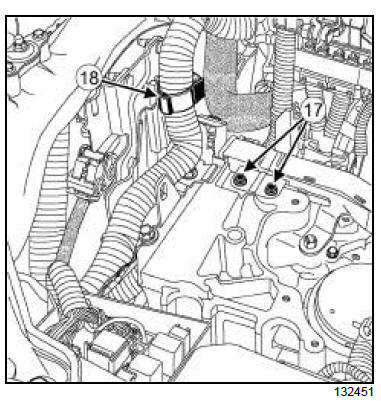
- Remove the bolts (17) from the wiring bracket.
- Unclip the wiring at (18) .
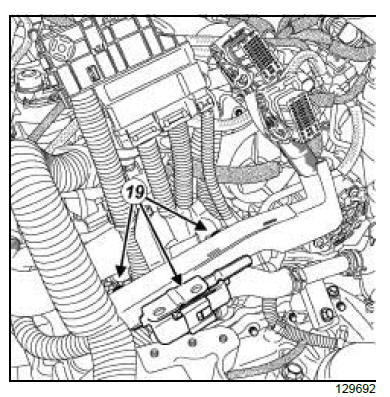
- Unclip the wiring brackets (19) .
- Move aside the wiring.
II - OPERATION FOR REMOVAL OF PART
CONCERNED
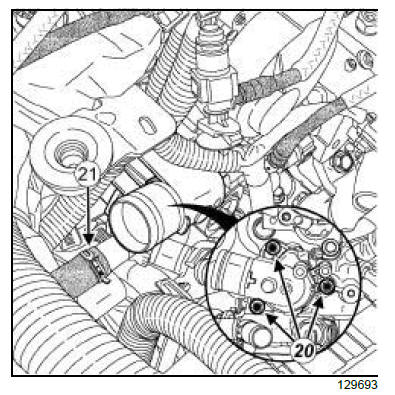
- Remove:
- the water chamber bolts (20) ,
- the exhaust gas recirculation intercooler water inlet
hose clip (21) using the tool (Mot. 1448).
- Disconnect the water chamber from the exhaust gas
recirculation intercooler water inlet hose.
- Remove the water chamber seal.
REFITTING
I - REFITTING PREPARATION OPERATION
- Always replace the water chamber seal.
| WARNING
The joint faces must be clean, dry and free from
grease (avoid finger marks). |
- Replace the coolant temperature sensor if necessary.
II - REFITTING OPERATION FOR PART
CONCERNED
- Refit the new water chamber seal on the water
chamber.
- Connect the water chamber to the exhaust gas recirculation
intercooler water inlet hose.
- Refit the exhaust gas recirculation intercooler water
inlet hose clip using the tool (Mot. 1448).
- Refit the water chamber bolts.
- Torque tighten in order the water chamber bolts
(11 N.m).
III - FINAL OPERATION.
- Clip:
- the wiring on to the brackets (19) ,
- the wiring at (18) .
- Refit the wiring bracket bolts (17) .
- Torque tighten the wiring bracket bolts (10 N.m).
- Connect:
- the coolant temperature sensor connector,
- the heater matrix water inlet hose to the water
chamber.
- Refit the heater matrix water inlet hose clip using the
tool (Mot. 1448).
- Clip:
- the wiring at (15) ,
- the wiring at (14) .
6-SPEED MANUAL GEARBOX
- Refit the bolt to the heater matrix inlet pipe.
- Torque tighten the heater matrix water inlet pipe
bolt (25 N.m).
- Clip the gear shift cable.
- Connect the " heater matrix water outlet pipe -
hose " assembly to the water chamber and the heater
matrix water outlet hose.
- Refit the heater matrix water outlet pipe bolt (6) .
- Torque tighten the heater matrix water outlet pipe
bolt (25 N.m).
- Refit the heater matrix water outlet hose clips (5) using
the tool (Mot. 1448).
6-SPEED AUTOMATIC GEARBOX
- Refit the heater matrix water outlet hose bolt (11) .
- Torque tighten the heater matrix inlet pipe bolt (25
N.m).
- Connect the " heater matrix water outlet pipe -
hose " assembly to the water chamber and the heater
matrix water outlet hose.
- Refit the heater matrix water outlet hose bolt.
- Torque tighten the heater matrix water outlet pipe
bolt (25 N.m).
- Refit the heater matrix water outlet hose clips (10)
using the tool (Mot. 1448).
- Connect the coolant radiator hose.
- Refit the coolant radiator inlet hose clip using the
tool (Mot. 1448).
- Refit the EGR cooling bypass solenoid valve.
- Refit the EGR cooling bypass solenoid valve bolts.
- Torque tighten the EGR cooling bypass solenoid
valve bolts (10 N.m).
- Connect:
- the vacuum hoses to the EGR cooling bypass solenoid
valve,
- the exhaust gas recirculation cooling bypass solenoid
valve connector.
- Refit:
- the air filter box
- the battery tray
- the battery
- the air inlet sleeve to the air filter unit
- the air inlet sleeve clips
- the engine cover.
- Fill the cooling system .
- Bleed the cooling system.
- Refit the engine undertray.
2TR, and FK0 or FK8
| IMPORTANT
To avoid all risk of damage to the systems, apply
the safety and cleanliness instructions and operation
recommendations before carrying out any
repair . |
REMOVAL
I - REMOVAL PREPARATION OPERATION
- Position the vehicle on a two-post lift .
- Disconnect the battery .
- Remove the engine undertray.
- Drain the cooling system .
- Remove:
- the air inlet sleeve
- the battery
- the battery tray.
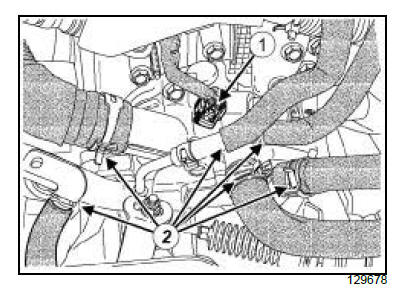
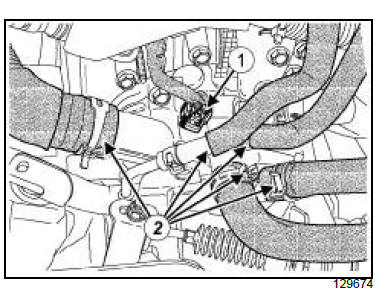
- Disconnect the coolant temperature sensor connector
(1) .
- Remove the clips (2) from the cooling hoses.
- Disconnect all the cooling hoses from the coolant inlet
housing and the coolant outlet unit.
- Remove:
- the clips from the wiring of the coolant inlet housing,
- the coolant temperature sensor,
- the coolant temperature sensor seal,

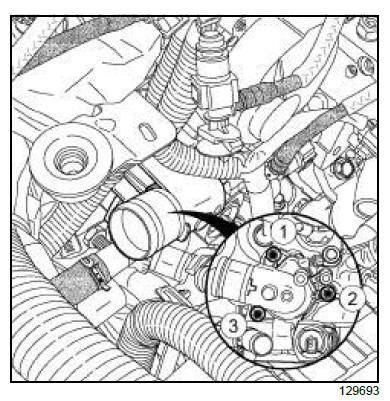
- Remove:
- the bolts (3) from the coolant inlet housing,
- the coolant inlet housing,
- the O-ring from the coolant inlet housing.
II - OPERATION FOR REMOVAL OF PART
CONCERNED
- Remove:
- the coolant outlet unit bolts,
- the coolant outlet unit,
- the coolant outlet unit seal,
- the thermostat,
- the thermostat seal.
REFITTING
I - REFITTING PREPARATION OPERATION
II - REFITTING OPERATION FOR PART
CONCERNED
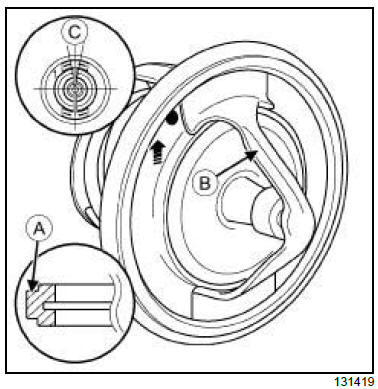
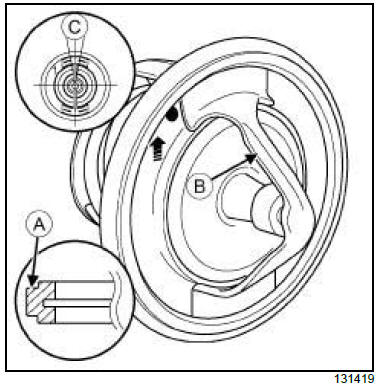
| Note:
The position deviation of (C) the mobile valve
may be within the region of 20º as illustrated. |
- Refit:
- the new seal (A) to the thermostat,
- the thermostat with the mobile valve (B) facing upwards,
- the new coolant outlet unit seal,
- the coolant outlet unit,
- the coolant outlet unit bolts.
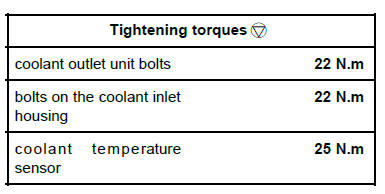
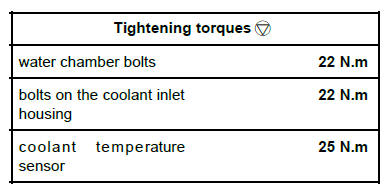
- Torque tighten the coolant outlet unit bolts (22
N.m)
III - FINAL OPERATION
- Apply new engine oil to the new O-ring.
- Refit:
- the new O-ring on the coolant inlet housing,
- the coolant inlet housing,
- the coolant inlet housing bolts.
- Torque tighten the bolts on the coolant inlet housing
(22 N.m).
- Refit:
- the clips on the wiring of the coolant inlet housing,
- the new coolant temperature sensor seal,
- the coolant temperature sensor.
- Torque tighten the coolant temperature sensor
(25 N.m).
- Connect all the cooling hoses on the coolant inlet
housing and the water chamber.
- Refit the clips on the hoses.
- Connect the coolant temperature sensor connector.
- Refit:
- the battery tray
- the battery
- the air inlet sleeve
- Fill the cooling system.
- Refit the engine undertray.
- Connect the battery.
- Bleed the cooling system.
2TR, and 6-SPEED MANUAL GEARBOX
| IMPORTANT
To avoid all risk of damage to the systems, apply
the safety and cleanliness instructions and operation
recommendations before carrying out any
repair. |
REMOVAL
I - REMOVAL PREPARATION OPERATION
- Position the vehicle on a two-post lift.
- Disconnect the battery.
- Remove the engine undertray.
- Drain the cooling system.
- Remove:
- the air inlet sleeve
- the battery
- the battery tray.
- Disconnect the coolant temperature sensor connector
(1) .
- Remove the clips (2) from the cooling hoses.
- Disconnect all the cooling hoses from the coolant inlet
housing and the water chamber.
- Remove:
- the clips from the wiring of the coolant inlet housing,
- the coolant temperature sensor,
- the coolant temperature sensor seal,
- Remove:
- the bolts (3) from the coolant inlet housing,
- the coolant inlet housing,
- the O-ring from the coolant inlet housing.
II - OPERATION FOR REMOVAL OF PART
CONCERNED
- Remove:
- the coolant outlet unit bolts,
- the coolant outlet unit,
- the coolant outlet unit seal,
- the thermostat,
- the thermostat seal.
REFITTING
I - REFITTING PREPARATION OPERATION
II - REFITTING OPERATION FOR PART
CONCERNED
| Note:
The position deviation of (C) the mobile valve
may be within the region of 20º as illustrated. |
- Refit:
- the new seal (A) to the thermostat,
- the thermostat with the mobile valve (B) facing upwards,
- the new water chamber seal,
- the coolant outlet unit,
- the water chamber bolts.
- Torque tighten the water chamber bolts (22 N.m).
III - FINAL OPERATION
- Apply new engine oil to the new O-ring.
- Refit:
- the new O-ring on the coolant inlet housing,
- the coolant inlet housing,
- the coolant inlet housing bolts.
- Torque tighten the bolts on the coolant inlet housing
(22 N.m).
- Refit:
- the wiring clips on the coolant inlet housing,
- the new coolant temperature sensor seal,
- the coolant temperature sensor.
- Torque tighten the coolant temperature sensor
(25 N.m).
- Connect all the cooling hoses on the coolant inlet
housing and the water chamber.
- Refit the clips on the cooling hoses.
- Connect the coolant temperature sensor connector.
- Refit:
- the battery tray
- the battery
- the air inlet sleeve
- Fill the cooling system.
- Refit the engine undertray.
- Connect the battery.
- Bleed the cooling system.
|


