FOOT BRAKE AUTOMATIC CONTROL
REMOVAL
I - REMOVAL PREPARATION OPERATION
- Position the vehicle on a two-post lift (see Vehicle:
Towing and lifting) (02A, Lifting equipment).
- Release the parking brake.
- Remove:
- the rear centre luggage compartment floor (see
Luggage compartment floor lining: Removal -
Refitting) (71A, Body internal trim),
- the front luggage compartment floor box (see Luggage
compartment floor lining: Removal - Refitting)
(71A, Body internal trim),
- the rear luggage compartment floor (see Luggage
compartment floor lining: Removal - Refitting)
(71A, Body internal trim),
- the front centre luggage compartment floor (see
Luggage compartment floor lining: Removal -
Refitting) (71A, Body internal trim),
- the left-hand side C-pillar lower trim (see C-pillar
lower trim: Removal - Refitting) (71A, Body internal
trim),
- the left-hand section of the luggage compartment
side box (see Luggage compartment floor lining:
Removal - Refitting) (71A, Body internal
trim),
- the receiver (see Receiver: Removal - Refitting)
(86A, Radio).
II - REMOVAL OF PART CONCERNED
| WARNING
To avoid damaging the parking brake cable protectors
and causing premature wear of the system,
do not handle the cables with a tool. |
- For vehicles fitted with a manual gearbox: before removing
the control unit, always save the clutch data
(see Fault finding - Replacement of components)
(37B, Electronic parking brake).
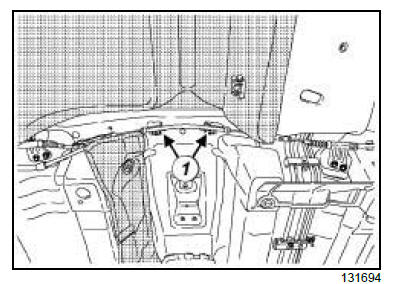
- Remove the parking brake cable bolts (1) from the
underbody.
- Disconnect the left-hand section (2) of the parking
brake cable from its clip (3) .
- Lift up the stopper (4) .
- Disconnect the right-side of the parking brake cable
from its clip (5) .
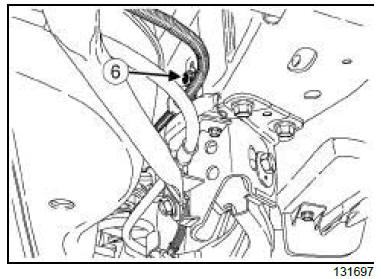
- Remove the parking brake cable bolt (6) on the
front-left side of the fuel tank.
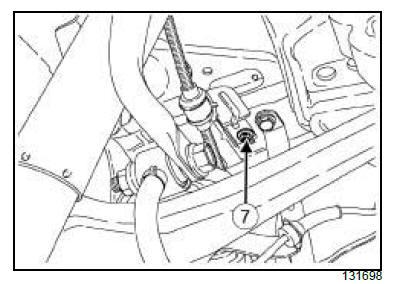
- Remove the bolt of the electronic parking brake (7)
on the rear left-hand face of the fuel tank.
- Let the electronic parking brake cable hang freely.
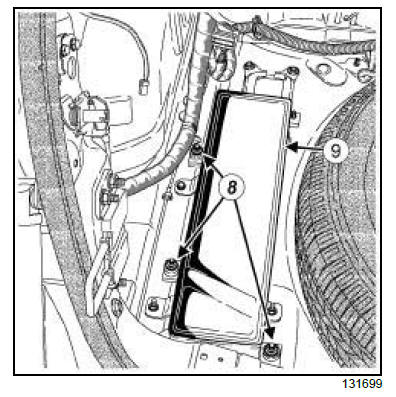
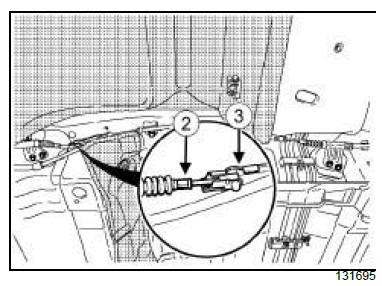
- Remove:
- the cover nuts (8) from the electronic parking brake
control unit,
- the cover (9) from the electronic parking brake control
unit.
- the connector (10) from the electronic parking brake
control unit.
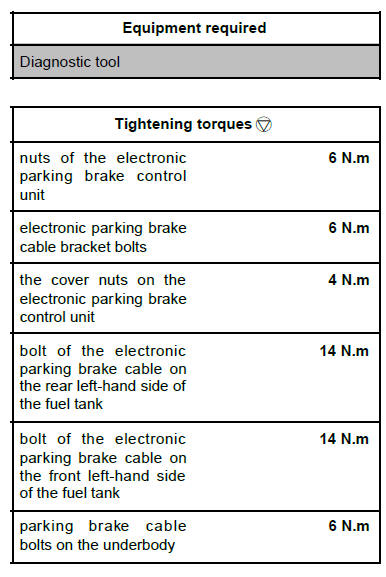
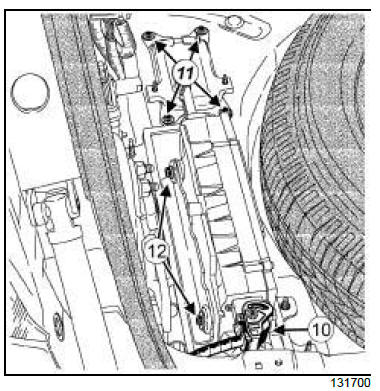
- Remove:
- the bolt (11) from the electronic parking brake cable
support,
- the electronic parking brake cable bracket,
- the nuts (12) from the electronic parking brake control
unit,
- the electronic parking brake control unit - electronic
parking brake cable assembly.
| Note:
The electronic parking brake cable cannot be
separated from the electronic parking brake control
unit. |
REFITTING
I - REFITTING PREPARATION OPERATION
- Always replace the clip on the right-side of parking
brake cable.
II - REFITTING PART CONCERNED
- Fit the electronic parking brake control unit - electronic
parking brake cable assembly
- Refit:
- the nuts of the electronic parking brake control unit,
- the electronic parking brake cable bracket,
- the bolts on to the electronic parking brake cable
bracket.
- Tighten to torque:
- the nuts of the electronic parking brake control
unit (6 N.m),
- the electronic parking brake cable bracket bolts
(6 N.m).
- Connect the connector to the electronic parking
brake control unit.
- Refit:
- the cover on the electronic parking brake control
unit.
- the cover nuts on the electronic parking brake control
unit.
- Torque tighten the cover nuts on the electronic
parking brake control unit (4 N.m).
- Refit:
- the left-side of the parking brake cable into its clip,
- the right-side of the parking brake cable into its new
clip,
- the bolt of the electronic parking brake cable on the
rear left-hand side of the fuel tank.
- the bolt of the electronic parking brake bolt on the
front left-hand side of the fuel tank.
- the parking brake cable bolts on the underbody.
- Tighten to torque:
- the bolt of the electronic parking brake cable on
the rear left-hand side of the fuel tank (14 N.m),
- the bolt of the electronic parking brake cable on
the front left-hand side of the fuel tank (14 N.m),
- the parking brake cable bolts on the underbody
(6 N.m).
- Observe the parking brake cable routing noted during
removal.
III - FINAL OPERATION
- Refit:
- the receiver (see Receiver: Removal - Refitting)
(86A, Radio).
- the left-hand section of the luggage compartment
side box (see Luggage compartment floor lining:
Removal - Refitting) (71A, Body internal
trim),
- the left-hand side C-pillar lower trim (see C-pillar
lower trim: Removal - Refitting) (71A, Body internal
trim),
- the front centre luggage compartment floor (see
Luggage compartment floor lining: Removal -
Refitting) (71A, Body internal trim),
- the rear luggage compartment floor (see Luggage
compartment floor lining: Removal - Refitting)
(71A, Body internal trim),
- the front luggage compartment floor box (see Luggage
compartment floor lining: Removal - Refitting)
(71A, Body internal trim),
- the rear centre luggage compartment floor (see
Luggage compartment floor lining: Removal -
Refitting) (71A, Body internal trim),
- With the ignition on, push the handle to release the
electronic parking brake. Then pull the handle so
that the automatic parking brake locking function is
signalled by a sound and the play compensation is
set automatically.
- Carry out a complete check and clear any faults generated
using the Diagnostic tool. Configure the
new brake control unit see (Fault finding - Replacement
of components).
|


