REMOVAL
I - REMOVAL PREPARATION OPERATION
- Position the vehicle on a two-post lift (see Vehicle:
Towing and lifting) (02A, Lifting equipment).
- Remove the rear wheels (see 35A, Wheels and tyres,
Wheel: Removal - Refitting, page 35A-1) .
DISCHARGE LAMPS
- Remove the headlight beam adjustment rear sensor
(see Headlight beam adjustment rear sensor: Removal
- Refitting) (80C, Xenon bulbs).
II - OPERATION FOR REMOVAL OF PART
CONCERNED
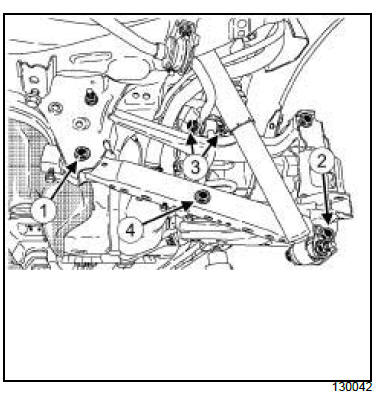
- Loosen:
- the lower trailing link bolt and nut on the rear axle
subframe (1) ,
- the lower trailing link bolt and nut (2) on the rear
stub axle carrier,
- the rear anti-roll bar tie-rod upper bolt and nut (3) of
the rear anti-roll bar on both sides,
- the lower bolt and nut (4) of the rear anti-roll bar tie
rod.
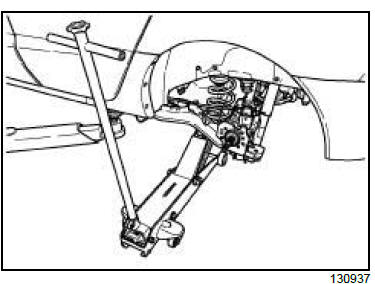
- Position the trolley jack with a shim under the lower
seat of the spring.
REFITTING
I - REFITTING PREPARATION OPERATION
- Always replace:
- the lower trailing link nuts,
- the rear anti-roll bar tie rod lower nut.
II - REFITTING OPERATION FOR PART
CONCERNED
- Fit the trolley jack with a shim under the lower seat
of the spring;
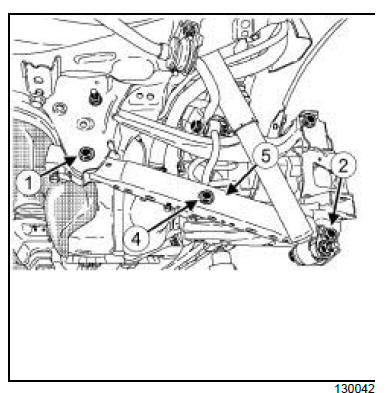
- Refit:
- the lower trailing link (5) ,
- the new lower trailing link bolt and nut (1) on to the
rear axle subframe,
- the new lower trailing link bolt and nut (2) on to the
rear stub axle carrier,
- the new lower bolt and nut (4) of the rear anti-roll
bar tie rod.
- Lower the trolley jack.
- Torque tighten:
- the nut of the lower trailing link on the rear axle
subframe (130N.m),
- the lower trailing link bolt on the rear stub axle
carrier (150 N.m),
- the lower nut of the anti-roll bar tie rod110
(N.m).
- the upper nut of the anti-roll bar tie rod110
(N.m).
III - FINAL OPERATION.
DISCHARGE LAMPS
- Refit the headlight beam adjustment rear sensor
(see Headlight beam adjustment rear sensor: Removal
- Refitting) (80C, Xenon bulbs).
- Refit the rear wheels (see 35A, Wheels and tyres,
Wheel: Removal - Refitting, page 35A-1) .
DISCHARGE LAMPS
- Adjust:
- the headlight wiring (see Headlight: Adjustment)
(80 B, Headlights)
- the headlight beam adjustment rear sensor Fault
finding - Programming (80C, Xenon bulbs).
- Adjust:
- the alignment (see 30A, General information,
Rear axle system: Adjustment, page 30A-13) ,
- the neutral position of the steering wheel angle
sensor Fault Finding- Programming (80B, Headlights).
|


