M9R, and 4X4 TRANSMISSION
| IMPORTANT
Consult the safety and cleanliness advice and operation
recommendations before carrying out any
repair. |
REMOVAL
I - REMOVAL PREPARATION OPERATION
- Position the vehicle on a two-post lift (see Vehicle:
Towing and lifting) (02A, Lifting equipment).
| IMPORTANT
To prevent the vehicle from falling, lash it to the
vehicle lift using a strap. |
- Remove the engine undertray.
6-SPEED MANUAL GEARBOX
- Drain the gearbox oil (see 21A, Manual gearbox,
Manual gearbox oils: Draining - Filling, page
21A-5)
6-SPEED AUTOMATIC GEARBOX
- Drain the gearbox oil (see 23A, Automatic gearbox,
Automatic gearbox oil: Draining - Filling,
page 23A-11)
- Remove:
- the particle filter (see Particle filter: Removal -
Refitting) (19B, Exhaust),
- the rear suspended engine mounting (see Lower
engine tie-bar: Removal - Refitting) (19D, Engine
mounting).
- the front axle subframe (see Front axle subframe:
Removal - Refitting) (31A, Front axle components).
- Uncouple the longitudinal driveshaft from the transfer
box (see 29A, Driveshafts, Propshaft: Removal
- Refitting, page 29A-12) (29A, Driveshafts).
- Secure the longitudinal driveshaft to the bracket of
the control cable using a strap.
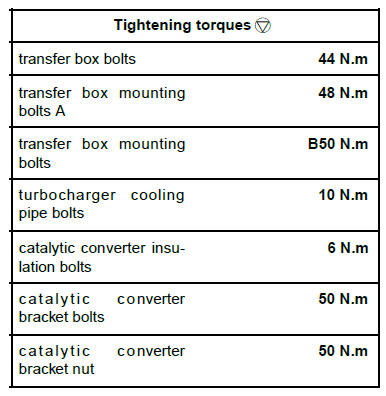
- Remove:
- the catalytic converter bracket nut (1) ,
- the catalytic converter bracket bolts (2) ,
- the catalytic converter bracket (3) .
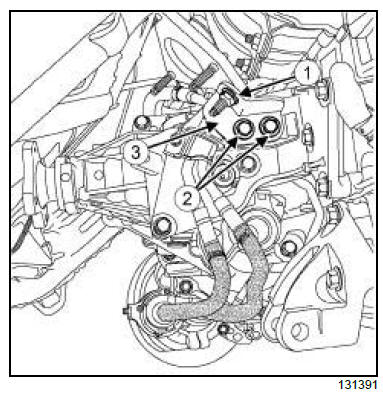
- Remove:
- the catalytic converter insulation bolts (4) ,
- the catalytic converter insulation (5) .
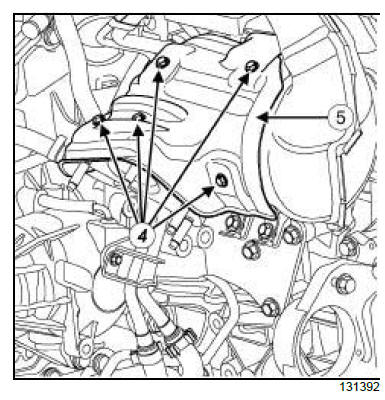
- Remove the bolts (6) from the turbocharger cooling
pipe.
- Move aside the turbocharger cooling pipe.

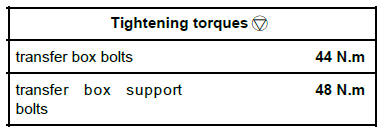
- Remove:
- the transfer box support bolts A (7) ,
- the transfer box support bolts B (8) ,
- the transfer box support (9) .
II - OPERATION FOR REMOVAL OF PART
CONCERNED

- Remove:
- the transfer box bolts (10) ,
- the transfer box.

REFITTING
I - REFITTING PREPARATION OPERATION
- Always replace the O-ring.
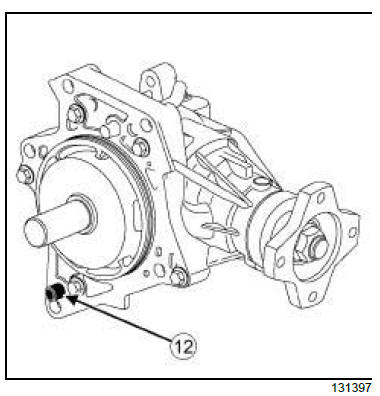
- Check that the centring dowel (12) is in position.
II - REFITTING OPERATION FOR PART
CONCERNED
- Refit:
- the transfer box,
- the transfer box bolts.
- Torque tighten the transfer box bolts (44 N.m).
III - FINAL OPERATION.
- Refit:
- the transfer box support.
- the transfer box support bolts A,
- the transfer box support bolts B,
- Torque tighten:
- the transfer box mounting bolts A (48 N.m),
- the transfer box mounting bolts (B50 N.m),
- Refit:
- the turbocharger cooling pipe,
- the turbocharger cooling pipe bolts.
- Torque tighten the turbocharger cooling pipe
bolts (10 N.m).
- Refit:
- the catalytic converter insulation.
- the catalytic converter insulation bolts.
- Torque tighten the catalytic converter insulation
bolts (6 N.m).
- Refit:
- the catalytic converter bracket,
- the catalytic converter bracket bolts,
- the catalytic converter bracket nut.
- Torque tighten:
- the catalytic converter bracket bolts (50 N.m),
- the catalytic converter bracket nut (50 N.m).
6-SPEED MANUAL GEARBOX
- Remove the front left-hand splash guard (see Front
wheel arch liner: Removal - Refitting) (55A, Exterior
protection).
- Fill the gearbox (see 21A, Manual gearbox, Manual
gearbox oils: Draining - Filling, page 21A-5)
- Refit the front left-hand splash guard (see Front
wheel arch liner: Removal - Refitting) (55A, Exterior
protection).
6-SPEED AUTOMATIC GEARBOX
- Fill the gearbox (see 23A, Automatic gearbox, Automatic
gearbox oil: Draining - Filling, page 23A-
11)
- Refit:
- the front axle subframe (see Front axle subframe:
Removal - Refitting) (31A, Front axle components),
- the rear suspended engine mounting (see Lower
engine tie-bar: Removal - Refitting) (19D, Engine
mounting),
- the particle filter (see Particle filter: Removal -
Refitting) (19B, Exhaust),
- the engine undertray.
2TR, and 4X4 TRANSMISSION
| IMPORTANT
Consult the safety and cleanliness advice and operation
recommendations before carrying out any
repair. |
REMOVAL
I - REMOVAL PREPARATION OPERATION
- Position the vehicle on a two-post lift (see Vehicle:
Towing and lifting) (02A, Lifting equipment).
| IMPORTANT
To prevent the vehicle from falling, lash it to the
vehicle lift using a strap. |
- Remove the engine undertray.
6-SPEED MANUAL GEARBOX
- Drain the gearbox oil (see 21A, Manual gearbox,
Manual gearbox oils: Draining - Filling, page
21A-5)
FK0 or FK8
- Drain the gearbox oil (see 23A, Automatic gearbox,
Automatic gearbox oil: Draining - Filling,
page 23A-11)
- Remove:
- the front right-hand wheel (see Wheel: Removal -
Refitting) (35A, Wheels and tyres),
- the front right-hand driveshaft (see 29A, Driveshafts,
Front right-hand driveshaft: Removal -
Refitting, page 29A-4) ,
- the connector pipe (see Intermediate pipe: Removal
- Refitting) ,
- the rear suspended engine mounting (see Lower
engine tie-bar: Removal - Refitting) (19D, Engine
mounting).
- the front axle subframe (see Front axle subframe:
Removal - Refitting) (31A, Front axle components).
- Disconnect the longitudinal driveshaft from the
transfer box (see 29A, Driveshafts, Propshaft: Removal
- Refitting, page 29A-12) (29A, Driveshafts).
- Secure the longitudinal driveshaft to the bracket of
the control cable using a strap.
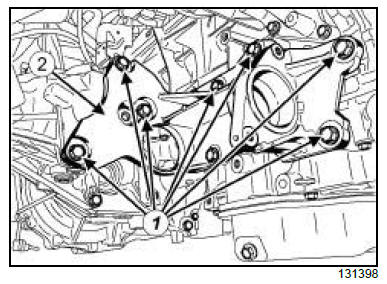
- Remove:
- the bolts (1) from the transfer box support,
- the transfer box support (2) .
II - OPERATION FOR REMOVAL OF PART
CONCERNED
- Remove:
- the transfer box bolts (3) ,
- the transfer box.

6-SPEED MANUAL GEARBOX
- Remove the right-hand differential output seal (see
21A, Manual gearbox, Differential output seal:
Removal - Refitting, page 21A-7) (21A, Manual
gearbox).
FK0 or FK8
- Remove the right-hand differential output seal (see
Differential seal: Removal - Refitting) (23A, Automatic
gearbox).
REFITTING
I - REFITTING PREPARATION OPERATION
- Always replace:
- the O-ring,
- the differential output seal.
6-SPEED MANUAL GEARBOX
- Refit the right-hand differential output seal (see 21A,
Manual gearbox, Differential output seal: Removal
- Refitting, page 21A-7) (21A, Manual gearbox).
FK0 or FK8
- Refit the right-hand differential output seal (see Differential
seal: Removal - Refitting) (23A, Automatic
gearbox).
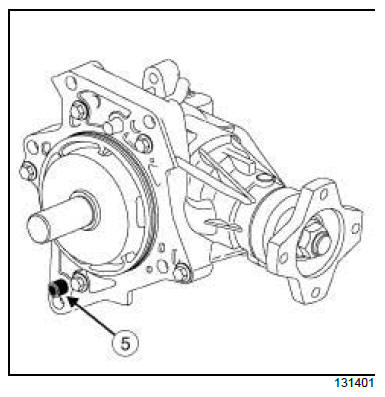
- Check that the centring dowel (5) is in position.
II - REFITTING OPERATION FOR PART
CONCERNED
- Refit:
- the transfer box,
- the transfer box bolts.
- Torque tighten the transfer box bolts (44 N.m).
III - FINAL OPERATION.
- Refit:
- the transfer box support.
- the transfer box support bolts.
- Torque tighten the transfer box support bolts (48
N.m).
- Refit:
- the longitudinal driveshaft to the transfer box (see
29A, Driveshafts, Propshaft: Removal - Refitting,
page 29A-12) (29A, Driveshafts),
- the front axle subframe (see Front axle subframe:
Removal - Refitting) (31A, Front axle components),
- the connector pipe (see Intermediate pipe: Removal
- Refitting) ,
- the rear suspended engine mounting (see Lower
engine tie-bar: Removal - Refitting) (19D, Engine
mounting),
- the front right-hand driveshaft (see 29A, Driveshafts,
Front right-hand driveshaft: Removal -
Refitting, page 29A-4) ,
- the front right-hand wheel (see Wheel: Removal -
Refitting) (35A, Wheels and tyres).
6-SPEED MANUAL GEARBOX
- Remove the front left-hand splash guard (see Front
wheel arch liner: Removal - Refitting) (55A, Exterior
protection).
- Fill the gearbox (see 21A, Manual gearbox, Manual
gearbox oils: Draining - Filling, page 21A-5) .
- Refit the front left-hand splash guard (see Front
wheel arch liner: Removal - Refitting) (55A, Exterior
protection).
FK0 or FK8
- Fill the gearbox (see 23A, Automatic gearbox, Automatic
gearbox oil: Draining - Filling, page 23A-
11)
|


