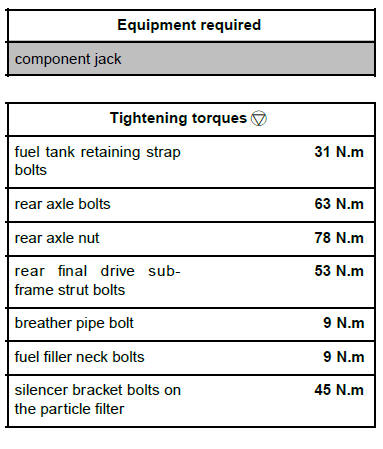
M9R
| IMPORTANT
Wear goggles with side protectors for this operation. |
| IMPORTANT
Wear protective gloves during the operation. |
IMPORTANT
During this operation, be sure to:
- refrain from smoking or bringing red hot objects
close to the working area,
- be careful of fuel splashes when disconnecting the
union.
|
| WARNING
To avoid any corrosion or damage, protect the
areas on which fuel is likely to run. |
| WARNING
Keep the pipe unions away from contaminated
areas. |
REMOVAL
I - OPERATION FOR REMOVAL OF PART
CONCERNED
- Position the vehicle on a two-post lift .
- Disconnect the battery.
- Lift up:
- the rear bench seat base
- partially, the floor carpet under the rear bench seat
base
- Drain the fuel tank.
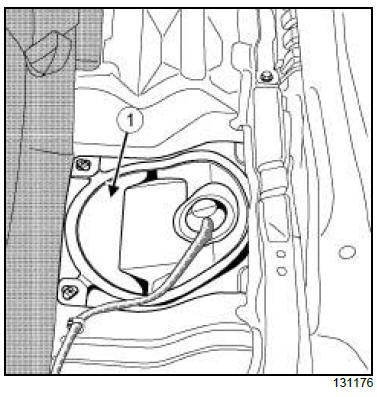
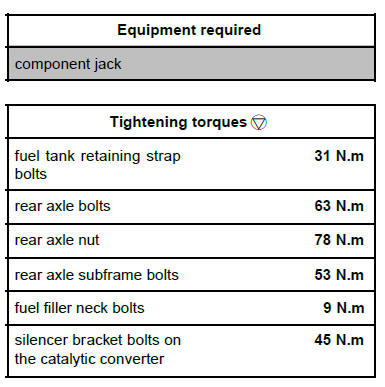
- Remove the inspection flap blanking cover (1) .
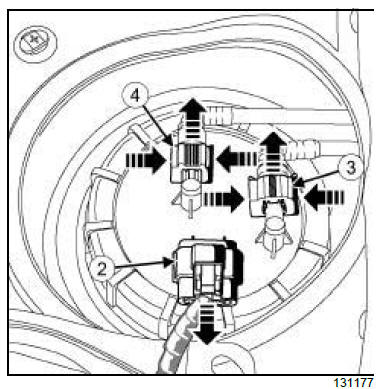
- Disconnect:
- the fuel sender connector (2) ,
- the quick-release union (3) from the fuel supply
pipe,
- the quick-release union (4) from the fuel return
pipe.
| Note:
Make preparations for fuel outflow from the supply
and return pipes. |
- Fit blanking plugs on the unions.

- Remove:
- the silencer bracket bolts (5) on the particle filter,
- the silencer from the rubber mounting bushes (6)
and (7) .
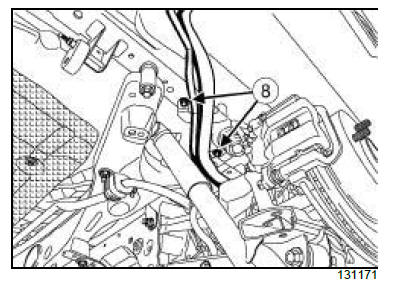
4X4 TRANSMISSION
- Remove the longitudinal driveshaft (8).
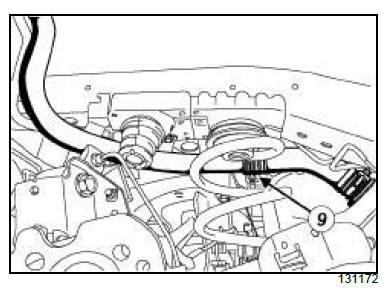
- Remove:
- the fuel tank heat shield (9) ,
- the rear right-hand wheel ,
- the rear right-hand wheel arch liner.

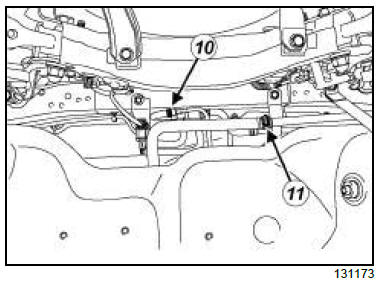
- Remove the fuel filler neck bolts (10) .
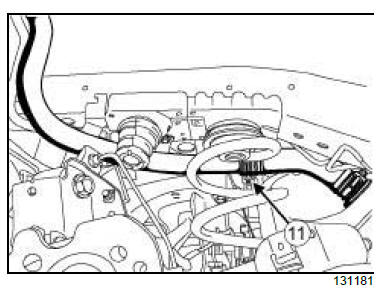
- Remove the fuel filler neck bracket (11) .
- Disconnect the filler neck from the fuel tank.
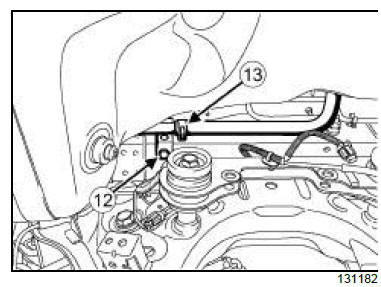
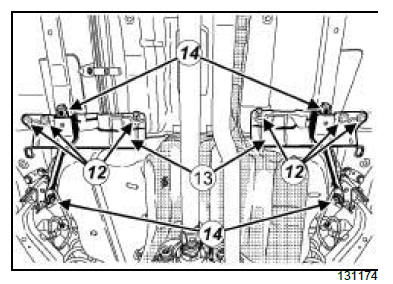
- Remove:
- the breather pipe bolt (12) ,
- the breather pipe bracket (13) .
- Disconnect the breather pipe.
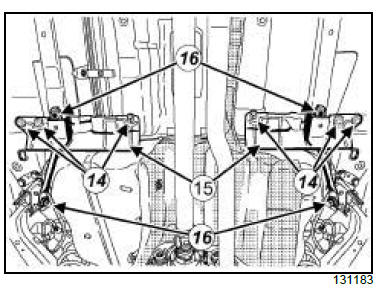
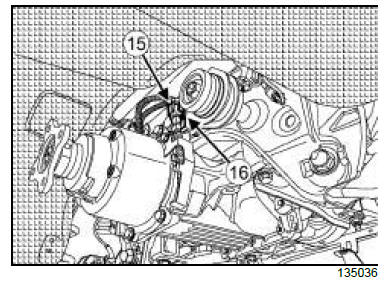
- Remove:
- the clips (14) ,
- the covers (15) ,
- the rear final drive subframe strut bolts (16) ,
- the rear final drive subframe struts,
- the parking brake cable.
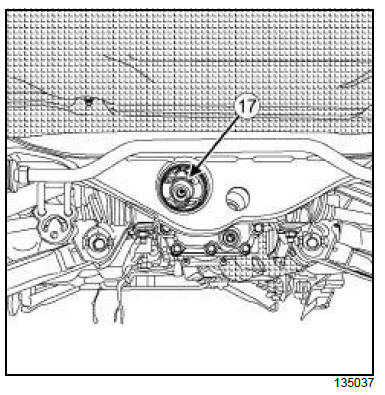
4X4 TRANSMISSION
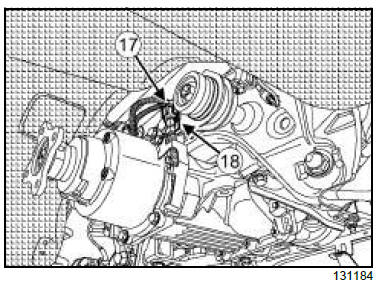
- Disconnect the connector (17) from the electric coupler.
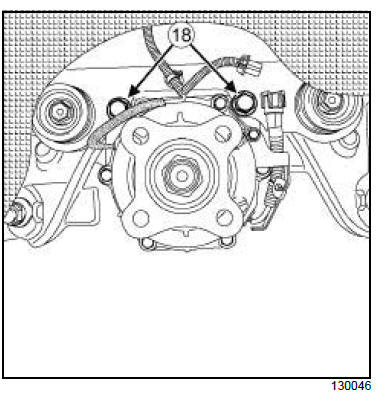
- Unclip the wiring clip (18) .

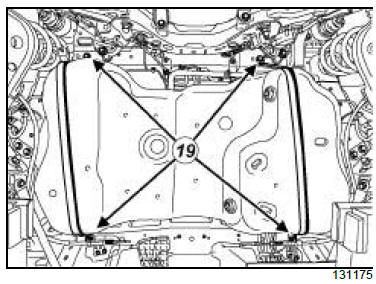
- Loosen the rear final drive nut (19) .
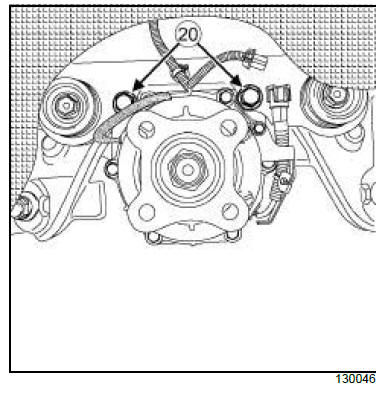
- Remove the rear final drive bolts (20) .
| Note:
Do not remove the rear final drive from the vehicle. |
- Tilt the rear final drive downwards.
II - OPERATION FOR REMOVAL OF PART
CONCERNED
- Place a component jack beneath the fuel tank.
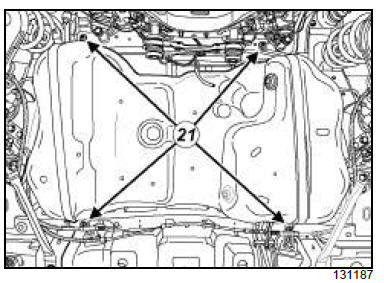
- Remove:
- the fuel tank retaining strap bolts (21) ,
- the fuel tank retaining straps,
- the fuel tank.
REFITTING
I - REFITTING PREPARATION OPERATION
- Always replace:
- the clips,
- the fuel filler neck bracket,
- the breather pipe bracket.
II - REFITTING OPERATION FOR PART
CONCERNED
- Refit:
- the fuel tank,
- the fuel tank retaining straps,
- the fuel tank retaining strap bolts.
- Torque tighten the fuel tank retaining strap bolts
(31 N.m)
- Remove the component jack.
III - FINAL OPERATION
4X4 TRANSMISSION
- Refit the rear axle in its original position.
- Torque tighten:
- the rear axle bolts (63 N.m),
- the rear axle nut (78 N.m).
- Clip on the wiring clip.
- Connect the electric coupler connector.
- Refit:
- the parking brake cable,
- the rear final drive subframe struts,
- the rear final drive subframe strut bolts,
- the covers (15) ,
- the new clips (14) .
- Torque tighten the rear final drive subframe strut
bolts (53 N.m).
- Connect the breather pipe.
- Refit:
- the new breather pipe bracket,
- the breather pipe bolt.
- Torque tighten the breather pipe bolt (9 N.m).
- Connect the fuel filler neck onto the fuel tank.
- Refit:
- the new fuel filler neck bracket,
- the fuel filler neck bolts.
- Torque tighten the fuel filler neck bolts (9 N.m).
- Refit:
- the rear right-hand wheel arch liner,
- the rear right-hand wheel,
- the fuel tank heat shield.
4X4 TRANSMISSION
- Refit the longitudinal driveshaft.
- Refit:
- the silencer on the rubber mounting bushes,
- the silencer bracket bolts on the particle filter.
- Torque tighten the silencer bracket bolts on the
particle filter (45 N.m).
- Remove the blanking plugs.
- Connect:
- the fuel return pipe quick-release union,
- the fuel supply pipe quick-release union,
- the fuel tank sender unit connector.
- Refit the blanking cover on the inspection flap.
- Refit:
- the floor carpet under the rear bench seat base.
- the rear bench seat base.
- Connect the battery.
2TR
| IMPORTANT
Wear goggles with side protectors for this operation. |
| IMPORTANT
Wear protective gloves during the operation. |
IMPORTANT
During this operation, be sure to:
- refrain from smoking or bringing red hot objects
close to the working area,
- be careful of fuel splashes when disconnecting the
union.
|
| WARNING
To avoid any corrosion or damage, protect the
areas on which fuel is likely to run. |
| WARNING
Keep the pipe unions away from contaminated
areas. |
REMOVAL
I - REMOVAL PREPARATION OPERATION
- Position the vehicle on a two-post lift.
- Disconnect the battery .
- Lift up:
- the rear bench seat base
- partially, the floor carpet under the rear bench seat
base
- Drain the fuel tank.
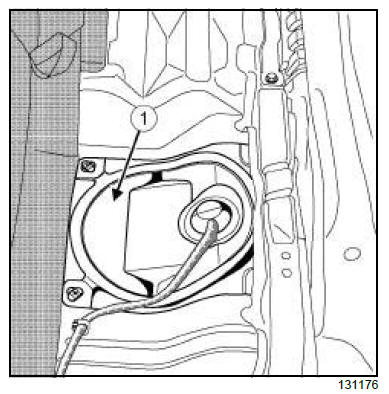
- Remove the inspection flap blanking cover (1) .

- Disconnect:
- the fuel sender connector (2) ,
- the quick-release union (3) from the fuel supply
pipe.
| Note:
Make preparations for fuel outflow from the supply
and return pipes. |
- Fit blanking plugs on the unions.

- Remove:
- the silencer bracket bolts (4) on the catalytic converter,
- the silencer from the rubber mounting bushes (5)
and (6) .
4X4 TRANSMISSION
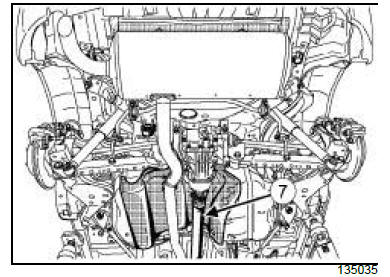
- Remove the longitudinal driveshaft (7).
- Remove:
- the fuel tank heat shield,
- the rear right-hand wheel,
- the rear right-hand wheel arch liner.
- Remove the fuel filler neck bolts (8) .
- Remove the fuel filler neck bracket (9) .
- Disconnect the filler neck from the fuel tank.
- Remove:
- the breather pipe bracket (10) ,
- the fuel vapour rebreather pipe bracket (11) .
- Disconnect:
- the breather pipe,
- the petrol vapour rebreather pipe.
- Remove:
- the clips (12) ,
- the covers (13) ,
- the rear axle subframe strut bolts (14) ,
- the rear axle subframe struts,
- the parking brake cable.
4X4 TRANSMISSION
- Disconnect the connector (15) from the electric coupler.
- Unclip the wiring clip (16) .
- Loosen the nut (17) on the rear axle.
- Remove the rear axle bolts (18) .
| Note:
Do not remove the final drive from the vehicle. |
- Tilt the rear axle downwards.
II - OPERATION FOR REMOVAL OF PART
CONCERNED
- Fit a component jack under the fuel tank.
- Remove:
- the fuel tank retaining strap bolts (19) ,
- the fuel tank retaining straps,
- the fuel tank.
REFITTING
I - REFITTING PREPARATION OPERATION
- Always replace:
- the fuel filler neck bracket,
- the clips,
- the breather pipe bracket,
- the petrol vapour rebreathing pipe bracket.
II - REFITTING OPERATION FOR PART
CONCERNED
- Refit:
- the fuel tank,
- the fuel tank retaining straps,
- the fuel tank retaining strap bolts.
- Torque tighten the fuel tank retaining strap bolts
(31 N.m)
- Remove the component jack.
III - FINAL OPERATION
4X4 TRANSMISSION
- Refit the rear axle in its original position.
- Torque tighten:
- the rear axle bolts (63 N.m),
- the rear axle nut (78 N.m).
- Clip on the wiring clip.
- Connect the electric coupler connector.
- Refit:
- the parking brake cable
- the rear axle subframe struts
- the rear axle subframe bolts
- the covers (13)
- the new clips (12) .
- Torque tighten the rear axle subframe bolts (53
N.m).
- Connect:
- the petrol vapour rebreathing pipe,
- the breather pipe.
- Refit:
- the new petrol vapour rebreathing pipe bracket,
- the new breather pipe bracket.
- Connect the fuel filler neck onto the fuel tank.
- Refit:
- the new fuel filler neck bracket,
- the fuel filler neck bolts.
- Torque tighten the fuel filler neck bolts (9 N.m).
- Refit:
- the rear right-hand wheel arch liner
- the rear right-hand wheel
- the fuel tank heat shield.
4X4 TRANSMISSION
- Refit the longitudinal driveshaft.
- Refit:
- the silencer on the rubber mounting bushes,
- the silencer bracket bolts on the catalytic converter.
- Torque tighten the silencer bracket bolts on the
catalytic converter (45 N.m).
- Remove the blanking plugs.
- Connect:
- the fuel supply pipe quick-release union,
- the fuel tank sender unit connector.
- Refit the blanking cover on the inspection flap.
- Refit:
- the floor carpet under the rear bench seat base
- the rear bench seat base
- Connect the battery.
|


